Pros and cons of autumn planting
In areas with harsh winters, there is no need to talk about the advantages of autumn planting; here peaches are planted only in the spring. In regions with suitable conditions, there are certain advantages to planting seedlings in the fall.
Pros:
- A young tree planted before winter “falls asleep.” During hibernation, it is not threatened by pests and diseases. And its roots, having taken root in the fall, continue to develop under the compacted soil. Thanks to good rooting, the tree bursts into growth in the spring. Active formation of kidneys is observed.
- Already in the third summer, the peach tree begins to bear fruit.
- In autumn, there is a larger selection of seedlings and their prices are lower than in spring.
- Autumn seedlings have leaves and roots are well developed. This allows you to objectively evaluate planting material.
- The tree does not have to spend a lot of energy, as in spring, on forming new branches and growing leaves. Therefore, the root system, on which the tree’s endurance and power depends, develops poorly. In autumn, the seedling devotes all its efforts to rooting. The prerequisites are created for the formation of a strong tree with strong immunity.
Minuses:
- It is impossible to accurately calculate the optimal planting time. The first frosts are unpredictable. They can always arrive earlier than expected. And if before this time the seedling has not had time to take root and grow stronger, it will not be well.
- Even in regions with a favorable climate, unusually cold winters occur, which can be disastrous for a young tree.
Why you should plant a peach in the fall and not in the spring
There is still no agreement between agronomists and practicing gardeners on the question of when to plant peach seedlings (as well as other fruit trees) - in spring or autumn. In the first case, there is a risk that the fragile tree will suffer from pests, and in the second, that it will not have time to adapt and will freeze.
Peach trees are not winter-hardy, but they are hardy. They can survive negative temperatures down to 22–25º C.
True, in this case, leaf buds, flower ovaries and roots located close to the ground will be significantly damaged.
The only drawback of autumn planting is that it is not suitable for all gardeners. In areas with a temperate climate, it is better to plant peaches in the spring. Although, of course, no one can give any guarantees that they will take root and bear fruit in the “risky farming zone.”
Autumn planting is good for those places where winter begins in accordance with the calendar, and not at the beginning of November or even at the end of October . During the 6–10 weeks that pass between planting and the first frost, the seedling has time to take root and grow stronger. Winter temperatures rarely drop below -15º C, so there is virtually no risk of roots freezing.
Another advantage of planting in the fall is that the tree “hibernates” for the winter, it is not disturbed by parasites, pests and rodents, and the roots quietly develop under the naturally compacted soil . This is very important for further survival. Therefore, in the spring, the peach shows rapid growth, buds are actively forming, and the first fruits can be expected in the third year after planting.
It is more profitable to purchase seedlings in the fall - prices are lower and the range is wider. The trees have leaves and developed roots, which allow us to judge the quality of the planting material.
Planting dates by region of Russia
There are no exact calendar dates for autumn planting. It is impossible to accurately plan the day or even the week of this event. You have to take into account the local climate and focus on the weather situation.
The peach must be planted so that by the time of planting it has already completed active growth, and the appearance of shoots and leaves would be excluded. At the same time, it should have enough time to take root.
The landing conditions can be met if:
- Plant a tree after it has lost its leaves.
- There are at least 4, and preferably 6-8 weeks left before frost.
Dates for planting peach in autumn by region:
- In the Volga region and central regions of the Russian Federation - the third ten days of September.
- In the Rostov region, in the Stavropol and Krasnodar Territories, in the North Caucasus - in the second ten days of October.
- In Crimea - in mid-November.
On a note!
The warmer and wetter the autumn, the later they start planting. If the first frost is possible in the region in October, it is better to plant a peach seedling in the spring.
Subsequent care of seedlings
Regardless of when it is better to plant a peach: in autumn or spring, a positive effect will appear only if all the rules for replanting it are followed. Many summer residents make a grave mistake - they leave the seedling to grow spontaneously and forget about it. A tree will only grow fully if it receives proper care. You need to do the following:
- after wintering, prune, freeing the plant from 3 strong side shoots;
- shorten the side branches by 2 buds;
- find any extra side shoots and eliminate them.
It is a mistake to think that juicy and sweet fruits can only be grown in the south. If you plant a peach seedling correctly and care for it regularly, then you can successfully grow this prolific plant in the middle zone with a temperate climate. Additionally, study the growth characteristics of each variety, this will increase the chances of success.
Site selection
It is not recommended to replant an adult peach. It doesn’t matter whether the transplant is carried out in spring or autumn, it tolerates it equally poorly. It is necessary to find a place on the site that will meet all the requirements of this culture.
Requirements for the landing site:
- The tree grows best on the south side of the site. There should be a lot of light. The culture is warm and sun-loving, not afraid of heat and drought.
- There should be no drafts, dampness, shading from buildings or trees. It’s great if there is a fence or hedge on the north side. It is necessary to retreat from the barriers 2-2.5 m to the south so that there is room for the development of the root system.
- The site should be dry, with a low groundwater level. You cannot plant peach in lowlands where water stagnates. Peaches grow well on southern and southeastern slopes of hills.
- There should be no fruit-bearing trees nearby; they will have a depressing effect on the young tree. An area cleared of old fruit trees is also not suitable. After uprooting, pests may remain in the soil.
- The best soil for peach is black soil, light loam and sandy loam soil. Alkaline soil is not suitable. High carbonate content also negatively affects peach growth.
On a note!
You cannot plant a peach in an area where nightshades, tobacco, sunflowers, strawberries, clover, legumes and melons grew. A seedling can pick up fungus and diseases in the soil.
The proximity of peach to other trees
An important role in the cultivation of peaches is played by proximity to other fruit trees. The fact is that trees compete with each other for light and moisture. In this fight, someone is bound to lose.
Undesirable companions for peach include:
- apricots;
- pears;
- cherries;
- walnuts;
- cherries;
- apple trees
The peach is sensitive not only to its neighbors, but also to its predecessors in the garden. The soil after some plants is often teeming with infections that are detrimental to peach. Peach cannot be grown locally:
- wild strawberries and strawberries;
- eggplant;
- tomatoes;
- potatoes;
- pepper
Even alfalfa and clover can stunt the development of young peach trees.
Preparing the soil and planting hole
On flat areas, peaches are planted in rows running from south to north. On slopes, rows are arranged in the transverse direction.
Planting pattern:
- distance between rows – 3-5 m;
- between trees in a row - from 2.5-4 m.
Soil preparation:
- Sow the area prepared for planting peaches with cereal crops every spring. Oats and rye are most suitable for the role of green manure. They will fill the soil with nutrients and eliminate harmful elements left behind by other crops.
- On chernozems, no fertilizers will be needed. In other cases, you need to pour a couple of buckets of humus mixed with black soil into the planting hole. Or 2-3 weeks before planting, prepare the soil mixture to fill the hole.
To prepare a nutritious soil mixture, take:
- rotted manure – 10 kg;
- potassium fertilizer – 50-60 g;
- ammonium nitrate – 80-90 g;
- superphosphate – 140-160 g;
- wood ash – 500 g.
Planting a peach may fail if the soil is not fertile enough, contains a lot of clay, is salty or contains a lot of peat. For reliability, it is recommended to do an analysis of the soil composition. This will allow you to find out which elements will need to be replenished. The missing substances must be added at least a year before planting.
To properly plant a peach in the fall, prepare a place and hole for planting:
- 2-3 months before planting the seedling, clear the area. Start by clearing out trash and weeding.
- Dig up the soil 2-3 times. When digging, choose stones, roots, etc. Repeated digging will saturate the soil with oxygen.
- Dig a hole with equal depth, width and length - 50 cm. If the seedling is large, the size of the hole can reach 1 m.
- Pour the prepared soil mixture into the hole. A hill should form, occupying 2/3 of the planting hole. Pour the entire top layer obtained when digging the planting hole on top. The prepared pit should stand for 2-3 weeks.
Too wet soils are neutralized using drainage. Expanded clay, pebbles or broken bricks are placed at the bottom of the pit. For this case, the depth of the pit is increased by 20 cm.
Autumn landing
So, how to plant a peach in the fall? First, let's figure out what is the optimal time to carry out this procedure. As a rule, autumn planting of peaches occurs in early September. To do this, choose a place located on the south side of the site.
If you plan to plant several seedlings at once, the distance between them should be at least three meters. If it is possible to plant this crop near a wall or a fence, then this would be the best option. Since such an area is well protected from strong winds and is fully illuminated by the sun.
It is also very important to prepare the land for planting peach crops. This procedure is carried out a week before the planned landing, namely:
- first, the area is thoroughly cleared of weeds and other debris;
- then, the area is dug up and rotted humus is introduced into the ground along with phosphate preparations;
- the prepared soil should stand for a week, and only then can the peach be planted.
Having completed all these simple manipulations, you can begin to form planting holes and prepare the seedling. At the same time, it would be useful to emphasize that even a seed can sprout if it is planted correctly and cared for.
Preparing the planting hole
If you want your peach to take root, you need to properly dig and prepare the planting hole. To do this, perform the following manipulations:
- dig a hole 80 cm deep and 70 cm wide;
- then, 30 liters of warm, settled water are poured into the finished pit;
- then a layer of broken red brick is laid at the bottom of the hole, which will serve as drainage;
- Next, you need to add a bucket of rotted humus mixed with soil and wood ash into the hole.
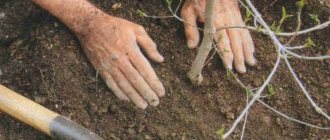
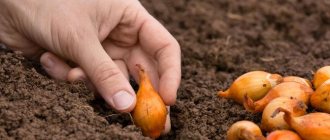
Having completed all the above-described manipulations, begin planting the peach crop. The landing is carried out as follows. First, a wooden strip is installed in the very center of the hole. Next, peach plants are planted.
The trunk is carefully installed in the center of the hole, so that the tree fits snugly against the rail. Then, you need to evenly spread the root of the crop and sprinkle it with soil. After the planting is completed, the peach trunk is secured with twine to the rail. And the final stage, abundantly watering the crop with a bucket of warm water, and adding mulch.
It is worth highlighting that the mulch layer should be at least 15 cm.
This kind of protection will help protect the root system in winter. Well, as for the mulch itself, the following components are used for this:
- dry straw or hay mixed with rotted humus;
- crushed pine bark;
- dry leaves;
- agrofibre.
Experienced gardeners recommend using the first option, since this mixture performs two important functions. The planted crop will be protected from severe frosts, and at the same time will be nourished with useful elements.
Methods for planting peach
Peach growers offer amateur gardeners to use two methods of planting peaches. There are no special recommendations for choosing one or another planting method.
Planting methods:
- "On the cone." This technology ensures good survival rate. The seedling is placed on a cone-shaped hill poured into a hole. Hence the name. The disadvantage of this method is the risk of damage. A thin seedling can be damaged or even broken by the wind. It can also become deformed due to soil subsidence. To avoid this, the seedling must be tied to a reliable support with twine.
- "Into the muck." Unlike the previous method, this landing can be carried out without outside help. Soil and water are poured into the hole so that the soil has a liquid consistency.
On a note!
When planting “on a cone,” the soil around the roots must be compacted well so that there are no air gaps between the roots.
Peach - summer care
The main activities during this period are to distribute the load of fruits on the branches of the tree. Leave one fruit on each branch for a length of 8-10 cm, remove the rest.
In the tree trunk circle, either mulch or loosen the soil and remove growing weeds.
During periods of prolonged heat, the peach needs watering. Also, a month before the harvest ripens, carry out the final treatment against pests and diseases.
Video - Secrets of growing LARGE peach
Step-by-step description of landing
If the hole is properly prepared and a nutritious soil mixture is poured into it, the planting procedure will not cause difficulties. You just need to prepare settled water and suitable support.
Step-by-step instructions for classic peach planting (“on a cone”):
- Step back from the center of the hole and drive in 1-2 supports that will support the peach in strong winds. This must be done before planting the seedling. Otherwise, you may damage the roots of the tree.
- Fill the hole with water - 5-10 liters. The displacement depends on the size of the pit. Wait until the soil completely absorbs the water.
- Place the peach on top of the earth mound, carefully spreading out the roots. The depth of the tree should be such that the root collar is 3-4 cm above the soil level.
- Keep the tree straight. It’s good if you have an assistant who will hold the seedling. Fill the roots with soil to the very edge of the planting hole.
- Water the seedling with a bucket of water and slightly compact the soil in the circle around the trunk. Be careful not to overdo it so as not to break or deform the roots.
- Stepping back half a meter from the center of the hole, make a soil bank so that water does not spill out of the tree trunk circle during watering. The height of the shaft is at least 10 cm.
- Sprinkle the soil around the trunk with mulch - pine needles, sawdust, shavings. Peat, rotted humus, ground bark, fallen dry leaves. The layer should be 5-10 cm thick.
- Tie the peach to the supports.
Step-by-step instructions for planting a peach “in the slurry”:
- Pour 1.5 buckets of water into the prepared planting hole (filled with humus or soil mixture).
- When 50% of the water is absorbed, start adding fertile soil. Sprinkle until the hole is completely filled. It will take about a bucket of soil.
- Deepen the roots of the seedling into the resulting “chatterbox”. The consistency of the soil should be liquid. The roots will be well fixed in it, and each root will be comfortably placed in the viscous substance.
- When the seedling is firmly and evenly installed, water it again.
- Cover the tree trunk circle with mulch.
Attention!
Do not use straw as mulch. It can harbor mice.
For a detailed guide to autumn peach planting, with an explanation of all the nuances, watch the video:
How to replant a peach in the fall
Replanting a peach in the fall to a new location is carried out only if absolutely necessary. This is an undesirable event. The tree may not take root, or its growth will slow down, it will weaken, and lose productivity.
You can replant a peach before it reaches seven years of age. It’s better to do this before 5 years of age. Then there will be more chances for successful rooting. The peach is replanted in late autumn, when the tree has stopped growing and is preparing for winter.
We purchase and prepare a seedling
Even with the most favorable climate and fertile soil, it is quite naive to expect that a strong peach tree will grow from a seed thrown into the ground. If you want to systematically harvest a large harvest, pay special attention to the choice of planting material.
What you should pay attention to when choosing a seedling:
- Place . Purchase seedlings only from reliable and trusted suppliers. The best option is a nursery located in your area. Avoid buying at agricultural fairs and from private individuals unknown to you, especially if you are a novice gardener. It is not a fact that the purchased plant will turn out to be a peach, especially of the desired variety. Another reason to be wary is the excessively low price.
- Time . Take your time to purchase a tree as early as possible. If you dig up peach seedlings before they enter a dormant period, the survival rate drops sharply. To determine whether the active growing season has ended, inspect the shoots and buds. The former should be completely covered with bark, and the latter should be fully formed.
- Variety . Choose trees adapted to the climate of your area. Before purchasing, compare the characteristics, study the advantages and disadvantages of each variety. Experienced gardeners advise purchasing seedlings of those varieties that were bred in Ukraine: they tolerate cold weather best. And for areas with a warm climate, it is better to take Bulgarian varieties.
- Age of the seedling . For beginner gardeners, two-year-old trees are suitable. Their height is 1.2–1.5 m, trunk thickness is 1.5–2.5 cm, at least 3–4 branches in the crown. There is at least 6–8 cm between the graft and the root. Experienced gardeners can also cope with an annual seedling. It looks like an even, smooth stick up to 1 m high, without branches or leaves.
- Appearance . The plant should look strong and healthy. Withered leaves, wrinkled, flaking bark, cracks are a reason to refuse the purchase. Inspect the roots - there should be a lot of them. A healthy peach has a fibrous root system. A tree with one large root does not take root well and is susceptible to disease. If the seller allows, do a test. A living tree's branches bend but do not break. When you cut them, the cut is white or pale green, but not yellowish-beige. When you remove the top layer of bark, you should see green, not brown, skin.
Buying from an online store has its pros and cons. You can get acquainted with the extensive range and characteristics of different varieties without leaving your home. Prices there are usually lower than in regular stores. But you do not have the opportunity to personally assess the quality of planting material, and returning it is a rather troublesome and costly procedure. Before placing an order, ask for the opinions of friends and acquaintances, read reviews about the store on thematic forums. Be sure to find out exactly where the nursery with which the online store cooperates is located.
When purchasing a seedling from a store or nursery located far from your site, take measures to ensure that it survives transportation safely. Remember that sudden changes in temperature and humidity are harmful to it. Wrap the roots with damp gauze or cotton cloth, cover with a plastic bag and securely secure. Do not unpack the peach roots right away. Leave it in this form for 2-3 days, after tearing off all the leaves and small twigs that require moisture.
Two days before planting in the ground, unroll the tree and immerse it for a day in a container with clean water at room temperature (preferably rainwater). There should be both roots and branches in the water. You can add a growth stimulator there. Carefully calculate the proportion according to the instructions for the drug.
Some gardeners use this trick: before planting, they pour melted paraffin over the trunk of the tree, paying special attention to the lower part of the trunk. This “cocoon” will protect the seedling from winter frosts, sun, wind, rodents and pests. And in the spring, the paraffin shell will not prevent the branches from growing and the buds from hatching.
Care after landing
Peach is considered almost the most capricious and demanding fruit tree. The planted seedlings must be looked after throughout the following season. They will need to be watered, pruned, and fed.
After the autumn planting, the following activities are required:
- pruning;
- whitewash;
- shelter for the winter.
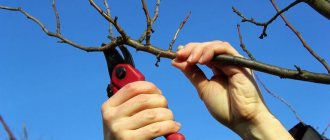
Pruning after planting:
- find the 3 strongest side branches and shorten them by a quarter;
- cut off all other side branches completely;
- Sprinkle the cut areas with crushed coal and lubricate with garden varnish.
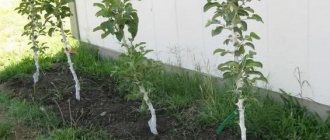
After pruning, whiten the seedling with a solution of lime-fluff. A layer of lime protects the plant from frost damage and premature bud development. And if the cover is not complete, then it will also protect against sunburn.
Ways to cover for the winter:
- Wrap the tree in burlap. Place a 20 cm thick layer of soil near the trunk.
- Place a cardboard box on the tree. Top with a layer of hay or straw.
- Build a hut. Stick two sticks into the sides of the peach and throw a bag over them so that the entire tree is inside the bag. Secure the bag with staples to prevent it from blowing away in the wind. Such a “hut” will protect the tree not only from cold and snowstorms, but also from rodents - mice, hares, etc.
As soon as snow appears, it is shoveled over the covered tree. The snow layer will protect the peach even in the most severe cold. In spring, the cover must be removed in time so that the peach does not ripen. Do this as soon as stable heat is established.
Attention!
For shelter, only “breathable” material can be used. The use of polyethylene film is prohibited.
Timing for autumn peach transplantation
Follow the weather forecast. The optimal average daily air temperature for an autumn event is 10 °C, nighttime - 5 °C. In order for the seedling to take root and enter winter prepared, move it to another place no earlier than 6 weeks before frost.
Peach planting dates depending on geographic location:
- Moscow region, central Russia - third ten days of September - mid-October;
- northern regions (Ural, Siberia) - early September, subject to cultivation in greenhouses;
- southern territories (North Caucasus, Krasnodar Territory, Kuban) - October 1-31.
Repot plants in the fall when they are dormant. It is determined by fallen leaves and lignification of the trunk.
Possible mistakes
Although there is nothing overly complicated about planting fruit trees, even a small omission can be fatal. Beginners rarely manage to complete the entire procedure without errors.
The most common mistakes:
- Excessive use of mineral fertilizers. With the best of intentions, novice gardeners generously pour superphosphate and other fertilizers into the hole. Because of this, beneficial bacteria necessary for processing minerals into a form that can be absorbed by plants die.
- Late pit preparation. If you do not prepare the hole in advance, the soil will subsequently settle and the root collar will be deeply buried. This slows down the development of the tree.
- Planting of non-zoned varieties. Such a mistake can be fatal. The tree will freeze or even die in one of the harsh winters.
- The timing is wrong. Early and late planting have equally detrimental effects on the seedling.
- Planting an overgrown seedling. A tree that is more than 2 years old takes too long to take root and develops poorly.
If you decide to plant a peach in the fall, then the most difficult and important point in this event will be the correct choice of planting dates. All other manipulations are not difficult; even a novice gardener can easily cope with them.
Nectarine varieties with photos and descriptions
Early ripening varieties
The following early-ripening nectarine varieties are most popular among gardeners:
- Fleming Fury . This ultra-early variety was created by breeders from America. Large fruits are almost completely covered with a red blush. The yellow flesh is quite tender.
- Big Top . This ultra-early variety, created in America, is distinguished by its unpretentiousness and high yield. The fruits have a bright purple-cherry color and a round shape; they weigh about 200 grams. The pulp is firm, juicy and yellow; closer to the seed it acquires a red tint. The sweet pulp has a honey flavor and slight sourness. The bone is difficult to separate from the pulp.
- Ruby 4 . This early-fruiting variety was created by Ukrainian breeders and is distinguished by its yield. Large oval-shaped fruits are covered with glossy skin and weigh about 200 grams. The pulp is juicy, delicately fibrous, yellow in color with a pale red tint. The taste of the pulp is sweet with barely noticeable sourness. The bone is difficult to separate from the pulp. The fruits tolerate transportation quite well.
- Rebus 028 . The early-fruiting variety created by Italian breeders is distinguished by its yield and resistance to diseases and frost. The shape of large fruits is round, slightly elongated, they weigh about 200 grams. The fruit is yellow in color, with a rich red blush on almost its entire surface. The juicy, dense, fragrant pulp is yellow in color and has a sweet taste.
- Caldesi . The variety of Italian selection is characterized by high yield. Almost the entire surface of the large, spherical, yellow-green fruits is covered with a marbled, rich red blush. The juicy, dense pulp is white in color. The bone is semi-detachable.
Mid-season varieties
The most popular mid-season nectarine varieties are:
- Stark Red Gold . This variety, created in America, is characterized by high yield. The large carmine-red fruits have a regular shape and weigh about 240 grams or more. The slightly fibrous, dense flesh has a rich yellow color, and near the seed it becomes reddish. The pulp can be easily separated from the pit.
- Wang-3 . This early-fruiting variety, created by American specialists, is distinguished by its productivity and resistance to frost and disease. The shape of the fruits is round, their color is deep red with light yellow fragments, they weigh about 220 grams. The cartilaginous yellow pulp has high taste.
- Alitop . This variety, created in Italy, is characterized by high yield. Large, oblong-round fruits weigh about 250 grams, almost their entire surface is occupied by a rich red blush. The juicy, dense, fragrant pulp is yellow in color with red veins and has high taste.
- Harko . The variety, created by Canadian breeders, has high yield and resistance to frost and disease. Almost the entire surface of the not very large yellow-green rounded fruits has a purple-red blush. The fleshy, juicy pulp is yellow in color and has a sweet and slightly sour taste. The bone is easily separated from the pulp.
- Ishunsky . This variety was created by Ukrainian breeders. The fruits, which are not very large and yellow in color, have a carmine blush; they weigh about 150 grams. The tender, fibrous, juicy pulp is yellow in color and has red veins. The pulp can be separated from the stone easily.
Late ripening varieties
Late-ripening varieties that are most popular:
- Poseidon . Domestic selection variety. The universal fruits are round in shape and yellow in color with a not very large carmine-colored blush arranged in streaks. The juicy, fibrous yellow flesh has a small number of red veins. The pulp separates from the stone easily.
- Harblazes . This variety is dessert. Almost the entire surface of the yellow, oval-shaped fruit is covered with a deep red blush. The very juicy pulp has a yellow color and a sweet-sour taste. The pulp can be easily separated from the pit.
- Sweet Lady . The variety, created by Italian breeders, is distinguished by its yield and resistance to diseases. The large yellow fruits have a deep red blush and weigh about 300 grams or more. The yellow, firm, dense pulp has an excellent taste. The pulp can be easily separated from the pit.
- September Queen . The blush of the pale green fruit is dark red. The cream-colored, dense, fragrant pulp has a sweet-sour, very pleasant taste. The bone is well separated from the pulp.
- Evpatoriya . This self-fertile variety was created in the Nikitsky Botanical Garden . It is recommended to be cultivated in Ukraine, Krasnodar region, Transcaucasia and Moldova. The yellow fruits are covered with a carmine-colored blush on ¼–1/2 part. The juicy fibrous pulp is yellow in color and has red veins; it has a pinkish tint near the seed. The pulp can be separated from the stone easily.
Other quite popular varieties of nectarine are: Nikitsky 85, NIC 19, Flavor Top, Kolonovidny, Krimzon Gold, Krymchanin, etc.
Nectarine varieties Super Queen, Snov Queen Perfect, Queen Lady, …
Nectarine pruning
When to prune
Growing nectarine requires the formation of its crown. Since fruiting in nectarines, like in peach, occurs on annual growths, the main task of its annual pruning, in addition to maintaining tree hygiene, is to ensure strong growth of annual shoots while preventing fruiting from shifting to the edge of the crown. That is why it is necessary to thin out and shorten nectarine branches every year.
- Walnut: growing in the garden, types
Nectarines planted in autumn are pruned for the first time only next spring, before sap flow begins. At the same time, sanitary and formative pruning of young nectarines is carried out. In the fall, if necessary, sanitary pruning of trees is carried out.
How to trim a nectarine
The crown of the nectarine is formed in the form of a bowl (or vase) - this shape gives it strength, and it will be easier for you to care for the tree and harvest from it. The formation of the crown is carried out in the spring during the first four to five years. Formation begins with the laying of skeletal branches.
In the first year, select 2-3 skeletal branches with a wide branching angle, shorten them to 10 cm at the outer buds, and remove the remaining branches. Each subsequent year, add another 2-3 skeletal branches located at the desired angle. Form first-order branches on last year’s skeletal branches, second-order branches on those from the year before, and so on.
While the crown formation process is underway, the conductor should be 20-25 cm higher than the uppermost skeletal branches, but when the nectarine crown is formed, the conductor is cut to their level. The recommended height of the trunk is 50-60 cm. The shoots formed in the area of the trunk are broken out before they become lignified. Some gardeners prefer a standardless form, in which skeletal branches can extend from the trunk almost close to the ground - this form allows you to restrain the growth of the tree for a long time, as well as harvest and care for nectarines without a ladder. The rational height of nectarine is 2.5-3 m.
Spring pruning
In April, in addition to formative pruning of the nectarine, sanitary work is carried out on the pink bud, removing broken, dry, diseased and frostbitten branches. At the same time, the nectarine is pruned for fruiting: two correct, developed shoots growing side by side are selected on the skeletal branch. The one that grows closer to the end of the branch is cut into 8-10 buds and left to bear fruit, and the one that grows closer to the trunk is cut off almost completely, leaving only 2 buds on it - from this replacement knot a shoot will grow that will bear fruit in next year.
What does “correct escape” mean? This is a shoot that has both growth (leaf-producing) and fruit buds. The next year, a new fruit link is formed from the replacement knot. This nectarine pruning is carried out annually in the spring, which allows for stable and full harvests.
When the nectarine fades and sheds excess ovaries, adjust the harvest load: the nectarine branch should have one fruit for every 10-15 cm of length, the remaining ovaries should be plucked out.
Summer pruning of nectarines
In summer, fruiting nectarines are not pruned. Instead, unnecessary shoots are broken out or pinched to stimulate the formation of branches and the formation of fruiting branches.
Pruning in autumn
After the end of leaf fall, if necessary, carry out sanitary pruning of the nectarine - remove weak, broken, dry and diseased shoots.