Every owner of a summer cottage who grows these beautiful vines sooner or later tries to propagate clematis. As a result, you can not only acquire interesting skills, but also get new plants that can be easily planted on your own territory, given as a gift, or exchanged for other seedlings by making an agreement with fellow gardening enthusiasts.
Various varieties of clematis serve as a traditional decoration for front gardens and summer cottages of domestic gardeners.
You can learn in detail about the generative (using seeds) propagation of clematis from a separate article on our website, and here we will talk about how to obtain seedlings by vegetative methods.
Dividing the bush
At first glance, this method seems optimal. The plant has an underground “tillering center”, from the buds of which new shoots grow annually. It would seem that it could be simpler: dig up the rhizome, cut it so that each part has roots and underground buds, and then plant the resulting sections in permanent places.
Dividing the rhizome into parts
In reality, things are far from so rosy. The procedure for dividing a clematis bush is usually associated with certain difficulties :
- Such an operation can only be performed with an adult, powerful plant, and this is difficult. It is not advisable to divide a young vine, since it has few roots and growth buds;
- Transplantation, and, consequently, division of clematis, is carried out in late spring, when the soil has finally warmed up. At this point, the plant has a developed above-ground part, consisting of stems from last and current years, or only young shoots (depending on the pruning group). The presence of a mass of brittle lashes complicates the work;
- when digging and cutting the rhizome, there is a high risk of damage to the growth buds and delicate, thin roots. Seedlings obtained in this way take a long time to adapt after transplantation, some even die;
- You won't get many new plants by dividing a bush. The quantity and quality of seedlings usually do not repay the effort.
The method of dividing a bush is labor-intensive and ineffective . Gardeners resort to it only in cases where clematis still needs to be dug up (for example, if it is necessary to radically rejuvenate the plant or “relocate” it within the site).
How to propagate clematis
This king of vines adorns pergolas and gazebos. It is not picky and feels good in the garden and flower bed. Some varieties are so decorative that up to two hundred flowers appear on one bush. The plant is at the peak of popularity. Luxurious flowering and noble appearance of foliage captivates at first sight. Growing a garden beauty is not difficult. But buying seedlings is expensive. A large number of summer residents who already have a treasured bush on their site are wondering how to propagate clematis on their own. The answer to this question is in this article.
Cuttings
As a rule, gardeners propagate clematis by cuttings in the summer. In principle, this can be done in the cold season (including using parts of stems that have already partially become lignified and obtained as a result of winter pruning), but in this case it is necessary to be able to work and grow seedlings in a heated greenhouse. Summer cuttings are rightfully called “green”, since planting material is obtained from non-lignified shoots of the current year.
Cutting clematis cuttings
As a “mother plant,” it is preferable to use a bush that has been growing in a permanent place for at least 3 years, selecting no more than a third of the young shoots for propagation. The stems are cut off at the moment when the clematis is going through the budding phase . At this time, plant tissues contain a large amount of biologically active substances. The specific timing of cuttings depends on the plant variety, as well as climatic conditions. In the middle zone, summer residents usually begin the procedure no earlier than the beginning of June. Shortly before cutting the stems, clematis is fed on the leaves with a complex mineral fertilizer with a low content of nitrogen compounds (this subsequently promotes more active rooting of the cuttings).
For propagation, it is better to choose those shoots (or parts thereof) that do not have flowers. The stem is considered ready for cutting if it does not break when bent.
To obtain planting material:
- select suitable stems from the bush and cut them off just above the second bud from the ground;
- the tops are separated, and the shoots themselves are cut so that each part has one node (that is, two buds and two leaves). If the internodes are short (4-5 cm), the cuttings may have two nodes;
- Each cutting is cut obliquely from below (3-5 cm below the node), and horizontally from above (2-3 cm above the node). Plastic sheets are shortened by half. If there are two nodes, the lower pair of leaves is completely removed.
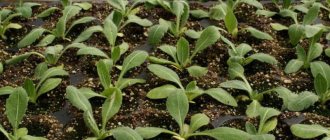
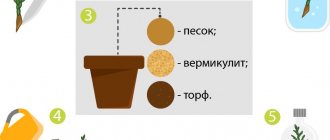
At the same time, prepare a place for planting cuttings. Seedling boxes about 30 cm deep (as in the photo) or glasses are used as containers. They are filled with a substrate consisting of two layers. The lower one (15-20 cm) is a mixture of pure river sand with humus or peat in a 1:1 ratio, the upper one (3-5 cm) is sand or perlite. The soil in the container should be well moistened.
Cuttings can be rooted in boxes or glasses with nutrient substrate
Then proceed like this:
- the lower sections of the cuttings are treated with a growth regulator (“Kornevin”, “Sodium Humate”, etc.), using the drug according to the instructions on the package;
- carefully take each cutting by the part left above the node and immerse the lower cut obliquely into the planting substrate until the node (or the lower of the two nodes) is 2-3 mm below the surface. Carefully squeeze the substrate around the stem;
- The cuttings are planted in a common box at a distance of 5-8 cm from each other, or 2 pieces per glass. It is recommended to water the plantings with a foundation solution to protect against fungal diseases;
- the containers are installed in a greenhouse, in which a constant temperature (22-25 degrees) and high humidity are maintained. The structure must be ventilated daily and shaded from direct sunlight.
process usually takes 5-6 weeks . If clematis cuttings are carried out correctly, during this time each plant should have several roots. Towards the end of the rooting period, young bushes are gradually “weaned” from greenhouse conditions in order to prepare them for planting in open ground.
There are two directly opposite opinions regarding the rapid development of the above-ground part of rooted cuttings. Some experts believe that the simultaneous growth of young roots and shoots of the first season is a good thing, since this allows you to get full-fledged young plants earlier. Others argue that it is preferable if, in the first season of life, young clematis develop only the underground part, since the rapid growth of stems interferes with successful wintering and is fraught with the death of some seedlings. It is unclear which of them is right. It is only true that some varieties of clematis, when grown from “green” cuttings, immediately form both roots and stems. Apparently, these varieties need more careful shelter in the first winter of their life.
The percentage of rooting of “green” cuttings is quite high (up to 90% depending on the clematis variety)
Unfortunately, most summer residents do not have the opportunity to grow young plants in heated winter greenhouses. Therefore, already in the middle of summer, young clematis begin to be planted in open ground . In the fall, the plants are trimmed (if they already have an above-ground part) and covered with a thick layer of mulch, and in winter they try to cover them with snow as much as possible. In this form, about 60% of seedlings successfully survive wintering. By spring, each plant already has about 10 roots 20-30 cm long. This is complete material, ready to be moved to a permanent place.
When will the seeds hatch?
If you are interested in how to plant clematis with seeds, then you should definitely find out in advance how long it takes for the plant to germinate. Otherwise, you may face unpleasant consequences.
The fact is that the seed hatching period is quite long. Moreover, the larger the planting material, the larger it is.
For example, the smallest ones, ranging in size from one to three millimeters, usually sprout in one to three months. For larger ones (three to five millimeters), the period increases to two to six months. They are best suited for propagating clematis by seeds in the fall. Finally, the largest seeds - from five to ten millimeters - can lie in the ground for a whole year before the long-awaited sprout appears.
Well, the size primarily depends on the variety. Therefore, there is no need to rush here. For example, if you plan to grow hot, Siberian or alpine clematis, then get ready for the first shoots to appear only after a year. All this time you will either have to look at an empty flowerbed, or plant it with annual crops so that it does not become empty.
Receiving layerings
Propagation of clematis by layering is the method most loved by summer residents. In one season you can not get so many new seedlings, but the labor costs are minimal. The requirements for the mother plant are similar to those for “green” cuttings: clematis must be at least 3 years old, have a well-developed root system and a sufficient number of young shoots of the current season.
For propagation by cuttings and layering, adult bushes with a powerful root system and a sufficient number of young shoots are used as mother plants.
The following technologies for obtaining layering :
| Way | Algorithm of actions |
| Vertical | The lower node of a fresh shoot is attached to the ground in the spring and covered with soil. By the end of the season, the stem has formed its own roots, after which it can be separated from the mother plant. The method is used not only for propagation, but also to strengthen the root system of young bushes |
| Horizontal (“Chinese”) | The entire shoot is placed in a specially dug groove, secured and covered with soil, leaving only the top on the surface. With proper care over the summer, roots grow from each node. New clematis can be separated from the mother plant and started to grow in permanent places at the end of the same season or next spring |
| Orlov method or “snake” | They act in the same way as in the previous method, but not all nodes are covered with soil, but after one |
| Air | On a strong shoot, make an oblique cut to the middle of the thickness next to one of the nodes. The tissues are treated with a growth stimulator. The incision site and the knot are covered with a thick layer of moistened moss, and a cellophane “sleeve” is put on top, tightly tying its edges below and above the knot. The stem is firmly attached to the support in several places, and the top is pinched. Make sure that the moss under the film remains moist. The seedling is separated from the bush after the young roots break through the moss layer |
With the vertical method of producing layering, the lower part of the young shoot is attached to the soil and covered with earth in this place
All the methods described are quite effective. The method of obtaining “air” layering is more labor-intensive than the others, but when it is used, plant tissues do not come into contact with the soil, which significantly reduces the risk of their infection with ailments of a fungal and bacterial nature.
Advantages and disadvantages of growing from seeds
The seed method of propagating clematis has its advantages and disadvantages. Before making a decision, you should familiarize yourself with them in more detail. The advantages of growing clematis from seeds include:
- Planting material is sold in almost every gardening store and is not expensive. In addition, the gardener has the opportunity to independently collect seeds from flowers already existing on the site.
- Clematis propagated by seeds have stable immunity to diseases and high winter hardiness.
- Clematis grown in this way are used for grafting other varieties.
The disadvantages of the seed method are:
- High complexity of the procedure. It requires time and increased attentiveness.
- There is no guarantee that the grown flower will retain all the characteristics of the mother plant.
This propagation method is most often used for small-flowered varieties.
Graft
Amateur gardeners use propagation by grafting relatively rarely, since such work requires certain skills. In addition, it is necessary to be able to store materials and care for young plants in a warm room throughout the year.
The essence of the method is as follows : parts of clematis shoots (scions), cut, as is done with “green” cuttings, are spliced with living pieces of rhizomes (rootstocks) so that the former eventually form their own root system. The rootstocks are usually the roots of species (wild) or varietal clematis. They are prepared in advance and stored in moistened peat or moss. Cuttings for rootstocks are cut and used as needed: in the summer - from plants living in open ground, and in the cold season - from specimens that they try to grow indoors (in container culture) or in winter gardens.
The material for scions is prepared similarly to the “green” cutting method.
The technology for carrying out the procedure may be different, but all techniques have one thing in common: appropriately designed sections on the cutting and a piece of root are connected as tightly as possible, and the overlap area is tied with a strip of cellophane film. Then the seedling is placed in nutrient soil so that the rootstock is completely immersed in it, and the junction with the scion is on the surface. The container with the plant is placed in a greenhouse and kept at a temperature of 18-22 degrees and a humidity of 85% until roots appear above the grafting site (that is, from the scion tissue). This usually takes about a month. With further growing, a self-rooted clematis seedling of the variety from which the cutting was taken for grafting is obtained.
The grafting method allows you to propagate clematis of any, even the most capricious, varieties throughout the year. At the same time, the amount of planting material is limited solely by the availability of labor resources and heated working areas. The vast majority of seedlings offered for propagation in our country are produced in large flower nurseries in this way.
Propagating clematis is easy. These plants have high plasticity and extraordinary growth activity. Therefore, even a novice gardener can get seedlings of decent quality from his bushes.
Preparing for sowing
In order for clematis propagation by seeds at home to be successful, they need to be properly prepared. Otherwise, it will not be possible to achieve high germination rates.
The best way to achieve the desired result is bubbling. To do this, you need to take a liter jar and pour a soda solution into it - about 4 teaspoons per liter of water. You need to pour the existing seeds into this solution, and then connect an aquarium or any other compressor. The bubbling procedure in the soda solution should last at least 5-6 hours.
After this, the liquid is drained and ordinary clean water is poured into the jar. Then bubbling continues for another 4-5 days. In this case, you need to change the water three times a day.
The next step is to place the seeds in suitable stimulants. This can be a solution of succinic acid, “Epin”, “Tsitovin” or “Humate”.
When this procedure is completed, you can move on to the next step.
Features of planting seedlings and subsequent care
Clematis is an unpretentious plant, but needs some care and attention. In spring and autumn, it needs pruning, during which weak lashes are cut out and a bush is formed. In this way, lush flowering is achieved. If the soil has a high level of acidity, then dolomite flour should be added to it. Excess moisture also does not have the best effect on the condition of clematis.
In the autumn, clematis needs careful preparation for the cold. To do this, the lashes are trimmed, bent and covered with covering material. With the onset of warmth, they begin to fertilize, introducing mineral components or organic fertilizers.