I think everyone knows well that greens contain many minerals and vitamins that are beneficial for our body. Dill, basil, parsley, arugula, celery, sorrel, and spinach are grown in many garden plots. Greens contain a lot of vitamins P, K, E, micro- and macroelements, dietary fiber, carotene, ascorbic acid, etc. etc. Housewives use greens when preparing almost all dishes; it not only adds benefits to them, but also gives them a wonderful taste and unique aroma. That's why we need it in the kitchen all year round. And summer is the time to make useful preparations for the winter.
Today we will talk about how to properly dry herbs such as dill, parsley, basil and green onions. Of course, fresh greens are healthier than dried or frozen. But it still contains a lot of useful substances for the human body. In addition, it is better to prepare healthy spices yourself than to buy them in bags at the supermarket. After all, it is still unknown what the manufacturers put there.
The most common way to prepare greens for the winter is to dry them. Of course, you can freeze onions, dill, parsley and other herbs, pickle them, or even grow them on a windowsill all winter. But drying is still the easiest and most popular way to preserve herbs for the winter. You can dry it using various methods. The main thing is that it does not turn yellow. Let's look at each of the methods in more detail. You can, of course, simply leave the dill or parsley on the table or hang it directly in bunches on a thread - but this way our herbs will dry for several days. And we will look at faster ways.
Preparing for drying
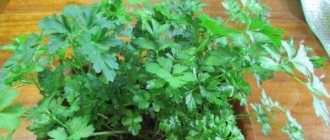
Dill is one of the most popular herbs used by housewives all over the world. It is used in the preparation of many first and second courses and snacks. It occupies a special place in vegetable salads, giving them a unique smell and taste.
Before you start drying herbs, you need to know a few secrets of this process.
First of all, you should prepare the greens for drying . To do this, select the freshest and greenest branches. You should not take yellowed or limp dill; dill collected after the start of flowering is not suitable for drying: it will spoil the finished product with an unpleasant odor. Dill umbrellas are also dried, but separately from the branches of young greenery. They are used for preparing marinades and pickling vegetables.
When cutting a plant for drying, make sure that there is no dew on it . When there is dew, the dill becomes saturated with excess moisture, which will subsequently spoil the appearance of the dried dill: it will turn black from excess moisture.
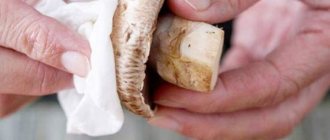
If you collect dill from your garden, you can skip the next stage of preparation . If the greens were purchased at the market or in a store, be sure to wash them in cold water. To rid dill of nitrates, soak it in cold salt water for 5-10 minutes.
Attention! Do not wash greens in warm or hot water; this will cause them to lose their color after drying.
Remove the greens from the water and place them on a clean cotton towel , dabbing them lightly on top. After this, transfer the dill to a dry towel and dry it. Under no circumstances should you do this on newspapers or sheets from magazines: dill will absorb all the toxins from the paint.
At this stage, the greens are ready to dry for the winter . Now all that remains is to decide on the method that will be most convenient for you.
Method 5. Dry pickling of greens
You can freeze absolutely any greens in food containers, cling film or foil in the freezer compartment of the refrigerator.
To do this, the greens must first be thoroughly sorted, washed, dried well and chopped (you can, by the way, leave them whole). Such greens are either placed in a container, or wrapped in film or foil and placed in plastic bags. And then they put/put it in the freezer. It is worth knowing that it is better to store such greens little by little with minimal air entering the bag.
Any greens can also be frozen in ice cube trays with added water. To do this, crushed greens are compacted into molds and filled with clean water. Once the cubes are frozen, they are poured into a bag and stored in the freezer. Such canned greens are stored for 6-12 months at a temperature of –15-20ºС.
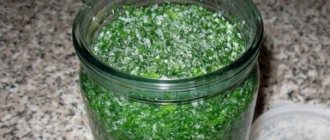
For such pickling you only need greens (any), salt, and suitable containers. Young greens must be carefully sorted, washed thoroughly, dried, coarsely chopped and mixed with salt. For good pickling, you need to take approximately 250 g of salt per 1 kg of greens. This mixture should be compacted into glass jars or wooden containers so that the juice is released from the greens. Then you need to leave this container for two days at room temperature, and then carefully fill the jars to the top.
Don’t be afraid to over-salt the greens: this way they will be preserved better, and you can always rinse them. The smaller the jars and the more densely the greens are packed into them, the better the final product will be.
This type of pickling is well suited for carrot and beet tops, parsley and dill, as well as garlic and onions.
Thoroughly washed greens must be dried, finely chopped and placed in a pan. Then add salt to taste, add water, bring to a boil and cook for about 5 minutes. Then the greens should be quickly poured into jars and rolled up.
How to dry dill at home for the winter
How to dry dill correctly so that it does not lose its qualities and remains green? It contains a large amount of vitamins, microelements and essential oils. To maximize the preservation of all useful components of the product, choose a convenient drying method for yourself.
Attention! Do not dry greens in direct sunlight to avoid loss of nutrients and taste.
There are several methods for drying spices, let's look at them in more detail.
On air
The most common method for drying greens is air drying . Using this method, greens are dried both vertically and horizontally.
Vertical drying
To dry in a vertical position, collect the prepared twigs in small bunches of 5-6 pieces . Carefully tie each bunch with thread, without damaging the stems. Damaged stems will begin to rot during the drying process, which will spoil the appearance and taste of the product.
Next, hang the tied bundles at a short distance from each other in a dark, ventilated room . In this form they will dry until ready. Make sure that there are no rotting twigs in the bunches during the drying process. If they do appear, remove them immediately.
Horizontal drying
To dry the greens horizontally, spread the prepared branches in a thin layer on paper towels. In this form, both chopped greens and whole twigs are dried.
Place paper towels with dill in a ventilated, dark place , away from direct sunlight. Stir the greens occasionally to ensure even drying. In a few days, the dried dill will be ready.
In the oven
Another way to dry greens is in the oven. Since dill is a very delicate spice, at high temperatures it will burn and lose its beneficial substances and taste. Therefore, greens should be dried in the oven at low temperatures, no more than 40°C. In this way, both whole branches and chopped dill are dried.
To dry using this method, place the prepared greens in one layer on a baking sheet lined with baking paper. This is necessary so that the dill sprigs do not come into contact with the metal, which can cause them to darken. Place the pan in the oven, leaving the door slightly open. This will allow air to circulate, drying out the greens. Every 30-60 minutes, remove the pan from the oven and stir the dill, checking it for doneness.
The drying time of the product in the oven takes from two to four hours.
Drying greens in the oven
In the microwave
The fastest drying method is in the microwave. Both whole and chopped dill are suitable for this method.
Take a disposable paper plate or a regular plate , previously covered with a paper towel. Place the prepared product on a plate, cover it with a paper towel and place in the microwave at maximum power for three minutes.
After this time, remove the dill from the microwave and determine its readiness. If the greens are not yet completely dry, stir them and place them back in the microwave for the same amount of time at maximum power.
In an electric dryer
An electric dryer (dehydrator) is a very popular device in housewives’ kitchens. One of its functions is drying herbs. To dry the dill in it, spread the prepared herbs in a thin layer on a tray and turn on the “Herbs” function . If this function is missing, simply turn on the electric dryer at 40°C. With this mode, the greens will be ready in three hours.
In a refrigerator
Another way is to dry the herbs in the refrigerator. This method is the longest, it takes 2-3 weeks.
Place whole or chopped dill on a flat dish or cutting board . Cover it with a paper towel or napkin and place it in the refrigerator on the top shelf. Don’t forget about the dill for the entire three weeks: periodically remove it from the refrigerator, turn it over, and if you find damaged branches, remove them to avoid spoiling the rest. Wipes should also be checked and replaced if necessary.
How to check readiness
The readiness of dried dill is very easy to check . Take a sprig or a pinch of the crushed product and try rubbing it between your fingers. If it crumbles, it means the drying is ready. You should continue the process if the dill becomes wrinkled in your hands.
It will be interesting:
A useful way to combat excess weight: dill for weight loss
How to use dill for high blood pressure
Method 2. Dry the greens in the oven
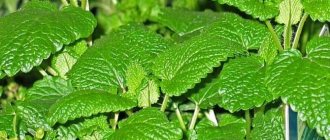
Using this natural air drying, you can harvest herbs such as rosemary, sage, thyme, as well as basil, dill and parsley.
To do this, you need not only herbs, parchment for laying them out and twine for tying them, but most importantly, warm and dry weather.
To air dry the greens, you must first sort them out and tie them into bundles with twine. The finished bundles should either be hung under a canopy or placed on a sieve, covered with gauze. Bundles laid out on a plane should be turned over regularly to prevent them from rotting. Depending on the weather and the condition of the greenery, the process takes from 6 hours to several days.
It is worth knowing that greens that are dried correctly will retain their original color and will not crumble in your hands. The faster the entire drying process takes place, the better the aroma and taste of the finished product.
In such artificially created conditions, the same herbs can be dried as with air drying. In addition to greens, the housewife will also need baking sheets, baking paper, as well as a slightly heated oven (40-50ºC), an oven or a special dryer with a suitable mode.
Prepared greens for this drying option must be washed well, dried and chopped. Then it needs to be spread in a layer of 1-2 cm on a clean, dry baking sheet, covered with baking paper and dried for 3-4 hours.
You need to remember that you can get rid of too high a temperature in the oven if you open the door slightly (you can put a folded towel between the wall and the oven door).
Prepared greens are stored in a dark and dry place either in glass jars or in cardboard or tin boxes. The container must be tightly closed. Under such conditions, the product will retain all its properties and will not lose its natural aroma for 6-12 months.
How and in what to store correctly
Proper storage of dried herbs is an important point . First of all, dried dill must be protected from bright light and direct sunlight, so place the dried spice in dark glass or porcelain jars. Containers must be hermetically sealed. Tin cans, paper bags and linen bags are also used for storage.
If you do not have such a container, place the dried dill in a glass jar and store it in the kitchen cabinet.
Important! Do not place containers with dried herbs over the cooking surface to avoid drying them out.
Method 7. Pickling greens
This method also keeps greens fresh well, but it retains less vitamins. Before pickling, the greens must be washed, chopped (coarsely) and dried. You can marinate washed, chopped (large), dried greens. It is placed in glass jars and filled with hot marinade. To prepare the marinade, mix and bring to a boil 25 g of salt, 45 g of sugar, and 1 tbsp.
Only properly prepared and stored greens will be an excellent vitamin boost in winter, when our body lacks heat, sun and nutrients.
What to do to prevent dill from turning yellow when dried
With any of the drying methods listed, you may experience yellowing of the finished product . How can I make it stay green? Unfortunately, yellowed dried dill no longer contains enough vitamins and microelements. To avoid this, the drying process must be carefully controlled.
When dill is naturally dried in air, yellowness is formed due to overdrying , that is, when the greens are left in the open air for too long. Monitor the readiness of the product and put it in a storage jar on time.
When drying greens in the oven, microwave and electric dryer, this effect is obtained from high temperatures . It is necessary to monitor the temperature and periodically check readiness by stirring the greens. When using the microwave, make sure the dill is covered with a paper towel or napkin.
A method for drying various berries (rowan, serviceberry, chokeberry, blackberry, raspberry, currant, blueberry).
Rowan and chokeberry fruits intended for drying are harvested before frost. Dry rowan at 70-75°C, chokeberry at 60°C. Well-dried fruits are wrinkled, retain their shine and pleasant aroma, and do not compress into a lump when squeezed. Irga is best dried in brushes in the sun, and in the oven the temperature is not raised above 60°C. Dried shadberry tastes like raisins. It is used for filling pies and making compotes. Raspberries, blackberries, blueberries, and currants are also dried at a temperature not exceeding 60°C, stirring occasionally. Dried fruits and berries are stored in closed containers - in boxes, barrels or bags - in a cool, dry place. Dietary decoctions and drinks are prepared from dried fruits.
Advantages and disadvantages
So, the greens are dried, put in jars for storage and ready for use. Now let's figure out how healthy dried dill is and whether everyone can eat it.
Benefits of dried product:
- long shelf life;
- high content of useful microelements and vitamins, thanks to which dill strengthens the immune system;
- does not contain nitrates;
- normalizes metabolic processes in the body due to the high content of essential oils;
- increases appetite;
- lowers blood pressure;
- suppresses depression;
- normalizes sleep;
- infusions and decoctions of dill normalize the functioning of the gastrointestinal tract and prevent gallbladder diseases.
Disadvantages of a dried product:
- dill is contraindicated for hypotensive patients;
- It is undesirable for people with renal failure;
- an excess of spices in a pregnant woman’s diet negatively affects the condition of the fetus;
- high content of essential oils can cause an allergic reaction.
Important! When cooking, do not add too much dried spice so as not to spoil the dish with its very rich taste.
Dry or freeze
Dill is famous for its large number of macro- and microelements, vitamins A, B, C and E and essential oils . All these components are preserved in greater volume when the greens are dried. Frozen spice loses significantly more nutrients. Therefore, the answer to the question of what is better: drying or freezing dill is clear: drying the herb rather than freezing it is most optimal.
Reference. The calorie content of dried dill is 250 kcal per 100 g of product.
When using a dried product, the main thing is to remember the dosage . Only a moderate amount of greens will add flavor and aroma to the dish, otherwise it will overwhelm all other odors.
The shelf life of dried dill is much longer than frozen . Dried spices can be stored for two years without losing their beneficial or tasteful qualities, while frozen spices can be stored for no more than one year.