General recommendations
To grow a plant in an indoor garden you need:
- Prepare the soil, fertilize, apply phosphorus fertilizer. Then humus in proportions of 10 liters. solution per 1 sq.m.
Manure cannot be used! In pepper it causes a decrease in yield.
- Before planting small seedlings, warm up the greenhouse and the ground using natural heat and heaters.
- Seedlings survive better if the seeds are grown in glasses with peat.
- Peppers in a greenhouse require care. It is important to follow the recommendations for watering, feeding, and seating chart.
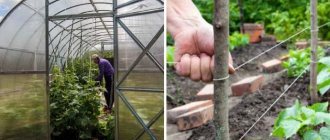
Planting peppers in a greenhouse has advantages: the thick walls of an artificial greenhouse protect the seedlings from wind, frost, and excess moisture. Double material scatters light, in this case the sun does not burn the leaves, but evenly illuminates the room.
Pepper growing technology
The technology for growing crops in a greenhouse differs from open ground technology. Additional efforts will be required to create a microclimate.
Necessary microclimate
Microclimate is the temperature of the soil and air, their humidity, the level of illumination and its duration, the composition of the air and its movement. It is easier to create the necessary conditions if the greenhouse is installed correctly: at a distance from high buildings and fences, oriented from north to south, and equipped with a sufficient number of windows.
Light regime for peppers in a greenhouse
Pepper loves light very much. During the entire growing season, it needs 12 hours of lighting; longer lighting is not needed, as it slows down the formation of buds. In cloudy weather, the level is adjusted using artificial lighting. Lamps must have a wide spectrum.
Photosynthesis requires blue light, red light for growth and flowering, and yellow light to produce chlorophyll. It is worth purchasing lamps with a reflector.
Types of lamps for greenhouses:
- metal halide;
- mercury;
- sodium
Watering and fertilizing peppers in a greenhouse
The plant is negatively affected by excess and lack of moisture in the soil. Soil moisture of about 85% is optimal. It needs to be provided with frequent but moderate watering. The first month after transplanting seedlings, 4 liters per square meter is sufficient. m. As it grows, the volume of water per unit area increases.
The main thing in watering is regularity. Irregular watering during fruit formation leads to their deformation and cracking.
Water in the morning strictly at the roots. To prevent a crust from forming on the soil, loosen it after each watering. You can use mulch - a layer of dry grass (5 cm) or dark spunbond retains moisture and prevents crust formation.
It takes 10-14 days for seedlings to adapt after transplantation; during this time, the seedlings should not be disturbed with unnecessary care. During the daytime, shade the plantings from the bright sun with white covering material.
Plants need potassium, phosphorus, nitrogen and a number of other trace elements to grow, flower, and set fruit.
At the end of the second week, carry out the first feeding. At this time, it is better to use organic fertilizer made from cow dung. Prepare an infusion in a large container, add 10 parts of water to 1 part of manure. After 3-5 days, the fertilizer is ready. 1 liter is enough for one watering can.
You can use mineral fertilizers instead of manure. Prepare the feeding solution immediately before use; for 10 liters of water you need:
- 20 g ammonium nitrate;
- 40 g superphosphate;
- 30 g of potassium sulfate.
Feed the plants a second time after two weeks. Prepare an infusion of herbs and add the entire complex of mineral fertilizers to it. The third time is when the first fruits are formed.
The bushes need to be inspected several times a week, by their appearance, determine which elements are missing and promptly replenish the deficiency. For example, when there is a lack of potassium, the leaves curl; a lack of phosphorus is indicated by the purple color of the lower part of the leaf. A gray tint to the leaves is a signal of nitrogen deficiency.
If there is a deficiency of one or another element, it is necessary to carry out foliar feeding.
Temperature, humidity and ventilation
It is necessary to know the critical values of air temperature at which normal development is disrupted. Plants stop setting fruit if the daytime temperature remains 16 °C or lower. High temperatures of 30° C and above prevent normal pollination, and flowers may fall off.
For peppers, the optimal daytime air temperature is 25°C, soil temperature is from 18 to 22°C.
To maintain a certain air temperature in the greenhouse, automatic ventilation systems are installed. The controller allows you to regulate the air temperature: if necessary, it turns on the fans and opens the vents.
Ventilation helps reduce air temperature. When organizing ventilation, you must remember that this crop does not tolerate drafts well, so you need to open doors and vents on one side.
In hot weather, plants are protected from sunlight in various ways: they cover the top of the greenhouse with lime, or hang a thin covering material or garden net from the ceiling.
Bush formation
Healthy seedlings quickly recover from the stress received during transplantation and actively grow. The formation of a bush helps to direct all the plant’s forces to flowering and fruiting.
Here are the rules to follow when forming a bush:
- remove all leaves up to the first fork;
- pinch the crown bud in the first branch;
- leave 2-3 shoots growing from the first branch - they will form the skeleton of the bush;
- branches of the first order will branch, forming branches of the second order, leaving strong shoots;
- delete all stepsons.
When pinching a shoot, leave one leaf. The leaf will nourish the ovary located below.
On the bush you need to leave from 15 to 25 ovaries. By rationing the harvest, large fruits are obtained. About a month before the end of the growing season, you can pinch off all the tops. By removing growth points, all plant resources are concentrated on the formation and ripening of fruits.
Harvesting
Here are the rules to follow when harvesting peppers in a greenhouse:
- Fruits that have reached technical ripeness should be collected at least once every 7 days.
- Cut the pods with the stalk, use tools: scissors, pruning shears.
- Pods picked at the stage of biological ripeness should be sent for processing; they are not stored for a long time.
Ripe fruits should be stored at a temperature of 1 °C, maintaining an optimal air humidity of 90%. If the fruits are laid out in layers of paper, they will easily retain their presentation for 2 months.
Fruits picked at technical maturity ripen within a month at a temperature of 10° C; at higher temperatures, ripening occurs earlier.
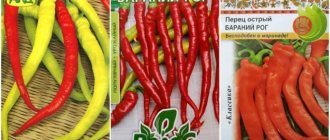
Varieties
The following types of overseas vegetables are prepared for greenhouse growing conditions:
| Variety | Characteristic |
| Claudio | Ripens 73-76 days after planting, is not susceptible to fungi, tolerates heat and light frosts well. |
| ox ear | Elongated fruit, weight - 120 -140 g. Seedlings are transported without loss of properties. |
| Atlant | A highly fruitful hybrid, the shape of the fruit is conical. Stores well and freezes. |
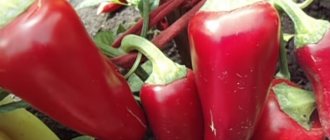
| Cockatoo | The fruits are large, weighing up to 500 g, and red in color. The height of the bush is about 60 cm. |
| Winnie the Pooh | Not capricious, has good immunity. The fruits are well stored, transported, have excellent taste, and contain vitamin C. |
| Health | Growing and caring for this pepper in a greenhouse is not difficult. It is unpretentious to light and watering. Gives a high yield. |
| California miracle | The fruits ripen within 100 days from the moment the pepper seedlings are transplanted. Vegetable weight up to 140 g. |
| Orange miracle | The color of the fruit is orange and is frost resistant. Used for the seedless method. |
| Hercules | Early ripening, ripening takes 3 months from sowing, the shape of the fruit is cubic, the shade is green, red. |
When to plant peppers as seedlings for a greenhouse
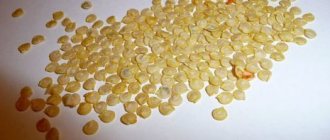
Every seedling begins with seeds. It is best to sow peppers for seedlings in the second or third decade of February or early March. The reason for such early sowing is the duration of germination of pepper seeds, at least 2 weeks.
The warmer and more equipped the greenhouse, the earlier you can start sowing peppers. A prerequisite is additional lighting. In February the winter days are still short, so it is necessary to install phytolamps. Experienced vegetable growers advise using blue and red lamps; peppers perceive their radiation most favorably.
Planting seedlings under a greenhouse tent lasts from April to mid-May. The exact timing of planting can be determined by measuring the soil temperature. The soil should warm up to at least 15°C: lower temperatures will cause the pepper plants to be stunted.
A prerequisite is that the stem of the seedling should have 12-13 leaves with a total plant height of 25 cm. This is a sign of a formed pepper that can already grow in a greenhouse. It is important not to overexpose the peppers in a peat glass or other container: if color and ovary appear on the seedlings at the “indoor” stage, the plant will be depleted and will not be viable.
Approximately 60-70 days should pass between sowing seeds and planting seedlings in the greenhouse.
Temperature
A polycarbonate greenhouse installed in the yard provides the conditions for this due to good light transmission and heat retention inside.
To get a good harvest, you need to maintain the following temperature conditions:
- The temperature for pepper seedlings is not lower than +22°C inside the greenhouse and +14°C on the ground.
- For rapid growth, a temperature of 27-28°C is required.
- Reducing the temperature to the minimum (14-16°C) will not cause the death of seedlings, but will lead to wilting and cessation of growth.
We grow healthy and strong seedlings
It is better to start sowing peppers in mid-February. To grow seedlings separately, use purchased soil such as “Malyshok” or “Living Earth”. And then do everything according to the instructions:
- Step 1. Pour soil into containers at a height of 6-7 cm, make shallow grooves, and opposite make small signs with the names of the varieties.
- Step 2. Water the furrows with boiling water and begin sowing. To do this, make a distance of up to 2 cm in the rows between the seeds, and 4-5 cm between the rows themselves.
- Step 3. Moisten the spread seeds with water from a spray bottle and sprinkle 1 cm of soil. Spray the soil again and cover the container with a lid.
- Step 4. Place the container on the battery for 2-3 hours.
- Step 5. Now we move it to a warm place (26-28°C) and wait for the first shoots.
As soon as the first shoots appear, we move the container with the plants to the windowsill or to the greenhouse vestibule. It is now advisable to also use special supplementary lighting - phytolamps. Maintain a distance of about 15 cm from the lamp to the seedlings, and turn it on from 8.00 to 23.00. During the day, the air temperature near the seedlings should be within 20-22°C, and at night – 18-20°C.
During this period, beware of a common disease of pepper seedlings - black leg. Just follow these rules: do not over-moisten the soil, at the first shoots immediately transfer the seedlings to the sun, and on the same day reduce the temperature from 28°C to 20°C. And as the plants grow, water them between the rows. Water the peppers as the soil dries out.
To avoid getting elongated and pale seedlings, make sure that there is not enough light in the heat. After all, it is precisely because of this that plants stretch out - to increase their own skin area, which traps ultraviolet rays. Therefore, if the air near your seedlings reaches 25°C, then the illumination should be maximum, and you cannot do without special additional lighting.
But if there is none, then urgently lower the temperature to 18-20°C, which, of course, will slow down the growth of seedlings, but will not allow it to become pale and long, like spider legs. Although the pepper seedlings themselves, unlike tomato seedlings, are not too prone to stretching, and yet.
As soon as the seedlings grow, they will need to be pruned. An hour before this process, water the plants. For picking, use a teaspoon, carefully separating a row of peppers of the same type with the flat side. Try to injure the roots as little as possible.
Pour soil into a new container so that it is a little less than half, and lower the plant there. Next, fill the sides with soil up to the cotyledons, slightly squeezing the trunk. Now also water around the edges of the container, but for the first couple of days do not give water at all - this will allow the peppers to develop a good root system.
And the root system is best developed in seedlings grown in 500-gram seedling pots and in peat tablets:
Soil preparation
Planting pepper seedlings in a polycarbonate greenhouse requires soil preparation. The soil is refined in advance, first in the fall, then in the spring. For this:
- They dig it up, saturating it with fertilizers.
Follow the organic dose: 5 kg per 1 sq.m.
- In April-May, the site is dug up a second time and fertilizers are applied.
Add phosphorus and potassium: 40-50 g per 1 sq.m. Or humus.
- Before planting seedlings, the ground is loosened, holes are dug, and filled with water.
Warm up the beds to a minimum temperature of 15-18 °C. Better up to 23-25°C.
Do not forget to ventilate the greenhouse and periodically loosen the soil until the plants take root. This saturates the soil with oxygen and increases disease resistance.
Planting pepper seedlings: subtleties and nuances
But what to do if the polycarbonate greenhouse is not heated, and it is no longer possible to grow peppers from seeds in it? It doesn’t matter: if you follow all the rules and technology, then planting pepper seedlings will be painless.
Peppers are planted in a permanent place in a polycarbonate greenhouse on April 17-20, if the seedlings are completely ready:
Preparing greenhouse beds
It is better to prepare greenhouse soil for planting in advance:
- In the fall, we add rotted manure, a bucket per square meter, for digging.
- In the spring, right before planting pepper seedlings, we do a second digging with dolomite flour, taking about a glass per square meter, plus superphosphate and a little potassium sulfate, according to the included instructions on the package.
One more thing. Pampered tropical peppers do not like heavy and cold soils, so if the soil in your greenhouse is quite clayey, add humus and peat to it. After that, dig it up onto the bayonet of a shovel and level it.
Before planting, warm up the soil for the pepper seedlings:
- Step 1. Before planting, generously water the hole with a bucket of hot water (70°C).
- Step 2. Wait for the water to absorb a little and cool slightly.
If your place is harsh, then try to grow seedlings with a large root system:
We dive on the spot: less stress, more benefits
Picking peppers at the cotyledon leaf stage is suitable specifically for a polycarbonate greenhouse, where you can immediately lower the air temperature by removing the heating and expose it to the gentle rays of the sun. Seedlings immediately develop a short and dense subcotyledon, but at home, on a windowsill, such seedlings simply stretch out. That’s why the methods are different, depending on the conditions under which you are working with the seedlings.
And now - step by step, how to properly plant pepper seedlings in a greenhouse, on what the future well-being of the vegetable and its productivity depend:
- Step 1: Prepare small pots. In such seedlings, they quickly build an earthen ball with roots, and therefore, when watered, they no longer turn sour and there is no need to be afraid of root rot.
- Step 2. When transplanting, take all seedlings only by the “ears” so as not to deform the delicate stem. Prepare the holes so that the roots fit freely and do not bend. Cover them with soil and compact them a little. Deepen the root collar to 0.5 cm.
- Step 3. Water, gently holding the seedling until all the water is saturated. Add soil right here, because... it just sagged a little from watering.
- Step 4. Place it in a shaded place in the greenhouse (for example, in a vestibule, or cover it with something). Protect from direct sunlight for a couple of days and make sure that the soil in the pots does not cool below 15°C, because at 13°C, seedling growth will stop completely.
There is no need to take too large a container for pepper seedlings, because... such soil requires a lot of water and turns sour, because the weak roots of this plant will not take it up so quickly. It is difficult to maintain the water regime in such a container. Therefore, it is much better to use smaller containers, in which it is easier for the pepper to form an earthen ball with roots.
That's all. Before you transfer the seedlings to the beds, feed them twice: two weeks after picking and two weeks after the first feeding.
Planting in a permanent place
Two weeks before planting the greenhouse seedlings, be sure to harden them off in the fresh air, starting with one hour on the first day.
If a polycarbonate greenhouse has standard dimensions of 3x6 m, then the most successful scheme for planting pepper seedlings is in three rows, with a distance of 35 cm between them, and 45 cm between plants. But there are other options, depending on the type of pepper:
It will be easier to care for greenhouse peppers if you plant them in rows across rather than lengthwise. Apply additional fertilizer to each hole.
When planting peppers in a greenhouse, make sure that the root collar is level with the soil surface. As soon as you install the earthen ball, fill the hole a little more than halfway and pour a third of the bucket onto the hole. As soon as the water is absorbed, fill the rest of the hole with loose soil and mulch with peat.
Watering planted seedlings
What’s good is that peppers need much less soil feeding area than eggplants and tomatoes.
- Before sprouting, pepper seedlings need to be watered every other day, 3 liters per square meter.
- In the period from germination to the first true leaf - twice a day and at the rate of 7 liters per square meter.
- After the first leaves - once every two days, 15 liters per square meter.
But be careful when watering - just give the pepper seedlings cold water once and they will stop their development for several weeks.
Fertilizers must also be applied in liquid form. These are “Agricola”, “Rastvorin” and “Fertika Lux”.
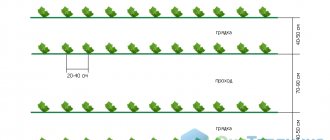
Disembarkation scheme
To know exactly at what distance you can plant peppers in a greenhouse, you need to follow the bush planting pattern. Gardeners use different methods:
Rassadny
It is considered the most popular and convenient. The distance between rows is 70-60 cm, between seedlings - from 30 to 40 cm. The taller the plant, the more space it needs. As a result, it turns out that for 1 sq.m. will accommodate from 3 to 5 bushes.
The hole is dug deep so that seedlings with a lump of earth can fit into it.
Before planting, pour 1 liter of water into the hole, wait for absorption and place the finished bush in the hole. You can put a piece of peat or humus inside the hole.
Seedless
Seeds are planted in the ground. They first develop a root system. The seeds are pre-soaked in water with fertilizers. Ash, peat, and nitrogen are added to the hole. Maintain sowing density (6 cm by 6 cm) and depth (no more than 1 cm). Shoots will appear in 14 -16 days.
For the seedless method, prepare the soil in advance, in October. Warm the soil to 22 °C.
Bush
This is a method of planting two bushes in one hole. Not suitable for greenhouses and cold climates. Plants become infected with fungi from each other and produce a reduced yield.
Planting peppers in a polycarbonate greenhouse - placement rules
pepper planting
When planting peppers in beds, it is very important to pay attention to the placement and distance between seedlings. By following all the rules, you can not only get a large harvest of good quality, but also speed up the ripening of pepper, and therefore its harvesting.
There are many rules for planting, but it makes no sense to compare which is better, since they depend on the varieties and climatic conditions in which they will grow.
If peppers are planted in a polycarbonate greenhouse, then the width of the beds will depend on the structures installed in it. Width is of great importance when growing this crop, influencing the volume of the harvest.
For example, in a three-meter greenhouse you can place two or three beds from 70 centimeters to one meter.
So, let's look at the rules for planting bell peppers. There are several planting rules, but most often, especially novice gardeners, adhere to the classic planting method.
To do this, prepare holes in advance, where the distances from each other will be at least 20 centimeters, and the distance between the rows will be about 50 centimeters.
However, those gardeners who have been growing this vegetable for a long time also have more effective planting schemes in their arsenal.
One of the methods is wide-row. Using this method for planting, it is necessary to make holes at a distance of 60 centimeters between the rows and from each other from 15 to 30 centimeters.
The second method, which is used to get a good harvest, is a two-line or three-line tape.
Between such tapes the distances are 60 centimeters; in the tape between rows there should be 20 to 40 centimeters and from 15 to 30 centimeters there should be distances between plants in a row.
The third method is square-nested. In this case, the roots of the plant are planted 2 pieces in one nest and a distance of 60 centimeters is maintained.
The fourth method is chess. In this case, nests for seedlings are made like on a chessboard; it is important to follow the placement rules of 20x20, 30x30 is also possible.
Using this method, you can significantly save space for planting without depriving your plants of comfort.
There is also a method where 3 plant roots are planted in one hole. However, this method is only suitable for the southern regions of our country.
Since, due to the thickening that is created during such planting, the pepper begins to need more sun during the entire growth period.
When choosing this method of planting, you need to know that it makes caring for the crop much more difficult and increases the risk of fungal infections.
Remember that when choosing planting methods in which several plants are placed in one hole, you will need to use twice as much fertilizer.
How to form a bush
Pepper in a greenhouse requires care and proper formation of the bush. This will allow you to achieve a rich harvest. Competent stepsoning occurs according to the following rules:
- Agricultural work is carried out only on bushes that have grown to 25 cm.
- The crown flower (the first one) must be ruthlessly removed. This will help the vegetable develop other shoots.
- Create the skeletal base of the bush.
- To do this, powerful shoots are collected, the rest are pinched and trimmed.
- Skeletal shoots develop and a primrose appears on them. Repeat the pinching procedure again.
- Process the remaining branches using the same method.
- Remove flowers inside the bush. They interfere and reduce productivity.
This method of formation is suitable for tall plants. On low-growing plants, only sluggish, weak shoots and diseased parts need to be removed.
Look at the tips on how to properly plant peppers from Nikolai Petrovich Fursov, candidate of agricultural sciences. Please note that he advises leaving no more than 12-15 fruits on each pepper bush.
Watering
To achieve maximum yield, you need to know how to properly water peppers in a greenhouse. Follow these guidelines:
- Watering the planted bushes is done at the root.
- Do not use rain irrigation. This leads to sterilization of the seedlings.
- During flowering, do not allow the soil to dry out. The buds will wither, the fruits will be thin and small in size.
- Prefer drip irrigation.
- For one bush, increase the amount of water from 1 to 2 liters as it grows.
- Do not water with cold water. It needs to be heated to a temperature comfortable for the plant, 22-24°C.
- Carry out the work in the morning.
- On cool days, water the pepper 2 times a week, on hot days 3-4 times.
- You can add mineral fertilizer to the water 1-2 times a month. This will increase the plant's immunity and productivity.
Automatic irrigation system for polycarbonate greenhouse
Pepper care
Caring for peppers doesn’t end there. Even timely planted seedlings and properly formed bushes require close attention.
Watering
It is important to water the peppers correctly:
- watering should be done in the morning;
- consumption: a bucket of water per 1 sq. m;
- once a week until buds form;
- twice a week during flowering and fruiting;
- direct the stream of water under the root without touching the leaves;
- use only warm and clean water to prevent plants from overcooling.
Important ! Plants are watered often and little by little, because if there is a lack or excess of moisture, the ovaries may fall off.
Top dressing
An important stage in crop formation is fertilizing:
- once every two weeks with nitrogen-containing fertilizer (urea) during the growing season;
- once every 14 days with phosphorus fertilizers during the period of fruit formation;
- It is allowed to feed with mullein a couple of times a season.
Important! If the plant drops its ovaries, it means it does not have enough sunlight. In such situations, it is worth removing all the leaves, leaving only the flowers and fruits.
Additional care
- regular weeding to remove weeds;
- loosening the soil to saturate it with oxygen;
- garter of stems;
- do not leave unattended and observe the appearance;
- leaves curled at the edges indicate a lack of potassium;
- if the underside of the leaf turns purple, it means the pepper lacks phosphorus;
- grayish leaves indicate nitrogen deficiency;
- the absence of ovaries and rapid growth of greenery indicate an excess of nitrogen, in which case watering is carried out with an infusion of ash.
Important! Too deep loosening can lead to damage to the root system, which in turn leads to the death of flowers and the death of the plant.
Top dressing
Many gardeners wonder what to feed peppers after planting in a greenhouse and during the period of active growth of the bush. There are several stages of introducing fertilizers:
- 3-4 weeks after planting the seedlings in the greenhouse. Superphosphate 5 grams mixed with water 10 liters and urea 10 grams is suitable. Pour 1 liter of solution under each bush.
- During the flowering period. Use a mixture of superphosphate (9-10 grams), potassium sulfate - 3 grams, water - 10 liters. Fertilize each bush with 1 liter of solution.
- Harvesting. Mix phosphorus 1 tsp. and potassium 1 tsp. with 10 liras of water. 1 liter of solution is poured under each root.
Feeding requires a competent approach. Do not use chicken manure or cattle manure. They can burn the root system, disrupt metabolism, which will lead to a decrease in yield and leaf growth.
Planting peppers in a greenhouse - caring for the plant after transplantation
After two weeks, when the plant has taken root, you can feed it. At this stage, it is best to use mineral fertilizers based on nitrogen, which is responsible for metabolism.
It is one of the most important macroelements, without which the development of plant growth and weight is not possible. If you prefer organics, then infusions of cow manure, chicken droppings or herbal infusions are good options.
If you do everything correctly, you will soon see that the plant grows well and young plants appear on it. If the plant does not develop, then it is necessary to figure out why this is happening and why there is no result from the applied fertilizers.
During the entire growth period, the plant must be fed. This will help it develop properly and as a result, you will get high yields.
The next feeding is done when the pepper begins to bloom and buds form. As a rule, this happens 14 days after applying the first fertilizers.
This time, the composition should include the entire list of microelements, so it would be best to purchase this complex in a nursery or in a specialized store, after consulting with a specialist.
Many brands are popular among gardeners, because it is difficult to recommend either in this article. During the ripening of the pepper and the first harvest, you can do the third feeding. It is no different from the previous one.
However, at this stage, wood ash can completely replace mineral fertilizers. Adding ash is very simple, just sprinkle it on the soil near the roots and water it with water. But the best option would be to pour a solution of 200 grams of ash diluted in one bucket of water.
One bush is watered with 1 liter of water. Alternating fertilizing from root to foliar is considered beneficial for pepper. You can even create a schedule so you don't get confused.
For example, in the first week you can do root feeding using yeast infusion. In the second week, the same type of feeding is made from an infusion of ash.
In the third week, a yeast infusion is also used, but for foliar feeding. In the fourth week, foliar feeding is carried out again using an infusion of ash. Each subsequent week the pattern is repeated.
Proper care
Caring for greenhouse peppers is easy if you know the rules and features of care.
- Place the seedlings comfortably. Closely planted seedlings will not give a good harvest due to lack of space for the fruits and root system.
- Plant the seedlings together with peat from a cup.
- Loosen the soil 2-3 cm deep more often. Pepper loves oxygen and fresh air.
- The soil should be moist.
- Maintain a microclimate in the greenhouse of 22°C during the flowering period, 25-27°C during fruit ripening.
- Provide seedlings with plenty of light.
- Do not plant peppers in cold soil. He will die.
- Periodically inspect the leaves for beetles and parasites.
- Use fertilizer in moderation, observing proportions.
- Form the bushes in the morning so that the skeleton has time to recover.
- Tie up the bushes before the fruits begin to appear.
- Remove all limp, diseased leaves and fruits from the bush.
- Remove ripe peppercorns in a timely manner so as not to weigh down the stem.
Planting patterns for bell peppers
In addition to temperature, the growth and development of pepper in greenhouse conditions is affected by the feeding area. It should be sufficient so that the plants do not experience a lack of nutrients. The planting scheme for a particular variety or hybrid is often recommended by seed producers and indicated on the packaging. The approximate distance between sweet peppers when planted in a greenhouse in a row should be:
- 0.4 m for tall varieties;
- 0.25-0.3 m – for short people.
When planting pepper seedlings in a greenhouse, row spacing should be at least 0.5 m, and preferably 0.7-0.8 m, so that it is convenient to care for the plants.
You can place peppers in a small 3x6 greenhouse on 2 or 3 beds of 1 m and 0.7 m wide, respectively. When staggered, peppers are planted according to a pattern of 0.25 by 0.25 m or 0.3 by 0.3 m. This way you can save greenhouse space without damaging the plants themselves.
Compatibility with other crops
Gardeners often ask the question: “Is it possible to plant several crops in one greenhouse? For example, tomatoes and peppers, cucumbers and bell peppers?” These crops are heat-loving, but their compatibility also depends on other growing conditions.
- Do not plant bell peppers in the greenhouse with hot chilies at the same time. The seedlings are pollinated.
- Planting cucumbers and peppers in the same greenhouse is not the best option for experienced gardeners. Cucumbers do not require ventilation, but peppers love fresh air. Cucumbers require heat, while peppers require moderate, constant temperatures.
- Tomatoes and peppers don't get along well together. They need different conditions in the greenhouse. Sweet vegetables need moisture, and tomatoes die from water.
Thus, it is better to plant crops in different parts of a large greenhouse or arrange an individual greenhouse for each.
Diseases
A thorough analysis of the greenhouse microclimate and an external inspection will help you find out why peppers grow poorly in a greenhouse and why they turn yellow. Most often, fungi and infections affect plants that are in a poorly ventilated area or flooded with water.
The main diseases of peppers are:
- Mosaic. Leaves lose transpiration and yields decrease.
- White rot. Plaque forms on the root part, the death of seedlings occurs in 3-4 days. The reason is high humidity, rare ventilation of the greenhouse.
- Late blight. Holes appear on the leaves, dark purple spots on the fruits and crown. The culprit is considered to be a cold snap at night and excess moisture.
- Black spot. The leaves and peppercorns become covered with tubercles, which turn black, causing the death of the plant.
They fight infections by sprinkling the damaged areas with charcoal or chalk. It is important to establish an irrigation regime and constantly maintain a comfortable atmosphere inside the greenhouse. Immediately remove diseased bushes away from healthy ones, and don’t hesitate to throw them away. This will help keep yields high.