Choosing a landing site
When it comes to placing a pumpkin, you have to think carefully, since in a common area among other vegetables it will offend its neighbors, whom it will certainly drown out with its powerful lashes. Although it is often planted among potatoes, which experience almost no oppression. But since a pumpkin, like cucumbers, with the help of its tendrils is able to climb neighboring plants and low structures, gardeners with little land take advantage of this, for example, letting its lashes climb over fences.
A wide variety of supports are invented for growing pumpkins.
When there is nothing suitable for this in the garden, then directly above the holes a flooring on stakes is made of two or three poles or slabs - 1-1.5 m in height. As the vines begin to grow, they are directed onto the flooring, and separate supports are placed under the hanging fruits. In this form, the pumpkin is not an obstacle for many low-growing vegetables, at a height above which it will grow.
The next question is how to create suitable soil conditions for pumpkins. The difficulty here is not so great, since one pumpkin bush will require a hole area of no more than 1 m2. If you consider that for an average family you need to plant 3-4 bushes, then you can find a place for this anywhere and provide the pumpkin with a nutritious soil mixture on it.
Seed selection
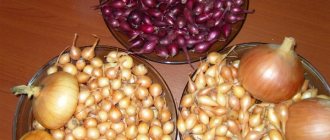
There are more than three dozen varieties of pumpkin. Almond, Mozoleevskaya 49, Golosemennaya, Vesnushka are hard-barked, large-fruited varieties that ripen early and are stored for a long time. The large-fruited varieties Ulybka, Zimnyaya Sladkaya, Kroshka, and Zimnyaya Stolovaya are good for winter storage. Early ripening portioned pumpkins have a sweet taste: Butter crumpet, Amazon, Winter sweet, orange bush.
You can grow many varieties of pumpkin from seeds in your garden. For growing by seed, it is not recommended to choose only muscat varieties, since the seeds may simply not sprout. Pumpkin seeds can be stored for 1 to 4 years.
When choosing seed, you need to pay attention to its freshness, checking in advance for germination. This is not difficult to do: just take a few seeds and germinate them on wet gauze. By looking at how many seeds have sprouted from all of them, you can determine the approximate percentage of their germination rate. This will make it easier to know in the future how many seeds to put in the holes.
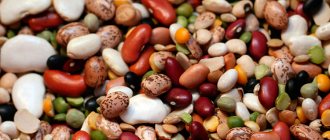
For a good pumpkin harvest, you need to choose only healthy seeds. To select the best, you need to prepare a 3-5% salt solution and dip the seeds into it. Those that float up are unsuitable for planting, but the rest can be planted. These seeds must be collected, washed and dried.
What kind of soil is needed for planting pumpkins?
Pumpkin grows well on structurally fertile, light dark-colored sandy loam soils. In areas well fertilized with manure, the fruits reach enormous sizes.
The basic tillage of soil for pumpkin is no different from tillage of soil for vegetable crops: in the fall, the bed is dug up with fertilizers using a shovel, and in the spring it is leveled with a rake. The soil for this vegetable should have an acidity close to neutral, the optimal pH being 6.5. You should not plant pumpkins where any pumpkin crops (cucumbers, zucchini, squash) grew last year.
Soil preparation
Preparatory work begins in the fall, so think about the place for the pumpkin in advance. What needs to be done: clear the area of weeds and crops that grew this year and prepare organic fertilizer. To do this, mix 60 grams of superphosphate, 30 grams of potassium chloride, 10 kg of humus (14 kg of manure can be used instead). This amount should be enough for 2 square meters. m. Fertilizer is applied in the cold for plowing.
To ensure looseness, coarse sand or peat can be added along with organic matter. In very slightly acidic soils, it is advisable to add wood ash. In spring, digging is not required, but it is necessary to remove weeds and level the top layer of soil with a rake.
Fertilizers for pumpkin when planting
In terms of pumpkin's requirements for the content of nutrients in the soil, it is very similar to cucumbers. Pumpkin feels great on a pile of finished compost, where various waste was dumped last season, as well as in those places where manure used to lie.
You can grow pumpkins in specially prepared trenches, filled with chopped branches, green or dry grass, manure, and various household waste, which are mixed with soil and a layer of fertile soil is poured on top. The depth and width of the trench is up to half a meter.
The greatest effect is obtained with the combined use of organo-mineral fertilizers per 1 m2: for digging 4–5 kg of manure and for feeding (when 5–6 leaves appear) 20 g of ammonium nitrate, 30 g of superphosphate and 15 g of potassium chloride. Nitrogen fertilizers (saltpeter, urea) can also be applied when loosening the beds in spring.
Caring for plants in the planting field
Pumpkin sprouts should hatch a week after planting in the ground. Further care of plants includes loosening the soil, regular watering, fertilizing, and controlling diseases and pests.
Watering
Large pumpkin leaves contribute to the rapid evaporation of moisture, so the plant requires regular watering, and only with warm water. As the pumpkin grows, the amount of water for irrigation must be increased.
It is recommended to slightly reduce the amount of watering during the flowering period: the fruits will set better. Resume moistening the pumpkin patch when the fruits begin to gain mass. Before harvesting, about 10 liters of water should be used to water one plant. When the pumpkins reach their full size, you can stop watering the plants.
Loosening and thinning
The soil around the plants must be loosened and cleared of weeds after rain or watering. With the emergence of seedlings, the first loosening is carried out to a depth of 6-8 centimeters. It is better to loosen the row spacing before watering to a depth of 12-18 centimeters to ensure rapid penetration of water to the roots of the plants. During loosening, it is recommended to lightly hill up the plants, increasing their stability.
After the seedlings have formed two true leaves, it is necessary to thin them out, leaving in one hole two sprouts of nutmeg or hard-bark pumpkin and one of large-fruited pumpkin.
When the seedlings have 3-4 leaves, a second thinning is carried out. In order not to damage the root system of the remaining seedlings, there is no need to pull out excess seedlings. It is enough to simply cut off the unnecessary seedling at the level of the ground surface.
Top dressing
Pumpkin produces a large amount of vegetative mass (leaves, stems) and fruits, so it needs frequent feeding, preferably with liquid fertilizers.
3 weeks after sowing the seeds in the ground, it is recommended to carry out the first fertilizing with manure or chicken droppings diluted with water in a ratio of 1:4. Such organic fertilizing must be repeated 3-4 times a month. It is good to feed the pumpkin by dissolving a glass of wood ash in 10 liters of water.
When applying the first fertilizing at a distance of 10-12 centimeters around the plants, it is necessary to make grooves 6-8 centimeters deep and pour the solution into them. For further fertilizing, furrows 10-12 centimeters deep are placed 40 centimeters from the plants.
After applying fertilizer, the furrows are covered with earth. If cloudy weather persists for a long time, it is recommended to spray the pumpkin with a solution of 10 grams of urea in 10 liters of water.
Pollination
If there are not enough pollinating insects on the land plot during plant pollination, you will have to do it yourself. To do this, you need to learn to distinguish between female and male flowers. The male ones have an elongated leg, while the female ones are located on the stem, they have an ovary under the petals.
At about 9 o'clock in the morning it is necessary to pick the male flower, tear off the petals and touch the pistils on the female flowers with the anther. If the male flowers have not yet bloomed, the male flowers of a closely related plant, such as squash, can be used to pollinate the pumpkin. The pumpkin harvest will be good, but the seeds will no longer be used for sowing.
Landing dates
In central Russia, mainly large-fruited and hard-bark pumpkins are cultivated, in the south - nutmeg. Types of pumpkin differ quite significantly from each other. In hard-barked pumpkin, the bark of mature fruits is woody, while in other types it is soft. This pumpkin is characterized by the greatest early ripening. Large-fruited pumpkin is the most cold-resistant and productive. The hard-barked pumpkin is also quite resistant to low temperatures; the most demanding of heat and also late-ripening is the nutmeg pumpkin.
Thus, it turns out that in the middle zone, without growing seedlings, you can only be guaranteed to get a harvest of hard-barked pumpkin, while nutmeg may not grow even using the seedling method. In the southern half of the country, any pumpkin can be grown, but nutmeg varieties, even in the south, are sometimes grown through seedlings.
Butternut squash is the most delicious, but also the most capricious
Pumpkin seeds germinate in soil heated to 13–14 °C, and its seedlings are very sensitive and die at 1–2 degrees below zero. The best temperature for normal growth and development of plants is 20–25 oC. If you sow it in the ground with the onset of heat, you may not wait for ripe fruits, which require from 115 to 130 summer days. Therefore, you often have to start growing pumpkin from seedlings. To do this, pumpkin seeds are sown in peat pots at the end of April. The pots must be large, at least a liter in volume.
The time for planting seedlings in the garden is approximately the same as for tomato seedlings. In the regions of central Russia this is usually the end of spring (depending on the actual weather), and in the north it can be mid-June.
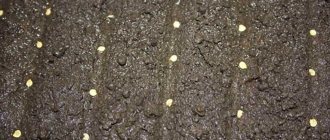
When pumpkin is grown by directly sowing seeds in a garden bed, they are sown in mid-May and it is better if holes are made for this so that they can be covered with glass. It has been noticed that slugs react very early to the emergence of pumpkin seedlings by gnawing their stems. To catch slugs, pieces of boards are laid out next to the seedlings and checked every morning.
Types and varieties
All varieties of pumpkin are for open ground, since it is difficult to grow such a large vegetable in a greenhouse. However, if you live in an area with short, cool summers but really want to grow pumpkins, try doing it in a greenhouse. Three varieties of pumpkin are grown in culture:
Common pumpkin (Cucurbita pepo)
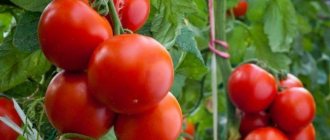
An herbaceous annual with large, smooth, rounded fruits, most often yellow in color, although there are varieties with fruits of other shades. The fruits of pumpkin ripen in September. The seeds in them are white or yellowish, with a thick skin, 3-4 cm long. If stored correctly, the fruits can last until the next harvest.
The best varieties:
- Spaghetti is an early ripening variety, ripening in 2 months. After boiling, the pulp of the fruit breaks down into long fibers similar to pasta, which is why the variety got its name. The pulp is tasty both hot and cold;
- Gribovskaya bush 189 is a popular early-ripening variety that grows as a bush, usually ripening two slightly ribbed, teardrop-shaped pumpkins, weighing 6-7 kg each. Ripe pumpkins are bright orange with green fragments, their flesh is bright orange, juicy and sweet;
- Almond - a mid-season climbing variety with round orange fruits weighing up to 5 kg with yellow-orange crispy, juicy and sweet pulp;
- Acorn is an early ripening variety, sometimes bushy, sometimes climbing, with small green, yellow or almost black fruits, similar to an acorn, with almost white or light yellow low-sugar pulp. The second name of the Zheludevaya variety;
- Freckle is an early-ripening bush variety with small green netted fruits weighing up to 3 kg with not very sweet orange or yellow pulp and small seeds;
- Bush orange - a variety with bright orange fruits weighing up to 5 kg with a soft and sweet core. Pumpkins of this variety are perfectly stored;
- Altaiskaya 47 is an early ripening, multi-purpose, productive variety, ripening within two months, with yellow-orange, hard-barked fruits weighing from 2 to 5 kg with yellow-brown or pale yellow stripes. The pulp is fibrous. The variety is resistant to low temperatures and stores well.
Butternut squash (Cucurbita moschata)
Also native to Central America - Peru, Mexico and Colombia. This is a plant with a creeping stem and alternate, pubescent, long-petioled leaves. It has yellow or brownish-pink fruits with longitudinal light spots and bright orange fragrant, tasty, dense but tender pulp and small grayish-white seeds with a darker rim along the edge. The species has a variety called turban-shaped due to the unusual shape of the fruit.
The best varieties of butternut squash:
- Muscat - a late-ripening, long-climbing variety with fruits weighing from 4 to 6.5 kg and dense, juicy and sweet orange pulp;
- Palav Kadu is a late climbing variety with large, round, segmented orange fruits weighing up to 10 kg with juicy and sweet orange pulp, distinguished by amazing taste;
- Pearl - a late-ripening pumpkin weighing up to 7 kg with dark green bark and very juicy, rich orange pulp;
- Butternut is a late-ripening climbing pumpkin with medium-sized pear-shaped yellow-brown or light orange fruits weighing up to one and a half kilograms with fibrous, sweet, oily bright orange pulp with a nutty flavor;
- Prikubanskaya - a mid-late climbing pumpkin with smooth pear-shaped orange-brown fruits weighing up to 5 kg in brown and orange spots with tender, juicy and sweet red-orange pulp;
- Vitaminnaya is a late-ripening variety, ripening for at least 130 days, with dark green fruits with a yellow stripe weighing up to 7 kg with bright orange pulp.
Large-fruited pumpkin (Cucurbita maxima)
It is represented by varieties with the largest fruits, which at the same time are the sweetest. The sugar content of some varieties reaches 15% - a figure higher than that of watermelon. The stalk of this pumpkin variety is round, cylindrical, with a beardless, rounded stem. The seeds of this type of pumpkin are matte, milky white or brown. The fruits tolerate low temperatures better than other varieties and are stored the longest at home.
The best varieties:
- Zorka is a mid-early variety with powerful and long vines, with dark gray fruits with orange spots weighing up to 6 kg and bright orange, very sweet and dense pulp containing carotene in high concentrations;
- Mramornaya is a late-ripening, long-climbing, high-yielding variety with lumpy round dark green fruits weighing up to 4.5 kg with crispy, sweet, rich orange dense pulp, rich in carotene;
- Candy is an early-ripening climbing pumpkin with large, rounded red-orange fruits weighing up to 2 kg with dark orange sweet, juicy and dense pulp, rich in sugars and vitamin C. This variety is cold-resistant and high-yielding;
- Volzhskaya gray is a mid-season climbing variety with slightly flattened round light gray fruits weighing from 7 to 9 kg with pulp from pale yellow to bright orange of medium sweetness. The variety is drought-resistant and stores well;
- Smile is an early ripening variety with bright orange round fruits with whitish stripes and crispy orange, very sweet pulp with a delicate melon aroma. The variety is cold-resistant and can be stored for a long time at room temperature;
- Centner is an early ripening variety of universal use with yellow, very large segmented pumpkins weighing up to 60, and even up to 100 kg with white sweet pulp. This is an outdoor pumpkin that is often grown for its seeds;
- Arina is an early unpretentious variety, resistant to diseases, with light gray round, slightly segmented fruits weighing up to 5 kg with dense and sweet yellow pulp. The seeds have a high oil content.
Planting pumpkins in seedlings
The best way to prepare seeds for sowing is by germination, in which case they lose their taste and, as a result, are less damaged by pests. Before this, they are disinfected for 20–30 minutes in a dark solution of potassium permanganate.
The pots are filled with nutritious garden mixture. 2-3 seeds are sown in one pot, burying them 3-4 cm, but after germination one best plant is left, the rest are removed. Before planting, the seedlings are kept in a greenhouse, they try to give as much sunlight as possible, remembering that pumpkin seedlings are sensitive to lack of lighting and stretch out very quickly. In an apartment, seedlings are kept on a lighted windowsill, where during the day the temperature on clear days is 25–27 °C and above, and at night it does not drop below 12 °C.
For pumpkin seedlings, select the largest pots
The period for growing seedlings in a greenhouse or at home is about a month. You should not keep it longer - the roots will not have enough volume of the pot for full growth: they will fill it very closely.
The holes for planting seedlings are prepared in a place where in the future the vines can be easily transferred to any supports. To create a better thermal and air regime, the sides of the holes are laid out from any rotting organic material or from turf, boards or slabs with an elevation of 25–30 cm above the soil. Fertilized soil in the amount of 2–3 buckets is poured inside the hole. In order to avoid moisture loss during the spring-summer period, the hole is covered with a film of any color, and its edges are sprinkled with soil.
Before planting the seedlings, a hole is cut in the film in the appropriate place. First, one or two buckets of water heated in the sun are poured into it, and then the seedlings are planted. The overgrown and elongated one is lowered into the hole deeper than usual - up to the cotyledons. The planted seedlings are covered with a piece of glass using a box made of boards. This measure is necessary to better warm the soil, reduce moisture evaporation and protect against birds.
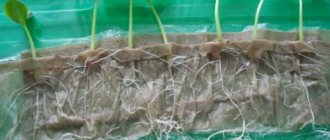
Ready pumpkin seedlings are a completely viable plant
Watering is carried out every other day until the seedlings become stronger and begin to grow. Adult plants are watered as needed, which they themselves signal by wilting leaves.
Video: planting pumpkin seedlings in open ground
Collection and storage
Harvesting is usually done when the plants reach biological maturity, but make sure your pumpkin is truly ripe before you harvest it. A sure sign of maturity is the drying out and suberization of the stalk in hard-barked pumpkins, and a clear pattern on the hardened bark in varieties of large-fruited and nutmeg pumpkins. The harvest should be done in dry weather, after the first frost, which will kill the pumpkin leaves. The fruits are cut off with the stalk and sorted by quality and size. Proceed as carefully as if you were handling eggs.
Unripe or damaged fruits will have to be processed, and those intended for long-term storage should be dried in the sun or in a dry, warm room with good ventilation for two weeks so that the stalks are inoculated and the bark is completely hardened. After this, the pumpkin can be stored.
Before frost, the pumpkin can be on a balcony, loggia or in a dry shed, covered with straw or rags, but when the temperature drops to 5 ºC, the pumpkin is transferred to the living room and kept in a warm, dry place with a temperature not lower than 14 ºC - this is how it should be stored the first two weeks, and then you need to find a place for the pumpkin with a temperature of 3-8 ºC and air humidity of 60-70%, where it will lie until spring, or even until the new harvest. Dry sheds, attics or basements are suitable for this. At higher storage temperatures, for example 15-20 ºC, the pumpkin loses about 20% of its weight and may rot.
If the harvest is too large, you can store the pumpkin on racks, laying straw on the shelves and placing the fruits in one row so that they do not touch. Or put them in boxes, sprinkled with dry moss. A mandatory requirement for storage is good air ventilation.
You can store a pumpkin in the garden, in a trench lined along the bottom and walls with a layer of straw 25 cm thick. When frost sets in, the trench with the pumpkin is covered with earth, leaving ventilation holes in it, which are closed during severe frosts and opened during thaws.
If the harvest is modest, it can be stored in an apartment or house, in a dark place, so that the seeds do not germinate and the pulp does not acquire a bitter taste. Carved pumpkin should only be stored in the refrigerator.
Planting schemes
The root system of all types of pumpkins is well developed, penetrating to a depth of 1.5 m. However, it requires a lot of space: the pumpkin spreads roots not only deep into the ground, but also to the sides, and the growing lashes reach a length of several meters.
Recent Entries
Chainsaw or electric saw - what to choose for the garden? 4 mistakes when growing tomatoes in pots that almost all housewives make Secrets of growing seedlings from the Japanese, who are very sensitive to the soil
The feeding area for pumpkins is perhaps the largest among known garden dwellers. The following planting schemes are recommended: 2 x 1 m, one plant per hole, or 3 x 2 m, two plants per nest.
If there is space, you can plant pumpkins along the path, and lay out the whips in directions from it
The best conditions for pumpkin growth
Every crop can produce a rich harvest if it is properly cared for. Pumpkin is no exception, so it is better to familiarize yourself with the recommendations indicated in the table:
| Temperature, degrees | Watering | Top dressing | Growth time, in days |
| Ground – 13-15, air – 17 | Daily after sowing and until a full root system is formed. If there is systematic rainfall, the crop may not need to be watered at all. If there is not enough moisture, then add a bucket of water to each adult plant. | The first (two weeks after germination) is a solution of chicken manure or mullein, then organic compounds are added once a month | Early ripening - 92-104, mid-ripening - 10-120, late ripening - 120-140 |
Pumpkin is the most frost-resistant representative of melons, but its possibilities are not unlimited.
If you choose the wrong planting date and create unsuitable conditions, the plants will grow weak and will not be able to produce a good harvest.
Ways to plant pumpkins
In addition to the usual planting of pumpkins in a pre-prepared bed (on a flat surface or slightly raised), gardeners often come up with some tricks to save space in the country and make caring for plants easier.
Planting on a compost heap
Any plant residues, including those that rot slowly, are placed in compost. And if grass compost matures by the next season and can be used as fertilizer for any vegetables, then large residues like cabbage stalks, tree branches or raspberries can be processed within 2-3 years. To avoid wasting space, you can plant a pumpkin in this pile, which is not yet ready as fertilizer.
Partially rotted remains will already be a nutrient medium for the plant, and those that will continue to rot will not hinder it in any way. The pumpkin roots will quickly take up all the free space in this pile: after all, it is quite loose. Since the pumpkin leaves are large, they will shield the future compost from the rays of the sun; it will be better for it to rot rather than dry out. True, you shouldn’t hope that such a pile of pumpkins will have enough nutrients; you’ll have to add a little mineral fertilizer. To make caring for the pumpkin easier, the pile should be fenced on the sides with boards, giving it a convenient shape and height. But on top of the plant residues you need to pour a layer of soil of 10–15 centimeters.
Both the pumpkin and the compost pile mutually help each other.
Such a bed, in fact, is a greenhouse: the rotting of large fragments warms the soil, and the pumpkin itself helps this. For growing on compost, it is more convenient to use varieties with not very long vines; it is better to plant seedlings in such a bed, placing the plants no more often than 80 cm from each other. But early ripening varieties can also be planted with seeds, temporarily covering the compost heap with spunbond. Caring for pumpkins planted in compost is very easy. Firstly, you have to bend over less. Secondly, such a bed does not require loosening, and often no weeding. But the heap needs to be watered no less often than a regular garden bed, and even more often.
Planting in bags
In order to save space in the garden, you can plant pumpkins in ordinary garbage bags made of thick plastic film, but it is advisable that their capacity be at least 100 liters. After all, the bags can be placed anywhere, even on the asphalt, as long as they are not completely in the shade. In the fall, a mixture of soil and compost or even just compost is poured into bags, and in the spring one pumpkin is planted. You can do this either with seeds or seedlings, depending on the situation.
It is best to place bags of pumpkins next to the fence, so as not to have to come up with additional support: the stems will climb up, and the growing fruits can be placed in nets, which are also tied to the fence. Pumpkins in bags are easy to care for, if only because the plants are at a very convenient height. It is also easy to regulate the humidity: irrigation water will not leak through the polyethylene, and if, on the contrary, the climate of the area is too humid, then excess moisture can be released through several drainage holes.
A variety of vegetables are planted in bags, including all pumpkin crops
Using barrels
Metal barrels can be used instead of plastic bags. Of course, this pleasure is not so cheap, but for this you can also take a barrel that is no longer suitable for its intended use.
In order for the soil inside the barrel to be better warmed by the sun, it is advisable to paint the outside of the barrel a dark color.
Of course, it is a pity to spend a new barrel for such purposes, but if it is clearly unnecessary, you will have to drill several drainage holes in its lower part. It is advisable to put a cut irrigation hose on the upper rim for easy care of plants.
In the fall, various plant waste is placed at the bottom of the barrel: branches from pruning trees, leaves from under trees and bushes, tops from collected root crops and other plants. Garden soil is poured on top. In the spring, water the soil in the barrel generously to speed up the decomposition of the waste poured into it. Since the contents of the barrel will have settled significantly by summer, humus will need to be added by the time the pumpkin is planted.
At the very beginning of summer, pumpkin seedlings are planted in a barrel. Sometimes two plants are planted, but it is better to limit yourself to just one. At first, the pumpkin is watered very often: both the seedlings need to take root and the biomass continues to decompose. Rotting causes heating, and the pumpkin in the barrel is very comfortable. Additional fertilizing is not required for this planting.
The fruits of short-stemmed pumpkin can even be left on a barrel
The vines hang freely from the barrel; over time, flowers appear on them and fruits begin to appear. If they have reached the ground, you can leave them there, placing a small plank under each one. If you are left hanging in the air, you will have to come up with additional support.
Planting pumpkin on nettles
One of the most popular natural fertilizers in the garden is an infusion of mowed grass and pulled out weeds. It smells very unpleasant, but contains many nutrients necessary for plants, and therefore is very often used for fertilizing. One of the leaders in nutrient content is common nettle. In this regard, it is used not only as a liquid fertilizer: various garden crops are often planted in nettles. Unlike manure, this eliminates the introduction of pathogenic bacteria, larvae of harmful insects and other pests.
The highest quality nettles are spring ones, collected in May. Make a large hole, right up to a bucket, and fill it with chopped nettle leaves (along with the stems; you can cut or tear them in any convenient way and not very finely). Mix nettles with soil approximately 1:1 and water well. It is better to water with an infusion of the same nettle, obtained by pouring a bucket of nettle with water and letting it sit for 5–7 days.
The top of the hole is sprinkled with clean soil, after a few days the pumpkin seedlings are planted and watered with clean water. After 3–4 days, the seedlings begin to grow.
Is it possible to plant pumpkins in a greenhouse?
It is impossible to grow nutmeg pumpkins in harsh climatic conditions, but even with ordinary large-fruited ones there can be a problem due to the lack of warm summer days. In this case, you can plant a pumpkin in a greenhouse. True, space in the greenhouse is precious, and the pumpkin grows in the form of a huge plant, occupying a large area, so you have to be a little cunning. In modern polycarbonate greenhouses it is difficult to implement such a trick, but in ordinary film greenhouses it is easy.
Often they plant a pumpkin next to cucumbers, giving it a place somewhere in the very corner. Planting holes are made in the same way as in open ground, they are filled with fertilizers, seedlings are either planted in the holes or seeds are sown. But by the time the stems grow to about half a meter, summer weather has already set in in the fresh air. They bend the edge of the film from which the walls of the greenhouse are made and release the pumpkin outside. This is how it grows all summer: the roots are in the greenhouse, and the fruits are in the open air.
A pumpkin is planted in a greenhouse, but is released outside to live.
Pests or diseases
Pumpkin can develop fungal diseases such as black mold, powdery mildew, rot, ascochyta blight and anthracnose.
Black mold appears as yellow-brown spots between the veins of the leaves, which become covered with a dark coating of fungal spores as the disease progresses. After the stains dry, holes form in their place. Young pumpkins shrivel and stop developing.
With ascochyta blight, large yellow-brown spots first form on the leaves, stems and shoot nodes, then light spots with a chlorotic edge, covered with black pycnidia containing the body of the pathogenic fungus. The pumpkin dries out and dies.
Powdery mildew is a real scourge of gardens and vegetable gardens, the symptoms of which look like a thick whitish coating, similar to spilled flour, which contains fungal spores. Leaves affected by powdery mildew dry out, fruits become deformed and stop developing. This disease is most active under conditions of sharp fluctuations in air humidity and temperature.
Anthracnose appears as large watery yellowish spots on the leaves. In wet weather, the veins of the leaves are covered with a pink coating. Gradually, pink spots spread over the leaves, petioles, stems and fruits, and by autumn the affected areas turn black. Anthracnose is most dangerous at high humidity.
White rot develops on all parts of the plant, causing damage to the root system, drying out of fruiting stems and reduced yield. The pumpkin turns yellow, turns brown, and becomes covered with a flaky coating of mold. Slime may appear on the stems. Gray rot appears as brown, blurry spots that quickly merge with each other and affect the entire plant. Wet bacterial rot can appear as a result of damage by slugs or podras to ovaries and young fruits in too dense plantings.
Among the insects, pumpkin is attacked by melon aphids, podura, or white springtails, wireworms and slugs.
Slugs eat the leaves of plants, sometimes leaving only a network of veins. There are especially many of them in the rainy seasons. In addition, they are able to live and harm plants for several years.
- Sandy and loamy soils - pros and cons
Melon aphids damage shoots, flowers, ovaries and the underside of leaves, causing them to curl and wrinkle.
Podurs are tiny white insects with a cylindrical body up to 2 mm long, feeding on seeds and underground parts of plants. Podura cause the greatest harm to plants in cold, damp weather.
Wireworms are the larvae of click beetles that gnaw at the root collar of young seedlings, which leads to the death of plants. Most of all, wireworms like to accumulate in damp lowlands.
Pumpkin processing
The fight against pumpkin diseases is carried out factually and preventively, which is undoubtedly preferable, since the disease is much easier to prevent than to cure. To protect pumpkin melon from fungal diseases, you need to observe crop rotation, comply with agrotechnical requirements, and take a responsible approach to each type of work, and especially to pre-sowing seed treatment. At the first signs of disease, spray the plants and area with one percent Bordeaux mixture or another fungicide. And try to make spring and autumn treatment of melons with Fitosporin mandatory - this will help you avoid many unpleasant surprises.
You will have to collect slugs with your hands or set up beer traps for them: place bowls of beer around the area and from time to time collect mollusks that crawled to the smell of it. Wireworms are also caught with bait by digging holes 50 cm deep in different places around the area, placing root vegetables cut into pieces there - carrots or beets - and covering the holes with boards, wooden boards or roofing felt. After a while, the traps check and destroy the wireworms gathered there. They fight durs by dusting the soil around the plants with wood ash. Aphids are destroyed with Phosfamide, Karbofos or a solution of 300 g of soap in 10 liters of water.
And yet, let us remind you that diseases and pests, as a rule, affect weak and unkempt plants, so observe crop rotation, fulfill agrotechnical requirements, conscientiously care for your plants, and you will not have to treat and save them.
Features and timing of pumpkin planting in different regions
Not only what varieties of pumpkin can be planted depends on the climatic conditions of the region, but also how and when to do it. If in the middle zone it is difficult to grow only the most heat-loving and late-ripening nutmeg pumpkins, then in Siberia or the Urals problems may arise with more cold-resistant varieties. But usually preliminary preparation of seedlings solves these problems. In the middle zone, they prefer to grow mid-season varieties with seedlings, and early ones are sown in the garden with seeds. Sowing seeds is possible in the last days of May, and planting seedlings without film covers is closer to June 10.
The climate of Belarus is similar to that of the Moscow region, and the approaches to growing pumpkins there are approximately the same. The State Register of Belarus includes about twenty varieties of pumpkins, and almost all of them are widely known in the central regions of Russia. The timing of planting seedlings or sowing seeds here is the same as in the central zone of our country; neither the planting rules nor subsequent care are any different.
In the Urals and most of Siberia, night frosts are possible even in June, so the time frame for growing pumpkins is very tight. Here they almost never risk sowing seeds directly into the ground, preferring to grow seedlings. It is transferred to the garden bed no earlier than mid-June. And even in this case, they monitor the weather, perhaps covering the plantings with non-woven materials for the first time. However, Siberia is large: in the south, as well as in the Southern Urals, summers are sunny and sometimes even dry: in these areas you can grow almost any variety of pumpkin, including direct sowing of seeds in a garden bed.
In the south of the European part of Russia there is no need to grow seedlings. Here the pumpkin grows without problems, huge fields are allocated for it, it is illuminated by the hot southern sun and grows large and tasty. All available varieties have time to ripen by sowing seeds directly in the field, which, depending on the weather, is possible either in early May or even earlier.
Video: planting a pumpkin in a tire
Aftercare
Pumpkin especially needs moisture during flowering.
Caring for pumpkin is easy because it is an unpretentious plant. The vegetable is not a particularly moisture-loving representative, despite the voluminous leaves, due to which intense evaporation of moisture occurs.
Moisture reserves are found in fleshy stems and cuttings, which allows the plant to safely survive dry periods. With abundant watering, the vegetative component begins to rot and is more susceptible to fungal attack.
During drought and during active growth, pumpkin is watered every day in the evenings. During fruit ripening, watering is reduced so that the vegetable does not grow watery. It’s better to underfill than overfill – this is the basic rule.
Pumpkin is especially predisposed to organic feeding. Therefore, it is recommended to apply them both before and after planting. The following options are suitable:
- settled manure
- chicken droppings
- vegetable compost
- humus
- potassium humate
Of the mineral compositions, preference is given to those that contain potassium, phosphorus and nitrogen. If these are not available, potassium salt, ammonium nitrate and nitrophoska are suitable. You can also add wood ash to the soil.
Miracle pumpkin
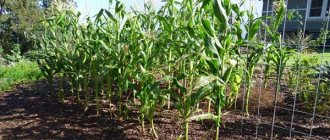
In early spring, green manure can be planted in the pumpkin planting area. By the end of May, they will have time to grow a rich green mass, which, when mowed, is slightly sunk into the soil. This will later serve as an ideal fertilizer for pumpkin.
When full 2-3 leaves appear on young seedlings, the plantings should be thinned. The peculiarity of growing large-fruited pumpkins is that only 1 sprout is left in the garden. When the variety is nutmeg or hard-barked, 2 seedlings are left.
Pumpkins require more than just watering. Loosening, mulching, removing weeds, weeding are additional activities. Similar actions are carried out after the first fruits are set, but no later than the beginning of August.
It is necessary to loosen as the weeds grow. Sawdust or peat are suitable as mulch. For better formation of adventitious roots, plants are hilled with moistened soil.
You should also pinch out the side shoots and the central stem. There are two ways to form a bush:
- into one stem - you should remove excess ovaries, leaving only 3 on the bush, on which there are 3-4 leaves
- into two stems - you need to trim the tops of the shoots so that there are 2 fruits left on the center one, and one on the side one
In wet weather, boards are placed under the pumpkins to prevent them from rotting.
Preparing pumpkin seeds for sowing
After you have sorted the pumpkin seeds and selected the smallest and largest ones, they should be prepared for planting. First you need to soak them:
- first immerse in hot (about 45°C) water for a couple of hours;
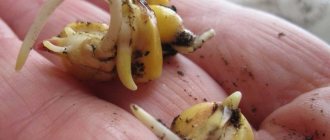
- then keep them wrapped in a damp cloth at room temperature until biting (usually 2-3 days).
Soaking helps speed up the germination of seeds and also deprives them of a taste attractive to pests.
In addition to soaking, some gardeners advise additional hardening of pumpkin seeds to increase the cold resistance of these plants, especially heat-loving varieties (for example, nutmeg pumpkin).
To harden, already sprouted pumpkin seeds are placed in the same damp cloth on the bottom shelves of the refrigerator for 3-5 days. As a microfertilizer, seeds in a damp cloth can also be sprinkled with ash.
The best option for pumpkin is to plant seeds for seedlings
Today, even southerners complain about the delay of spring and the speed of autumn. The cold suddenly returns, and the garden, which had been softened in the sun, is mercilessly crushed by the frost. That is why gardeners began to plant not seeds in their beds, but seedlings nurtured in the warmth of home, waiting until the time of frost had passed.
Pumpkin is a healthy, tasty plant, but very heat-loving. The optimal average daily temperature for plant well-being is 20–23 °C, the lower limit is 16 °C. If the thermometer drops to 14 °C, the pumpkin will stop growing. So seedling cultivation is the best option for her.
Pumpkin is a very beautiful and, most importantly, healthy vegetable.
In addition to those intended for food purposes, there is a large group of decorative pumpkins. In shape they are warty, pear-shaped with a two-color color; turban-like with a red cap, there are pumpkins that copy the shape and color of tangerines. Nature has done a particularly good job of coloring two-color species: various fringes, stripes, droplets, lines that harmonize very well with each other. The fruits of decorative pumpkin are inedible, but they are very beautiful and varied; they are grown with pleasure in flower beds.
Decorative pumpkin varieties are characterized by extremely diverse shapes, colors and textures, the effectiveness of which is emphasized by their miniature size.
How to calculate sowing time
Pumpkin seedlings that are over 30 days old have a hard time taking root in the garden, so the sprouted seeds are placed in the soil about 25 days before planting in the ground. In the middle and central zone, favorable weather for this usually occurs in mid-May, in Siberia - no earlier than the end of the first ten days of June.
Containers and soil for planting seedlings
If the seedlings will be grown in soil purchased in a store, then it is recommended to give preference to soil for melons, which will suit pumpkins much better than universal soil. You can prepare the mixture yourself by combining one part of rotted sawdust and leaf humus with two parts of peat.
If seeds for seedlings are planted in a common box, then often the sawdust is simply laid four centimeters thick directly on the bottom, and a layer of 8 cm of the remaining ingredients is poured on top. Accordingly, the depth of the seedling box should be at least 14–16 cm.
It’s a good idea to leave a reserve to add to the stems, which grow very intensively and often stretch out, but the bedding allows them to get stronger.
Pumpkin seedlings really do not like transplanting, so they are never planted, and when sowing seeds, one must take into account that it is in this container and in this soil that the shoots will develop within four weeks.
Peat pots are ideal containers for growing pumpkin seedlings
Of course, it is best to sow pumpkin seeds directly into separate cups, peat tablets or pots . The volume of the container should be about 10 cm3. When placing seedlings in a common box, it is necessary to adhere to a sowing pattern of approximately 15x15 cm so that the grown plants do not crowd each other.
Video: how to plant pumpkin seeds in peat cassettes
Picking
When growing pumpkin in a common container, young shoots need to be picked. Basically, out of three seedlings, one stronger one is chosen. Sometimes seedlings are thinned out by transplanting excess plants into a separate container. The culture does not tolerate this process well, so it should be removed along with the earthen clod.
Picking is necessary because as the pumpkin grows, the seedlings become denser. Because of this, the sprouts begin to struggle to obtain nutrients from the soil. As a result, the seedlings will weaken, which will lead to a weak and poor harvest. But due to the fact that the crop does not tolerate transplantation and work with roots, it should be picked carefully. This is important, since damage to even one cotyledon leaf will cause slow development.
During the procedure, planting depth is important. The ideal option is if the cotyledon leaves protrude 5 mm above the soil. Otherwise, the growing point will be damaged and the sprout will die.
Dive rules:
- make holes in the ground;
- carefully dig up the seedling and insert it into the prepared hole;
- cover with soil;
- compact and water using the root method. You need to make sure that water does not get on the leaves;
- After absorbing moisture, sprinkle this area with dry soil.
After diving is completed, the seedlings should be transferred to a shaded place, protected from UV rays. You can take it out to a sunny windowsill after it has taken root.