Step-by-step guide on how to germinate seeds
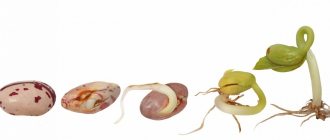
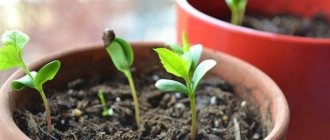
Firstly, seeds for germination must first be soaked. Secondly, think in advance about how you will do this and prepare everything you need (Figure 1).
Figure 1. Main stages of germination using beans as an example
Thirdly, you will need good water with the correct acidity from 6.3 to 6.8, and a growth stimulant will also come in handy. Fourth, consider where you will germinate the seeds. It should be a warm (24-27°C) and dark place.
Why soak seeds before sowing?
Why soak seeds before sowing? Soaking is a preliminary preparation of seeds that promotes good growth. According to gardeners, soaked seeds produce strong and fairly high-quality seedlings.
After soaking, tomato seeds are not only disinfected, but their yield also increases by 30%.
Soaking seeds occurs in several stages:
- First you need to select weak, damaged and empty seeds.
- Healthy seeds are heated and treated with nutrients that are sold in garden stores.
- Next, the seeds are soaked. Place several layers of cloth in a wide container with water (any cotton fabric, gauze, cotton swabs, anything that can be folded into several layers). It is very important that the fabric is only lightly covered with water, so there should not be too much water in the container. The prepared seeds are placed between layers of cloth soaked in water. The water must be changed periodically so that it does not stagnate. Also, the tissue in which the seeds lie should not dry out, otherwise they will die.
Different vegetable crops require different amounts of soaking time. So, for example, peas take 6 hours, cabbage, cucumber and tomato seeds will need more time - 18 hours.
After soaking, the seeds are dried quite a bit and then sown in prepared containers.
What seeds need germination?
Of course, it would be good to soak the seeds of all the crops that you are planning to plant in your garden. After all, soaking and germination help eliminate unsuitable seeds and help the good ones sprout.
Note: But, unfortunately, this is not possible. Seeds that are too small after germination have a very delicate sprout and you simply cannot plant them without damaging them.
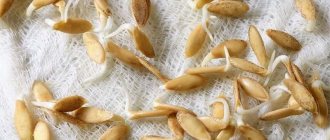
Therefore, speaking about seed germination, we can distinguish a group of medium (like cucumbers) and large (like pumpkin) seeds. It is these seeds that usually require a germination procedure (Figure 2).
Figure 2. Usually only large seeds are germinated - pumpkin, beans or cucumbers
Small seeds, such as carrots or tomatoes, have a large number, so even if not all of them sprout, there will still be enough sprouts. Then you still have to thin out. Although below we will still tell you one way to germinate small seeds. Suddenly you acquire something very valuable and in small quantities.
How to germinate seeds at home
The most common way to germinate seeds is to place the seeds between two layers of cotton cloth in a wide container with a flat bottom.
You need to place the seeds in a warm place and be sure to maintain the desired temperature and humidity.
Typically, the process of seed germination lasts until the sprout has roots up to 15 mm. As soon as you see the roots of the branch, you should immediately replant them in open ground.
You can store the seeds in a plastic bag in a cool place, but the temperature should not be below 0 degrees. This method is suitable for you if you do not want to plant the seeds ahead of time. Do not close the bag too tightly, otherwise the seeds may suffocate.
What does the process of germinating seeds that you have previously soaked look like?
- Take a large flat bottom cup and fill it with wet sawdust.
- Wrap the seeds in damp cotton cloth between two layers.
- Place the seeds in your container, wrapped in cheesecloth.
- If you have large seeds, then you can not use a cloth, but simply spread them on sawdust.
- Do not wash the seeds under any circumstances.
- If your sprout has roots that are more than 15 mm thick, then you can break them off when removing them from the fabric.
- If the sawdust begins to dry out, you can periodically moisten it with a sprayer.
- The germination procedure takes from 3 to 8 days, it all depends on the crop you planted.
Experts advise germinating seeds in expanded vermiculite, as it absorbs moisture very well and releases it easily, so the moisture will remain much longer.
After the shoots appear, you can sprinkle the seeds with a layer of fertile soil, this applies to nightshade crops.
Rules for soaking seeds
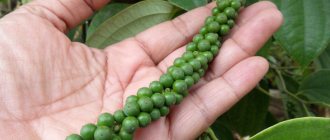
Everything is simple here. You need to soak the seeds for several hours: from two to ten. Soaking time is affected by the size and density of the seeds. If these are, for example, cucumbers, then two hours is enough, and if these are beans, then you can soak them for ten hours (Figure 3).
Figure 3. Soaking allows you to separate high-quality planting material from low-quality ones
Soaking serves two functions. First, good seeds will sink and bad seeds will float. Thus, the first selection can be made. Secondly, thanks to soaking, the seeds will swell and then germinate faster.
Description
How to germinate seeds for seedlings? Most vegetable crops are grown only through seedlings. This method is especially relevant for cold regions.
The question may arise, why grow seedlings if you can sow the seeds directly into the ground. Yes, this option is also possible, but it only applies to those crops that produce large sprouts, for example, pumpkins, legumes and others. Although they are also germinated to get a good harvest. It is worth remembering one rule: the smaller the seeds, the more susceptible they are to various problems. For example, small seeds are quickly clogged by weeds, and for garden pests small seeds are a godsend. Pest bugs destroy them very quickly, which then reduces the yield. So you need to germinate seedlings, but you can learn how to do it correctly at home from this article.
Benefits of Sprouting Seeds
The main advantage is that in this way you can immediately remove unusable seeds, those that will not germinate. Germinated seeds also germinate faster and plants grown from such seeds are stronger and equally progressive (Figure 4).
Figure 4. Germination accelerates crop development
This procedure is especially popular among summer residents whose plots are located on soils with low fertility or in a northern climate. The germination procedure allows you to speed up the growth process of crops and get the harvest a little earlier.
Positive aspects of germination
The two-pass period is very important for any plant . The main advantage is that you can select the strongest and most selective seeds. Those seeds that hatched first and will give you 100% germination when further planted in open ground. Once you have planted the seeds for germination, your results will be noticeable the next day.
Another plus is simplified care. After planting in open ground, your sprouts will be at the same stage of development and this will significantly simplify the care of your plant.
If you like to take care of plants, then germination is perfect for you, because you need to take care of the seeds regularly: make sure that the water level is always approximately the same (when soaking the seeds), so that during germination the gauze in which they are wrapped is sufficiently wet, After climbing, you can add some soil.
You can also find a minus. But it is for those who do not like to care for plants - germination takes a lot of time, you need to be careful when planting seeds that have taken root, they are very easy to damage, it is best to use tweezers.
But such work should be a joy for the gardener, because then from such a tiny and fragile seed you can get large, juicy and tasty fruits that will delight the whole family.
Necessary equipment
No special equipment is required. Depending on the chosen method of germination, you will need some available tools. These can be shallow containers, woven rags, gauze, cotton wool, cotton pads, and even a sanitary pad can be useful (Figure 5).
Figure 5. For germination, you can use any available materials
You will also need warm water, about 30°C, with a good level of acidity, as well as a drop of growth stimulator added to this water.
For more intricate methods you may need: hydrogel, mineral wool, agroperlite. And, of course, for all methods you will need film or some kind of cover.
Caring for sprouted seedlings
Caring for sprouted seedlings involves ensuring the correct temperature, watering and lighting. In order for the seeds to germinate and become viable seedlings, it is necessary to provide the correct and good light. It is believed that 14 hours of sunlight per day is sufficient for sprouted seeds. This is much more than mature plants require, so very often you have to resort to the help of special lamps.
Turn the seedlings over, twist the container and rotate it so that the seedling receives light evenly and grows well.
As for the temperature regime, for seeds it is necessary to maintain it within 22-25 degrees, but when the seeds germinate, the temperature can drop to 15-18 degrees.
Low temperatures slow down the growth of seedlings, but seedlings grown under lower temperature conditions are stronger and more viable.
The soil with young seedlings should not be dry; at the same time, water should not be retained in the soil, because excessive moisture can destroy a crop that has not yet matured. Until the seedlings sprout, spray the soil with a spray bottle, and water the grown plants with ordinary water, but at room temperature.
It is better to water adult seedlings in a tray. This type of watering will ensure a strong root system.
How to germinate carrot seeds
Small carrot seeds contain a large amount of essential oils, so they take a long time to germinate. Sprouting will help cope with this problem.
There is a very unusual way to get sprouts, and it requires almost no labor. To do this, the seeds are placed in an old sock or gauze bag and buried to the depth of a spade bayonet in a flowerbed or garden. The seeds are left in the ground for two weeks and then removed. Once in the soil, they will become moist and send out young shoots. After sowing, such planting material will sprout much faster.
Pre-soak
For quick germination, the seeds are pre-soaked. This technique awakens the growth mechanism that is in stasis during dry storage. Under the influence of moisture, the shell swells, the flesh becomes loose, facilitating the path for the shoot and root.
A shell that is too thick and strong, similar to a shell, requires a radical method - scarification.
The technology consists of properly damaging the outer shell of the seed using a knife, sandpaper, or coarse sand, immediately before soaking.
Soaking Features:
- Use of melt water. The source of liquid can be snow, ice, or precipitation in the form of rain. An alternative is tap water frozen in the refrigerator and melted.
- The use of growth accelerators (not mineral fertilizers) before soaking reduces the time of emergence.
- The period the seeds are kept in a humid environment is no more than a day at a comfortable room temperature, immediately before planting.
- Seeds that are too dry and do not swell for a long time are pierced with a thin needle or other sharp object, providing moisture access inside. These specimens are left in the water for another day.
- Cotton pads and a cloth diaper with seeds are periodically moistened 3-4 times a day.
- Seeds saturated with moisture and taken out of water quickly lose volume, and the awakened seedlings may die. Therefore, they are soaked immediately before sowing. Otherwise, leave in damp conditions, in a cool place. The water is changed daily.
Wheat sprouting
Almost every health-conscious person has heard about the benefits of consuming sprouted wheat. Today, when the cult of proper nutrition has gained momentum, the Internet is replete with a lot of advice on how best to germinate wheat and how to use it correctly in food.
Sprouted wheat contains a large number of microelements that a person needs for good functioning of the body!
In fact, soaking it is very simple:
- The grain is purchased clean, fresh, and chemically untreated . You can buy this in grocery stores, and more recently in pharmacies.
- The wheat is washed with water until the drained water becomes clear. The floating grains are thrown away.
- Then the wheat is re-filled with water , preferably structured, and left for half a day at room temperature. Make sure that the water does not bloom. If an unpleasant odor appears, it will have to be replaced.
- After 12 hours, the water is drained , and the swollen grains are placed on damp gauze and covered with it on top to protect it from drying out.
- After another 12-15 hours, the first sprouts will appear - the wheat can be eaten.
Expert opinion
Yulia Safronenko
Big fan of experiments and personal gardening techniques
Ask a Question
From personal experience: cutlets made from sprouted wheat turn out very tasty! To do this, I pass it through a meat grinder, add some salt, and add a little fried onion. Then I form the cutlets and fry them in a frying pan.
What seeds are bubbled and how to carry out the procedure
The essence of bubbling is to saturate the seeds with oxygen and remove the protective shell. On average, seed germination time is reduced by 8-12 days.
The procedure is performed with a specialized bubbler or a regular aquarium compressor. Let's look at the process using an example of using an aquarium compressor:
- A container of suitable size for the procedure is filled with clean filtered water.
- Seeds calibrated (sorted) for planting are placed at the bottom of the container.
- The air outlet tube is placed in a container of water and the compressor is turned on.
The duration of the procedure depends on the specific plant.
- Approximately 5-6 hours for legume seeds.
- Approximately 9-11 hours for salads and radishes.
- Range from 12 to 18 hours for strawberry and tomato seeds.
- +- 18 hours are required for melon, cucumber, parsley or dill seeds.
- Onion and carrot seeds require about 21-23 hours.
- The bubbling period for watermelon and pepper seeds is about 24-36 hours.
IMPORTANT! It is advisable to carry out bubbling before planting seeds - otherwise, only damage to the seeds is expected, which will make it impossible for them to grow in the future.
How to disinfect seeds
Disinfection of seeds is carried out for one purpose - to destroy fungi and other pathogens that are somehow found in the seed. Disinfection of seed should be carried out not only for personally collected material, but also for purchased material - the manufacturer cannot guarantee healthy seed due to intermediaries.
Among the effective methods of disinfection are the following.
Through potassium permanganate
The processing procedure is carried out according to the following scheme:
- Prepare a solution at the rate of 1 gram of potassium permanganate per 100 milliliters of water (1%).
- Place the seeds in the solution for 20-40 minutes.
- After processing, the seeds must be thoroughly washed and dried.
REFERENCE. All vegetable and flower crops can be processed in a similar way - only the required percentage of potassium permanganate and the duration of treatment may differ in the procedure due to the characteristics of a particular plant.
Through hydrogen peroxide
This disinfection method is as follows:
- 3% hydrogen peroxide is placed in a container suitable for heating and heated to 35-40 degrees Celsius.
- After heating, the seeds are soaked in peroxide for about 5-9 minutes.
- After treatment, it is advisable to rinse the seed with clean water and dry it before planting.
IMPORTANT! Such treatment before planting increases the growth rate of seedlings, and also disinfects the surface of the grain and lowers the level of nitrates.
Using the drug chlorhexidine
Treatment with a 0.05% chlorhexidine preparation is carried out as follows: any dense fabric is moistened with the solution, the seed fund is placed on it and left for about half an hour. This drug is good because it has a complex disinfecting effect and increases the germination of grains.
Conditions and technology for effective seed germination at home
The necessary conditions for seed germination are:
- moisture;
- warm;
- air access;
- light for those seeds whose weight is less than 1 mg.
If you do this on a plate, then it, like the air above it, must be moist, since even a short drying can weaken the seedlings at best, and destroy them at worst. When germinating seeds correctly, to ensure optimal humidity, place the container with seeds in a transparent plastic bag, cover with glass, etc.
Sow the sprouted seeds into the ground. For their successful germination, it is necessary that the soil surface does not dry out. Until shoots appear, use only clean, settled water to water germinating seeds. During this period, the plants do not need feeding.
The soil also has certain requirements. Sowing seeds does not require highly fertile soil at all, since the supply of nutrients contained in each seed is quite sufficient. Rich soil will only cause damage, as it contains salts in high concentrations.
Watch the video of seed germination, which shows the basics of this technology:
Contraindications for sprouts
Sprouts have virtually no contraindications. They should not be eaten during periods of exacerbation of gastrointestinal diseases. Not recommended for people during the postoperative period.
Some experts classify them as “adult” food and do not recommend giving sprouts to children under 12 years of age. Other doctors consider them very useful for the developing child’s body and say that they can be added to the menu of children starting from the age of one. But this is possible in the absence of other contraindications. Therefore, you should first consult with your pediatrician.