Mushrooms
0
1412
Article rating
Kira Stoletova
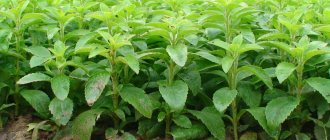
In the summer, summer residents practice growing champignons at their dachas in open ground. The technology of planting and care does not require special knowledge and is accessible even to beginners.
Growing champignons in open ground at the dacha
Preparing the substrate
In order to grow mushrooms, you need to create a substrate rich in dead organic matter, and then place spores there. If the spores are viable and the conditions are favorable, then all that remains is to harvest.
Champignons in the country can be grown in closed and open ground.
To quickly obtain a harvest, take developed mycelium (mycelium), placing it in a favorable environment. Champignons in the country can be grown in closed and open ground.
The soil for champignons should be enriched with a large amount of easily decomposing organic matter. However, even mushrooms cannot tolerate high concentrations of ammonia. This means that the soil layer must be saturated with organic matter that has gone through the fermentation process. To do this, compost is prepared as follows:
- Half the barrel is filled with fresh cow dung. A layer of wood ash about 1 cm thick is laid on top.
- The mixture is poured with water and mixed thoroughly. Now the barrel of compost needs to be placed somewhere away from where people live, since the activity of bacteria in this nutritious “broth” will be accompanied by a strong odor.
- For at least 10 days, and preferably 2 weeks, you need to stir the compost several times a day. After this, the fermented organic matter should stand quietly for about 3 days.
The finished compost is poured onto the prepared beds. You need to put covering compost on top. It is prepared as follows:
- You need to take 50 kg of straw, the same amount of cow or horse manure. Horse manure is preferable in this case because it is dense. Ammonium nitrate and superphosphate (2 kg each) are added to this mixture. In addition, you will need 4 kg of gypsum.
- The straw is soaked in water for 2 days, after which it is mixed with manure. This mixture is divided into 4 parts.
- The resulting mixtures must rest. After a week of rest they need to be stirred, then after 5 days and after 4 days. These preparation steps are necessary in order to create a sufficiently loose substrate. During the first stirring, ¼ part of gypsum, saltpeter and superphosphate is added to each pile. Before mixing, the mass is moistened with water. During subsequent wetting and mixing procedures, fertilizer and gypsum are added in equal proportions based on the remaining mass.
Once all types of compost are ready, you can start sowing.
How to grow champignons at home.
"Mushroom" place
Champignons do not need light. To plant champignons in the country, select a shady place. It should be cool and humid, but without stagnant water. The minimum area of the bed is 2-3 square meters. It is necessary to remove the top layer of soil 20 cm thick. A specially prepared mixture (substrate) is laid in the resulting deepened ridge. If the place is too damp, then place a layer of drainage (8 cm) below - crushed stone or broken brick. The recess is filled with a special fresh substrate, the preparation of which takes time (about a month).
See also: “How to grow oyster mushrooms at home from scratch: the easiest way.”
Preparing the mycelium of seed material
If champignons grow wild in a given area, then the seed material can be obtained from nature. This is the cheapest way to grow mushrooms.
In order to choose high-quality seed, you need to find an environmentally friendly place. Mushrooms have the ability to absorb substances from soil, water and air. If the pollution exceeds certain limits, the mushrooms die and no longer grow in the area. With moderate pollution, the mycelium and fruiting bodies grow, but contain all the pollutants in increased concentrations.
Contaminated champignons planted in a summer cottage will gradually be cleaned. If the ecological situation in the garden plot is favorable, then the mushrooms can be eaten. However, the mycelium will have to be transferred with contaminated soil, which means that it will be possible to eat the fruiting bodies only after several years.
To avoid the worries and concerns of contamination, find a site with a good harvest of fruiting bodies away from industry and busy roads.
Determine the area where you will cut the soil. It all depends on your capabilities and desires. In order to preserve the mycelium, you need to remove a layer of soil no deeper than 5 cm. You cannot clear the soil of fallen leaves and blades of grass. Fungal hyphae permeate not only the soil, but also the litter.
For convenience, cut the removed soil into squares and carefully place them in bags. It is advisable to maintain the integrity of each cut block.
Before planting, the soil with mycelium must be stored under conditions that exclude sudden temperature changes. It is best to keep planting material at high humidity and temperature +7...+10°C.
Growing champignons in bags.
Preparing store-bought mycelium
Ready mycelium can be purchased in specialized stores and supermarkets. Live myceliums are sold in packages that maintain optimal humidity. Before sale, the mycelium is kept in refrigerators at a temperature of +5...+7°C. This ensures a dormant regime that inhibits the growth of fungi.
It is difficult to determine the quality of mycelium when purchasing, since the viability of dormant mushrooms is checked when they are activated. However, it is recommended to open the package and smell the contents.
Living mycelium smells like fresh mushrooms and fertile soil. The reason for rejecting mycelium is a putrid or sour smell. This means that bacteria have become active in the substrate. This occurs when fungi, which are antagonists of bacteria, die.
Self-cooking
You can grow mycelium yourself, using only spores of mature champignons. You can do this right away in the garden. To be on the safe side, you can first plant the mycelium at home in temporary soil.
Growing champignons at the dacha in open ground saves time. However, in this case it will not be possible to harvest soon.
Planting champignons in the country is done as follows.
- Find mature mushrooms, pick them and chop them.
- Prepare the planting soil. To do this, dig a trench 25 cm deep, pour fermented manure into it, lay straw with horse manure on top, and sprinkle it all with a thin layer of soil. Now the mushroom bed needs to be watered with a small amount of water. The bed should be moist, but not wet.
- Spread the mush of caps on damp soil, and then sprinkle it with a thin layer of earth (about 3 cm).
If the planting material is of high quality, then the mushrooms will begin to bear fruit in the same season. To guarantee and have the best effect, mycelium can be grown at home in the fall.
Growing champignons in the garden.
We study the process of growing in a summer cottage
Before starting a new activity, you need to remember that champignon mushrooms do not tolerate sunlight. To grow this type of mushroom you need good ventilation and humidity. Therefore, you will have to choose a place to plant mushrooms taking these nuances into account. We find a suitable site. Many summer residents grow their champignons in the circles of the orchard or simply in the vegetable garden. In the summer heat it is difficult to provide the necessary conditions for growing champignons. The fruiting bodies of mushrooms grow en masse in a narrow temperature range from +15°C to +18°C and a high percentage of humidity (90%). Therefore, you can count on a good harvest only before the heat sets in at the beginning of summer or after it subsides in the fall. But growing champignons at the dacha in a greenhouse allows you to collect mushrooms regardless of external weather conditions and at any time of the year.
In the selected area we place small trenches with the following parameters: length and width are 1 meter each, and depth is 30 cm. The dimensions are given for ridges planned in open ground. We fill the dug trenches with mullein or manure, but be sure to lay a layer of turf soil on top, then a substrate.
We are preparing a substrate or soil mixture for planting champignons in a summer cottage. Preparation takes a month to a month and a half.
- The most optimal composition for champignons is horse manure. In second place is cow straw. First, the manure is shaken with a pitchfork and then enriched with urea or ammonium sulfate in the proportion of 25 g of the substance per 10 kg of manure.
- The manure is kept in this composition for 10 days, shoveled again and chalk is added. Its amount is taken at the rate of 65 g per 10 kg of substrate. The mixed champignon mixture must be folded into a pile and compacted on the sides.
- The next time the composition is shoveled after 8 days, at the same time adding 10 g of superphosphate and 60 g of gypsum for every 10 kg.
- Now all that remains is to wait for the composition for the champignons to acquire a light brown tint and begin to disintegrate without emitting the smell of ammonia. The matured substrate is laid out very tightly on a dug-up bed 1.2 m wide.
Important! The champignon bed is located in a shaded area without active sunlight.
The matured mushroom substrate is placed in trenches. This moment is the most convenient to provide champignons with protection from drafts. On the north side of the trench, it is good to reinforce glass to protect against the freezing wind. A canopy over the garden bed will be very useful, which will save the champignons from heavy rain and active sun. It can be made from ordinary plastic film. After preparing the bed, leave the substrate on it for a week, periodically compacting it.
Planting mushrooms in the garden
In order for champignons to become a common crop in the country, you need not only to plant them correctly. The choice of landing site is of great importance. Mushrooms do not need light, so you can choose shaded places for them. If there are no such zones, then the area with the mycelium will have to be specially shaded.
In addition, mushroom beds should be placed in a place protected from the wind. Champignons grow well where there is good moisture, but there is no stagnant waterlogging. Protection from winds makes it possible to maintain stable humidity and temperature conditions, which is extremely important for mushrooms.
The principle of arranging the place where the mycelium will develop is universal. In order to understand how to grow champignons at the dacha in open ground, it is enough to know that these mushrooms need to be provided with a large supply of dead organic matter, which must constantly decompose. This is why there is a mixture of manure and straw. Manure is organic matter that will feed the mycelium in the first years of its development. Decaying straw (grass, leaves, sawdust, etc.) is food for mushrooms, which will be available to them in a few years.
On the beds
Placing crops on beds is necessary to create specific conditions and fencing this area with plantings. Beds are not only a separate area, but also an area raised above the main soil. This placement allows you to protect the plantings from waterlogging and create special conditions.
Mushrooms are rarely planted in open ground beds. The advisability of such placement arises in the case of constant waterlogging.
If the bed is well shaded, then caring for champignons will require little time and effort.
A trench 1 m wide is dug in a shaded lowland. The length of the trench is determined at will and in connection with the characteristics of the location. The width of 1 m is determined by the convenience of caring for the bed and harvesting. The trench is filled with nutrient substrate according to the scheme described above. Only the top layer of soil in which the mycelium is located should rise 10-15 cm above the ground level. The edges of the bed must be reinforced with boards or bricks.
With this arrangement, the mycelium will be located in an area of sufficient moisture, and rotting organic matter will be located in an area of waterlogging. If the bed is well shaded, then caring for champignons will require little time and effort.
In the hole
A depression in the soil for growing mushrooms is used when soil moisture is constantly low. The depth of the hole depends on the desire of the person and the condition of the soil. If a hole is created as a means of combating drought, then it is better to go deep to a layer of clay.
A layer of compost is placed at the bottom of the pit. The top should be covered with fresh grass or leaves. Then a layer of soil is laid. After watering, mushrooms are sown on the soil in the form of spores or finished mycelium. From above, the seed is again covered with a thin layer of soil and leaves. After this, the pit can be covered with a lid. With this device, moisture will not evaporate, and the temperature will be constant.
Sowing mycelium
At home, the purchased mycelium must be activated before planting. To do this, it is placed in a dark place with a temperature of about +20°C. This should be done 2-3 days before planting. If the mycelium begins to develop in the warmth (a clearly visible “web” of hyphae appears), the humidity inside the package increases and the mushroom smell intensifies, this means it’s time to start planting.
It is recommended, if possible, to disinfect the soil before sowing. This is done to combat diseases and pests. Only the top layer of soil into which the mycelium is immersed is subject to disinfection. This should only be done if you are planting purchased mycelium or sowing spores. If soil is transferred from the forest, then disinfection does not make sense.
Growing champignons in a box.
Mushroom picking
Growing champignons in the country and in the garden will take about 3-5 weeks. During growth, ripe mushrooms acquire a light pink tint. They are collected immediately as soon as the fruiting body reaches a size of 2 cm, since overgrown ones lose their gastronomic qualities and weaken the mycelium.
Irina Selyutina (Biologist):
The first harvest is harvested 30-40 days after the mycelium was planted. It is important not to forget that ripening occurs in waves: many mushrooms ripen in one day, and after a day this process stops. The next wave of harvest will need to be harvested in a week. Harvesting must be complete and not selective. Only in this case will new mushrooms grow faster. But if you leave some of the mushrooms in the garden, this can contribute to the spread of diseases.
By the way. To keep mushrooms better - to increase their shelf life - it is better to collect mushrooms whose caps have not yet fully opened.
If the harvest time is observed, the mycelium can bear fruit for about 2 months.
Harvesting is carried out by twisting out the fruiting bodies and then filling the resulting void with soil. The average yield in the second and subsequent years is approximately 5-6 kg per 1 m2.
Mycelium care
The mycelium requires stable environmental conditions. This means that it needs to be watered if necessary. A stable temperature can only be maintained indoors. However, even in open ground, temperature changes can be stabilized by forming shelters from polyethylene film. Autumn cold snaps will not kill the mycelium, but will significantly reduce the yield.
Long-existing mycelium in open ground must be fed with manure diluted in water in a ratio of 1:5. This should be done in spring or autumn after fruiting has ended.
For the winter, it is advisable to cover the mycelium with a layer of leaves or sawdust. This layer will reduce temperature changes, and in the summer it will grow with fungal hyphae.
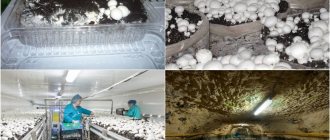
Growing mushrooms indoors
Indoors, champignons are most often grown in boxes placed on vertical racks one above the other, although long beds can also be arranged.
After planting the mycelium, the room should be very humid (75-90%) and warm (not lower than 25-27°C) so that the compost does not dry out. If this does happen, cover it with thin burlap or blotting paper and gently moisten it with a spray bottle.
If the process goes well, after 7-14 days white cobwebby mushroom threads will appear - first around the planted mycelium, and then on the surface of the substrate. They need to be covered with a damp mixture of peat, limestone and earth (in a ratio of 5:1:4) and wait another 3-5 days. After this, you should lower the room temperature to 12-17°C and wait for the harvest.
There are other options for the cover mixture, for example, peat and chalk (9:1), garden soil and chalk (97:3).
Light is not important for growing mushrooms. But do not forget to constantly check and regulate the humidity and temperature in the room during the forcing and growth of champignons. To do this, use air conditioners or heating devices, spraying the floor or shelving with a spray bottle, and ventilation.
The first mushrooms grow within 2-3 months after the formation of the mycelium. At first they will grow in “nests” of 5-20 pieces, then the mycelium will spread over the substrate more evenly. You need to remove the mushrooms while the lower part of the cap is still covered with a whitish film, and the brown plates are not yet visible. Carefully twist each mushroom out of its place and sprinkle the hole with the covering mixture.
Fruiting lasts for 1-2 weeks, and in total, when grown in this way, you can collect up to 6-7 waves of harvest (the first 2-3 will be the most productive).
The spent substrate can be used to fertilize the beds, which, however, is not recommended near areas where champignons are grown, because it contains a large number of pathogens of fungal diseases.
Before laying new freshly prepared substrate blocks, the room is washed (if necessary, disinfected with a 2% bleach solution), dried and ventilated well.
Features of growing in a greenhouse
Growing in a greenhouse can be carried out all year round or only during periods of above-zero temperatures. Mycelium can be planted on beds or shelves. You cannot leave soil with mycelium on the shelves for the winter - the hyphae will freeze and dry out. Only myceliums immersed in a thick layer of soil and covered with leaves, sawdust and grass can overwinter.
Even unheated greenhouses protect mycelium from thermal damage, since indoors there is no wind or sudden temperature changes. However, there is no snow there either. To compensate for its insulating role, a shelter of leaves or plastic film is needed.
Preparing mushrooms for planting
While the substrate is going through the ripening stage, let's start purchasing mushroom mycelium.
Mycelium can be purchased in specialized stores and communities of gardeners involved in growing champignons. The purchased material must be used strictly following the instructions.
It is difficult to determine the suitability of purchased raw materials, because they are stored exclusively in the cold. The best guide is the expiration date indicated on the packaging. At home, you also need to place the champignon mycelium in a room with a temperature no higher than +10°C. Only a couple of days before the intended planting, the packaging is taken out and transferred to a warm place (22°C).
If the mushroom spores are alive, then after 2 days the first signs of growth of the champignons in the package will appear:
- characteristic mushroom aroma;
- cobwebs on contents;
- increasing the humidity of the mycelium.
When the listed signs are absent, you can try to “revive” the mycelium.
It is transferred to a container, covered with a sheet of newspaper and moistened with a spray bottle, being careful not to wet the mycelium. The newspaper is kept damp all the time, and the container is placed in a warm place. This creates ideal humidity conditions for the fungus.
Important! Avoid direct contact with water on the mycelium, this is detrimental to the champignons.
If after these procedures no signs of fungal life appear, then such mycelium is unsuitable for planting.
Another nuance - we prepare the soil mixture in advance to cover the mycelium. This stage takes 20-25 days. For the mixture, prepare 1 part each of sand and turf soil and twice as much peat (2 parts). Stir and leave until the mushrooms emerge.
It can be argued that representatives of champignon mushrooms are one of the most common edible mushrooms; there are more than 60 species of them. You can meet representatives of this family on all continents except Antarctica; they can grow not only in the forest, but also in the field, in the garden or meadow, in open areas in the steppe and desert. Active growth of mushrooms, provided there is sufficient nutrition and soil moisture in the middle zone, can be observed from May to October. Having studied the conditions for growing champignons, you can easily master the technology for producing them at your summer cottage, not only in the warm season, but also in winter. Champignons are used to prepare various dishes, including original sauces. In Mediterranean countries they prefer to be used raw in salads.
Content
- Description of the mushroom
- Where are champignons grown?
- Substrate preparation video
- How to sow mushroom mycelium video
- How to grow champignons - care recommendations video
- How to grow mushrooms in garden beds
Description of the mushroom
Since champignons are classified as saprophytic plants, humus-enriched soils can be considered an ideal place for them to live, so they can often be found on a forest edge covered with a thick layer of fallen leaves or on a pasture manured by cattle. Successful industrial cultivation of the fungus will also require an environment rich in decomposing organic compounds.
For industrial cultivation, two types of champignon are used:
- four-spore two-ringed
- bisporous.
Meadow and field mushrooms are bred less frequently.
Champignons are hat mushrooms; they have a central stem, its height is 5-6 cm. The mushroom cap usually has a diameter of 5 to 10 cm, but you can find individuals with a cap more than 30 cm in diameter. At the beginning of growth, the mushroom has a bell-shaped or spherical cap, then it becomes convex and outstretched.
Based on the color of the cap, mushrooms are divided into several groups:
- milky color
- white,
- creamy,
- brown, so-called royal champignons.
As the mushroom grows, the shade of its plates changes; if in a young mushroom they have a delicate, pinkish color, then in an older one they are red-brown, then they become dark burgundy.
Where are champignons grown?
To grow champignons in a suburban area, you can use:
- beds and trenches dug in the garden - in summer,
- basements, greenhouses, greenhouses, dugouts, sheds - in the cold season.
Ideal conditions can be considered premises with air humidity of about 85-90% and a temperature above 12°C, preferably in the range from 13 to 30°C. Regarding illumination, it should be noted that champignon is not picky about it; a good harvest can be obtained by growing mushrooms in a dark room.
Substrate preparation
The main attention should be paid to the preparation of the nutrient medium, i.e. substrate. Compost is prepared by mixing straw bedding with fresh horse manure. Straw obtained from winter cereal crops with a mixture of horse and cow manure is often used. But if necessary, pig or sheep manure or chicken droppings are also successfully used; straw is replaced with chopped corn stalks or fallen leaves from trees.
Experts warn: you should never use rotten straw or rotted manure!
To improve the quality of the substrate, add to it:
- ammonium sulfate or urea,
- alabaster, gypsum or chalk as mineral additives.
A stock of manure or chicken droppings intended for preparing a nutrient medium is placed in stacks on a leveled and covered with roofing felt or concrete area, compacted well, then covered - the possibility of exposure to sunlight or rainwater should be excluded. You can also use a shed for storage. They begin to prepare the substrate in advance, about a month before it needs to be placed in boxes, trenches or beds.
Straw mixed with manure is composted, i.e. provoke its decomposition under the influence of microorganisms. Since a host plant is not required for the growth of champignons, it is possible to grow champignons at home only if the champignon compost contains a sufficient amount of:
- nitrogenous compounds obtained from manure,
- carbon, which wheat and rye straw contains in large quantities,
- calcium, which is contained in the chalk additive.
In addition, the quality of compost is increased by adding complex mineral fertilizers and meat and bone meal. The addition of gypsum helps to structure the compost mass and prevent it from caking.
Successful cultivation of champignons largely depends on the recipe and how accurately the compost mass is prepared in accordance with it. Experienced mushroom growers have their own time-tested formulas for the highest quality substrate. Beginning amateur benders can use the following formulas: to 12 kg of fresh wheat straw, add 1 kg of gypsum or chalk, 25 g of ammonium sulfate, 8 kg of fresh cow or horse manure, or chicken manure. Depending on the type of manure, it will take from 23 to 26 days to prepare the substrate.
If mushrooms are grown throughout the year, you will need to prepare a room with a temperature higher than +10 degrees - this is the optimal temperature for preparing the substrate. If you plan to grow mushrooms in the summer-autumn period, then a moisture-proof canopy over a concrete or asphalt-covered area will be sufficient - the mass should not have contact with the ground.
The technology for preparing compost mass is as follows:
- the straw is crushed and moistened,
- after two days it is laid in layers, alternating a layer of straw and a layer of manure,
- As the straw and manure are laid, they are moistened with water and pre-diluted mineral fertilizers.
The optimal dimensions of the heap are 1.5 m in height and the same in width. When forming a heap, you should remember that it must contain at least 100 kg of straw - with less of it, fermentation may be slow or not start at all - the heating temperature will be too low. The greater the amount of substrate that is prepared simultaneously in the pile, the higher its quality will be and the greater the amount of mycelium can be obtained.
The heap will need to be rebuilt after 5-7 days, which will require additional moisture for each layer. The interruption is carried out in such a way that the areas located on the outside move inside the collar, and the internal areas move outside. In the process of preparing one portion, it is recommended to perform the interruption 4 times - each of them will lead to equalization of the time required to complete the process - the fact is that it occurs at different depths in different ways. Moisturizing is done daily, but you should not give more water than the formed pile can hold.
Usually, readiness is determined by the disappearance of the ammonia smell and the mass acquiring a dark brown color. As a rule, this happens on the third day after the last breaking of the heap. Now you can form compost beds with a layer at least 10 cm thick for planting mycelium, or put the compost in special containers or polyethylene bags with a layer of 20 cm.
How to sow champignon mycelium
Experienced mushroom growers recommend buying mycelium from well-known manufacturers - if the technology was violated during its production, or its warehousing and storage were carried out incorrectly, then it is very likely that the thread-like formations called hyphae died - in this case, the growth of the mycelium will not occur. The best option is vegetative propagation of champignons, when the mycelium obtained in the laboratory is sown. Most often, rooms with constantly high humidity and stable temperature are used for sowing mycelium, for example, cellars. If the mycelium is purchased in the form of compost blocks, then you will not need to prepare compost yourself.
Only cooled compost is suitable for sowing mycelium - to reduce the temperature, spread it out in a thin layer and wait until it drops below +25 degrees. It is recommended to maintain this condition - otherwise, the subsequent increase in temperature after sowing will lead to inhibition of the development of the mycelium or its death.
Sowing is carried out according to the following standards: 1 ton of compost will require 6 kg or 10 liters of grain mycelium. If you grow mushrooms for your own consumption, in small quantities, then you can focus on the following standards: one two-hundred-gram package of mycelium per 40 kg of substrate. It is sown in prepared holes that are about 8 cm deep and located in increments of at least 15 cm between the rows and holes in the row itself. Adjacent rows should have holes arranged in a checkerboard pattern. Seeding can be done manually or using a special cutter and roller.
To maintain stable humidity, the substrate, after sowing the mycelium, is covered with straw mats or burlap. To prevent diseases of the mycelium, it is recommended to treat it every third day with a two percent formaldehyde solution.
In the case of cultivation using uncovered technology, the air is humidified by watering the floor and walls - moisture getting on the compost can cause mycelium disease. The best temperature for the growth of mycelium is + 23 C, while the substrate temperature should be within 24-25 degrees.
How to grow champignons - care recommendations
It will take 10-12 days for the mycelium to grow under optimal temperature conditions. During this period, a large number of thin white hyphae will appear in the substrate. If the threads become noticeable on the surface, they need to be covered with a layer of peat mixed with a small amount of chalk. It is recommended to adhere to the following proportion: for 6 parts of peat, take 1 part of chalk and 3 parts of dolomite chips. The thickness of the poured layer should be about 3-4 cm.
After 4-5 days after this procedure, it is recommended to reduce the room temperature to +17C. You should also start watering the top layer of compost using a watering can. The amount of water should not be large - it should moisten only the top layer, without going into the compost layer.
It is very important that during sowing of the mycelium and during the growing process there is an air flow into the room - if the carbon dioxide content in the air exceeds the norm, the growth of mushrooms will slow down. Humidity should be kept at 60-70% throughout the process. Fruiting of mushrooms will begin approximately on the twentieth to twenty-fifth day after planting the mycelium. Fruiting occurs simultaneously, the breaks between its peaks can be 3-5 days. The duration of the period is from 50 to 60 days.
Successful cultivation of champignons ends with harvesting, which is done manually, as if twisting the mushroom out of the mycelium. It is desirable that the air temperature during the harvesting period be from +12 to +18 C. To prevent spots from appearing on the champignon caps, the room is well ventilated before starting work. Experienced mushroom pickers determine the best time for harvesting by observing the film connecting the champignon cap to the stem - it is necessary that it stretches well, but it is not advisable to allow it to break. After harvesting, the mushrooms are sorted, setting aside damaged and overripe specimens.
Harvest every other day or daily. When fruiting ends with the substrate, it will be possible to fertilize the soil in the beds.
How to grow mushrooms in garden beds
You can also use regular open-air beds to grow champignons. This method is more economical and does not require large financial outlays. The main task is to properly prepare the compost. To prepare it, you can use horse or chicken manure. In the process of preparing it, which lasts about a month, you will need:
- mix the manure, pour it with a hot urea solution and compact it,
- after 10 days, shake the pile, add chalk and form a new pile, less dense,
- after the next 10 days, add superphosphate, compact again and wait until the substrate reaches a crumbly state and turns brown.
A layer of substrate up to 35 cm thick should be laid out on the bed, the mycelium can be planted at a compost temperature of about +23 +25 C, the air temperature should not be lower than +20 C. The size of the mycelium for planting in one hole should be the size of a chicken egg, optimal the depth of the hole is 5 cm. After planting, the holes are covered with substrate, watered, and covered with a layer of film or newspaper to retain moisture in the soil.
After 20 days, when the mycelium appears, the cover is removed and the bed is covered with a layer of peat mixed with turf soil. Fruiting in open ground continues for two months; the harvest should be harvested in a timely manner - otherwise the mycelium will be severely depleted. Watering the area should be done twice a week with heated water from a watering can.
Author: Sergey and Svetlana Khudentsov
10
Features of growing some types of mushrooms in the country
Keep in mind that forest animals are symbionts by nature. For life, development and formation of fruiting bodies, they need a continuous exchange of substances with the bodies of higher plants. In most cases - with their roots. Each forest mushroom has its own symbiont. The boletus has birch, the porcini mushroom has coniferous trees, and the boletus has aspen.
Accordingly, there should be a tree on your site that will allow the fungus to develop. Without this condition, the mycelium and mycelium will die without nutrition. Don't think that mushrooms will harm trees - they are not parasites. Symbiotic coexistence is equally beneficial for both the plant and the fungi.
I’ll tell you about the features of growing some mushrooms:
- White. They take root next to a pine tree - it must be a mature tree at least 30 years old. The best type of breeding is through forest mycelium. A big mistake is to plant them next to fruit trees.
- Boletuses. If you decide to engage in spore breeding, then you should cut off the pulp under the cap of the overripe one. Soak the mass in dechlorinated warm water for a day, and then bury it in the ground according to my advice.
- Butter, honey mushrooms. If most forest mushrooms need a living, healthy tree-symbiont, then these require rotten, almost collapsed stumps for development. Having uprooted such “wealth” from the forest, you can grow delicious garden mushrooms on it with great success. Another option is to carefully cut off the bark sprinkled with honey mushrooms from the stump. It is more convenient to use a saw or hacksaw. The “Mushroom Kingdom” can be planted in the shade of trees, covered with mosses, and then supplied with the necessary nutrition - wood dust.
- Morels. Spring mushrooms, ready for April-May. At this time, you need to go to the forest to collect fruiting bodies and mycelium. Morels do not like the proximity of fruit trees, especially apple trees.
- Champignon. These are the mushrooms that do not require symbiont trees on the site. On the contrary, they tolerate proximity to any higher plants, including fruit and fruit plants. They are grown on a special substrate with straw. They love champignons and manure, compost heaps rich in organic matter. Prefer good moisture and shade.
- Oyster mushrooms, shiitake. They grow on trees, including dead ones. Therefore, you can grow them on rotten stumps and logs using the method that I described above. Oyster mushrooms are the most productive of cultivated mushrooms. The mycelium does not survive frosty winters - harvesting from one plantation can take several years.
I advise you to start with cultivated mushrooms, whose mycelium, along with detailed growing instructions, can be found in garden centers. As soon as this works out, you can start experimenting with forest ones.
Substrate preparation
Before growing mushrooms, it is important to prepare the substrate. For this you need:
- fresh straw – 50 kg;
- manure (horse, pork, cow) – 15 kg;
- bird droppings – 25 kg;
- ammonium nitrate – 1.3 kg.
It is recommended to lay compost where there is no contact with the ground. This is done to prevent the compost from becoming infected with diseases and pests that negatively affect each of the growing methods. Also, the selected location should be protected from natural precipitation.
Compost for growing is prepared as follows:
- Layer straw and manure in layers, moisten the layers and sprinkle with saltpeter.
- Cover the top of the pile with polyethylene to retain moisture.
- Let the compost sit for a week.
- Stir the compost, moisten it, add 2 kg of chalk.
- Leave the pile for 3 days.
- Mix hay with manure, add water, add 750 g of superphosphate.
- Leave the fertilizer for 7 days.
- Mix the compost, add 2 kg of alabaster.
- After 3 days, stir the pile.
Important!
The compost preparation process takes 20 days. The fertilizer is considered ready when the smell of ammonia disappears. Due to the pungent odor, it is recommended to choose a corner location in your summer cottage for planting champignons.
Mycelium preparation
Mycelium is the body of the mycelium, the material for sowing in the country, which infects grain or substrate. It is recommended to purchase a mycelium or assemble it yourself for further cultivation at your summer cottage.
Purchased material
The purchased seed is stored in the refrigerator at a temperature not exceeding + 10 ° C. The suitability of the mycelium should be checked 3 days before planting. To do this, you need to keep the box of mycelium at room temperature. After 3 days, signs of champignon growth will appear:
- It will smell like mushrooms.
- The contents will become covered with cobwebs.
- The planting material will become damp.
If such signs do not appear, the mycelia look dry, then it is worth making an attempt to revive the material before planting:
- Place the acquired mycelium inside a plastic food container and cover with newspaper.
- Moisten the newspaper from the sprayer so that the material itself does not get wet.
- Place the container in a warm place.
- Make sure the paper remains wet at all times. This is necessary to create high humidity inside the container.
- After 4-5 days, the contents of the container will show the first signs of the growth of mycelium, which should be planted in the country.
Important! If no signs of life are found, and all the contents begin to ferment, a clear brown color is visible, then such material is unsuitable for growing.
Self collection
It is preferable to make your own champignon mycelia for growing in the country. Ingredients:
- oats – 2 kg;
- water – 2 l;
- peroxide – 200 ml;
- forest champignons.
Champignon mycelium is prepared in stages:
- Pour oats into a saucepan and add water. The liquid should cover the cereal.
- Pour in peroxide and put on fire. Cook for 45 minutes. The grain will become soft, but not completely cooked.
- Place the grain in the bottom of a sterile jar.
- Carefully break the mushroom. Take 5-6 small pieces with a sterile instrument (tweezers, needle) and place them inside the grain.
- Roll up the jar with sterile lids with small holes (make them with a needle). It is recommended to cover the holes with a bandage and secure them with electrical tape.
- Place the jars in a cool, dark place.
After some time, the inside of the can of grain will show signs of grain contamination. The oats will become covered with cobwebs. The material will be ready for cultivation when all the grain is contaminated.
Important! If the glass of the jar becomes covered with brown spots, then it needs to be boiled.
Also, during work it is necessary to maintain constant sterility. It is recommended to disinfect all surfaces. To prevent the mycelium from becoming infected with harmful microflora during preparation, you need to use a quartz lamp.
An easier way to prepare planting mycelium is to move it from the forest. It is recommended to carefully dig up the soil around the champignons and cut out several squares. They are planted slightly “gutted”.
Methods for growing mushrooms in the country
I will tell you about the most common methods of relocating to your site.
Propagation by spores
I prefer to use this method as a backup, safety net. For example, if I bring mycelium from the forest, I don’t forget to “sow” spores in the neighborhood. The method for preparing “mushroom seedlings” is very simple:
- I separate the mushroom caps, finely chop them with a knife or pass them through a meat grinder.
- I fill it with dechlorinated water (rain is best) and let it sit for a day.
- About 0.5 m from the tree trunk, I dig a hole 25-30 cm deep. Best of all is the one under which they grew in their natural environment.
- I pour the “seedlings” into the hole, cover it with forest substrate - rotted leaves, wood dust.
- For the first 1-2 weeks I don’t touch the “planting” at all. Then I begin to water the breeding site with water using the sprinkling method.
This breeding method is waste-free. If after a trip to the forest you still have trimmings of spoiled mushroom caps, do not rush to throw them away. Prepare “mushroom seedlings” according to my recipe. If it doesn’t take root, there’s nothing to worry about – you’ll add useful fertilizer to the soil.
For “seedlings” of mushrooms, overripe caps are best suited - they will contain ready-made spores. There is nothing to worry about if they are wormy - when soaked, the pests will emerge. It is best to place the mushroom mass in heated and dechlorinated water.
A little secret: you need to start a process similar to the fermentation process in the stomach of a forest animal that feeds on mushrooms - it is this that “revives” the spores. To do this, I add a couple of spoons of sugar, dry yeast or leaven and start fermentation. During soaking, do not forget to stir the mixture with a spoon.
Growing mycelium
I have already written that breeding mycelium is the most difficult, time-consuming, but also the most reliable method. I'll tell you step by step how I implement it:
- 1-2 weeks before collecting the mycelium, I prepare the substrate - I mix last year’s compost, rotted leaves and dust from an old stump in approximately equal parts.
- When going to the forest, I always take a bag filled with this soil mixture, a bottle of water, and a bayonet-shovel (I don’t forget to sharpen it well).
- I look for the variety I need by the type of fruiting bodies. If you are not an experienced mushroom picker, then first study the reference book and find the necessary images on the Internet so as not to move inedible or even poisonous mushrooms onto your plot.
- Using a bayonet-shovel, I remove the forest substrate 10-15 cm in diameter from the fruiting body until I reach the mycelium, which resembles a cobweb. It often gets intertwined with plant roots, so you have to carefully cut them off (that's why I sharpen the shovel).
- I take the mycelium along with a large lump of native substrate and place it in a bag with prepared soil mixture. It is important that it is poured in a deep layer.
- I moisten the mixture a little with water from a bottle.
- Then my task is to bring the mycelium to the garden as quickly as possible.
Mushrooms love the same substrates as in their native forest. In most cases - light, breathable, drained. But not over-moistened, caked, or heavy. Having decided on the landing site, I proceed as follows:
- At a distance of 40-60 from the trunk of the symbiont tree, I remove the top layer of soil (25-30 cm).
- I fill the bottom of the hole with a mixture of humus, plant residues, and wood dust.
- I carefully place the mycelium on this bedding.
- I sprinkle it with the same layer of rotted leaves, dust and humus.
- I lightly moisten the planting site.
If the mycelium has taken root, you will notice the first signs of life within 2-3 weeks.
Growing mycelium in the garden
This method is the most professional of those listed. It is impossible not to note its simplicity, as well as the high probability of mycelium engraftment. The latter is divided into two types:
- Grain. For planting, the mass is mixed with compost or garden substrate.
- Compost. Fill with water, stir until the consistency of sour cream, and then plant.
I recommend proceeding with your purchase according to the following instructions:
- Buy mycelium on a specialized website or at a gardening store. Carefully study the annotation to it - whether the “seed material” is suitable for your region and the type of soil on the site. Here I prefer not to save money - I buy a little more mycelium than I need.
- Before planting, I store the mixture in the refrigerator. Before the “sowing” itself, I test its viability - I move it to a warm place for 3-4 days. If it is active, it begins to grow and smell like mushrooms. If not, it will not show signs of life and will be enveloped in a sour smell.
- I choose a place for planting - in partial shade, on the roots of trees. I remove the top layer of the substrate by 30-40 cm. At the same time, I retreat from the tree trunk by about half a meter. The area of the recess depends on the volume of purchased mycelium.
- At the bottom of the hole I place a mixture of humus, tree dust, sawdust and ash (15 cm). Then - a thin layer of fertile black soil.
- I place the mycelium on the mat, distribute it, and smooth it with my hands. For better engraftment, it even needs to be compacted into the ground a little.
- I cover it with the same soil mixture, a layer of rotten leaves, and lightly water it.
The mycelium does not require special care in the future - only watering (by sprinkling) every 2-3 weeks. If the summer is rainy, then additional water procedures are not required.