17959
Beautiful and delicate clematis look perfect in any garden, combined in contrasting colors with roses, annual flowers, herbs and conifers. These plants are quite fragile and sensitive, so the gardener needs to know exactly how and when to replant clematis in the fall and spring, and also properly care for them throughout the year. Only by ensuring timely watering, nutrition, lighting, tying and pruning will the wonderful clematis flowers decorate the garden from year to year.
A change of location is required when there is excessive growth and aging.
In terms of variety of shapes and colors, the vine can compete even with representatives of tropical species, so it turns out to be spectacular in a garden of any size - from the smallest front garden to a large park.
In what cases is it necessary to replant clematis?
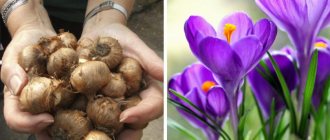
- If the bush begins to fade, despite all the rules for caring for the plant being followed. This is mainly caused by two reasons. The first is that clematis is growing excessively, and moving this flowering vine to another segment of the territory is the only way to preserve it. The second is damage by some pest. Most often these are fungal diseases of the root system due to excessive soil moisture. In both cases, during the process of transplanting clematis in the fall, a number of additional measures are carried out.
- When changing the layout of the site, and, consequently, its landscape design.
- It happens that initially (in spring) the place for planting this flower was chosen incorrectly. For example, all the features of the development of clematis and the nuances of the decorative design of the garden are not taken into account. The reasons can be very different.
- To rejuvenate old flowers. Transplanting clematis to a new location contributes to this. The only difficulty the gardener faces is the difficulty of separating the planting material from the main bush, since its root system is highly intertwined.
Particular care must be taken with first-year plants and hybrid varieties. It is recommended not to touch them at all, and if they are replanted in the fall, then only in case of emergency.
Read about how to plant clematis here.
Caring for clematis in the spring at the dacha
Proper care of vines ensures abundant, long-lasting flowering. Clematis does not require anything supernatural, but it is necessary to repeat the main points.
Removing cover
You can open clematis in the spring after the snow melts, but it is more advisable to wait for the onset of stable warmth. For the middle zone this is April (middle). As soon as the shelter is removed, the plant is treated against fungal infections and fed with ammonium nitrate.
Watering and loosening
Clematis needs a lot of water, so watering is done often. A special feature is not too much moisture. The main criterion is to prevent the soil from becoming waterlogged or dry out. For an adult plant, 2-3 waterings per week with a volume of 3-5 liters are sufficient.
Loosen the soil the next day after watering; if the circle around the trunk is not mulched, then weeds should be removed at the same time. Loosening is necessary within 3-4 months after planting. Then it must be stopped to avoid damage to the roots.
Top dressing
In the first year, clematis seedlings are not fed, but only if there was enough compost, ash and humus at the time of planting. Next spring, clematis needs nitrogen fertilizers, but in normal quantities. Otherwise, a lot of green mass will grow, and flowering will be weak. For acidic soil, watering with lime milk is required. Before flowering, the vine needs complex phosphorus-potassium feeding.
Trimming
Spring pruning of clematis has a sanitary function. Last year's shoots are cut back to the first bud to stimulate the growth of new ones. Similar drastic pruning is repeated next spring. The following pruning is performed strictly according to the type that corresponds to the type of vine.
Garter
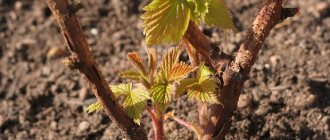
When planting, support is provided for clematis shoots. At the end of spring, the shoots grow by 10 cm every day. To protect the vine from mechanical damage, you need to tie the lower part of the vine as close to the ground as possible. This will prevent the possibility of infection from entering. It is most effective to arrange the vine in a fan. By changing the slope of clematis, you can regulate its flowering and growth.
Preventive treatment against diseases and pests
Treatments help protect plants from pest invasion and the spread of diseases. You can reduce the risk of fungal infections in early spring by spraying the bushes with a solution of Fundazol.
Be sure to burn all cut shoots. Good protection against root-knot nematodes is to mulch the area around the trunk with mint, wormwood, or apply mineral fertilizers that contain ammonia.
Slugs and snails are lured into baits and collected.
Transplant timing
Autumn is a flexible concept, especially since it is different in each area. In addition, there are opinions that it is advisable to replant clematis in the spring, as soon as the soil warms up to a sufficient depth. In principle, all the recommendations that can be found on the Internet are correct. So what should a particular gardener focus on?
Such discrepancies are caused by the fact that most authors share their experience without indicating which region they live in and all the specifics of their site - soil characteristics, lighting, airflow, winter characteristics, and so on. Therefore, the criterion for determining the best time to transplant clematis should be this - this flowering vine needs about a month to adapt well (first of all, take root) in a new place. Moreover, this should happen before the first frost, since the plant is extremely sensitive to low temperatures.
Analysis of various opinions, reviews of specialized experts and summer residents with many years of experience in growing clematis gives reason to believe that autumn replanting of this flower is still preferable. And the approximate dates are easy to determine on your own, taking into account local weather conditions and weather forecasters. Although for most regions the most suitable month is September.
Clematis in autumn
Share this article with friends:
In the fall, clematis first of all needs to be prepared for the upcoming winter. But many lovers of these flowering vines have a whole series of questions related to what can and should be done with plants at this time of year.
Here are some of them:
- How to plant clematis in the fall.
- How to replant clematis in the fall.
- Is it possible to propagate clematis in the fall?
- How to care for clematis in the fall.
Let's take a closer look at each of them. Let's start with the first one.
Selecting an area for transplantation
This is one of the most crucial moments. If you approach the matter competently, then you can forget about the subsequent transplantation of this clematis specimen for 30 years. It will develop perfectly in one place.
What to focus on:
- Good lighting. However, clematis does not tolerate excess sunlight.
- This type of vine requires a lot of space, as it grows quite quickly.
- Normal soil moisture level. Therefore, it is advisable not to choose the following areas for clematis transplantation:
- near external fences, walls of country houses, large trees, and so on. That is, everything from where water can flow onto flowers during rainfall;
- lowlands, where all the moisture is usually concentrated. For clematis roots, even short-term stagnation is detrimental;
- segments of territory in which underground water layers come close to the surface;
- places where it is not possible to provide effective drainage.
- No drafts. In clematis there is a clear discrepancy between the different parts; if the flowers are quite large and heavy, then the shoots, on the contrary, are thin. Even a moderate breeze can break off the stems.
- Any soil except high acidity. The lower limit of the pH value is 6.0.
- The acidity in the area where the clematis is supposed to be transplanted (if this is the most suitable place) can be artificially reduced. For example, organize soil treatment with lime-based compounds. Such techniques are called liming. The nuances of this technology and the dosage of the drugs applied are easy to find on the Internet.
- It is advisable that low-growing plants be adjacent to the clematis after transplantation. They will reliably cover its tree trunk circle, thereby protecting this area of land from overheating in the heat.
The procedure for transplanting a bush to another place step by step
The most difficult thing is to remove clematis from the ground and transport it to a new planting hole. Compared to this task, transplantation is very simple:
- Moderately moisten the soil at the bottom of the hole by pouring about 10 liters of water into it. When it is absorbed, rake the soil into a mound.
- At the top of this hill, make a depression into which an earthen ball will fit on the roots of the clematis.
- Treat all cuts on the above-ground and underground parts of the plant, washing them with 2% copper sulfate or a solution of any other fungicide.
- Place the clematis in the planting hole. Check the position of the root collar. If a plant is transplanted before the age of 3 years, it needs to be deepened by 10–12 cm, adult clematis - by 15–18 cm.
- Fill the hole with earth. Water the plant. After about half an hour, the water will be absorbed and it will be possible to fill the trunk circle with a diameter of about 50 cm with mulch.
Burying not only the root collar, but 2–3 growth buds into the soil ensures active branching of clematis for the next year
Video: how to properly transplant clematis
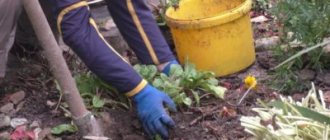
How to remove clematis from the ground
Young bushes. It's much easier to work with them. You just need to dig around the trunk circle (to a depth of at least a couple of bayonets) and carefully remove the plant along with the soil stuck to the roots. In this form, if upon inspection of the coma there are no signs of the presence of pests or rot, the clematis is transplanted to a new area.
Old-timer bushes. Some believe that it is better not to touch them, others are sure that this way they can be rejuvenated. The author adheres to the latter point of view and has done this himself more than once. Of course, you can’t count on the wild flowering of the “old ones”, and they mainly serve for the development of a new bush. The difficulty of replanting lies in the highly branched root system. To avoid damaging it, you need to dig out clematis in a circle with a large radius. Unfortunately, this is not always possible with a dense “layout” of the site. Consequently, some of the roots will have to be simply chopped off.
If clematis is replanted due to wilting, then it is necessary to treat the roots. To begin with, they are exposed, only carefully to prevent damage. After the soil is removed from them, the clematis root system is carefully examined. If there are signs of infection, these areas are removed (cut out, cut off).
It is also advisable to disinfect the roots. For example, in a manganese solution or use drugs from the group of fungicides (antifungal compounds). And after transplanting, spill the soil in the tree trunk circle with “Trichoflor” (5g/bucket) and sprinkle wood ash on top.
Preparing clematis for winter
Planting clematis and caring for it in the fall could be called an easy and pleasant task if it were not for preparing the plant for wintering, since without shelter it may die. At the end of October or beginning of November, after pruning the clematis, you need to remove leaves and plant debris from under the bush and build a shelter for the plant that is suitable for plants of this group.
Clematis that bloom on last year's shoots are hilled to a height of 30-40 cm or a bucket or two of sand with the addition of wood ash is added to their roots at the rate of 250 g per bucket so that the roots of the plant do not get wet. The scourges are carefully laid on the ground and covered with spruce branches. If you have thaws in winter, you need to lay sawdust or dry peat on top of the spruce branches on the clematis, cover it all with plastic wrap and secure it so that the shelter is not torn off by the wind. It is very important that there is an air gap between the clematis and the shelter.
- Hydrangea: an oriental beauty that loves water
With the onset of spring, the polyethylene is first removed from the clematis, then the layer of substrate, and the spruce branches and sand with ash are left until the spring return frosts have passed, and only after that the clematis is carefully lifted and distributed over the support.
Those clematis that bloom on the shoots of the current year are covered with sand to the height of the shoots remaining after pruning - 15-20 cm, after which they are covered with a layer of sawdust, peat or rotted manure 20-25 cm thick and covered with film.
Proper cultivation of clematis - planting and care in the garden
Or you can cover the clematis with sand and ash, and then cover it with snow. Under cover, plants can survive both frosts up to 40 ºC and thaws without harm to their health.
The procedure for autumn transplantation of clematis
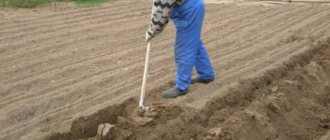
Well preparation
The approximate distance between adjacent holes is within 1 m. If this is a type of clematis with small buds, then it increases to 2.5 m. The approximate dimensions of the holes (in cm) are 60 x 60. There are different recommendations for depth. How to choose the right value?
- Firstly, the clematis itself is buried by at least 15 - 20 cm.
- Secondly, if you have to organize drainage, then you need to add about 15 cm to this layer.
The total is the above 2 bayonets. This preparation allows the clematis to take root faster and at the same time protects its lower part from freezing until the flower is covered for the winter. With the onset of warm days, such a layer of soil will reliably protect the plant’s root system from overheating in the sun.
Organization of drainage
There is no point in relying on the soil being loose enough to absorb water well. It has already been noted that its stagnation negatively affects clematis. The easiest way to drain holes is to lay broken bricks on their bottom to the specified 10 - 15 cm.
Preparing the soil mixture
It is rare in any area to find soil that is ideal for growing clematis. In addition, since replanting work is carried out in the fall, the soil should be enriched with nutrients. And if the flower moves to a segment, for example, with alumina, then additional measures are even more necessary.
What to do:
- Mix the soil from the site with any of the organic fertilizers (peat, humus, compost, dry manure, wood ash).
- If necessary (especially for dense soils), it is recommended to add coarse sand. This improves drainage efficiency.
Even if the site has good soil, it is still worth preparing it separately for clematis. It is not a fact that in the chosen place it is not depleted, or that its acid-base balance is not disturbed.
It is recommended to make the mixture in the following proportion (per 1 hole): soil + mineral fertilizer (150 g) + lime and wood ash (1 and 2 cups, respectively).
Second option: mix (in parts) compost (2) + sand (1) + peat (1).
Installation of the support structure
On the issue of its necessity, explanations have already been given - so that future clematis stems do not break. It needs to be installed during the process of replanting the flower, since it will be difficult to do this later due to the risk of damage to the root system of the plant. It is placed in the center of the hole, since young shoots (and in the spring they are still thin and weak) must immediately rest on something.
Placing clematis in the ground
- The prepared soil mixture is poured onto the drainage with the expectation that a layer of about 5 cm will form. But this is in favorable soil with good drainage.
- The planting material is placed in the hole so that not only the root neck, but also at least 2 more buds are below ground level. This way the seedling will bush better.
- The clematis roots are carefully straightened. If they are very tangled, you can use a thin wooden peg or something similar.
- The hole is filled with prepared soil. It is advisable to do this in stages. The roots themselves are covered with a mixture of sand and wood ash (about 5 cm), and the mixture is loaded into the hole from above. This is one of the most common options when transplanting clematis in the fall. Firstly, drainage in the root system area is improved. Secondly, its direct contact with fertilizers is excluded, which, if the dosage is incorrect when preparing the soil mixture, can burn the roots.
- The shoot protruding from the ground is pruned to a level sufficient to conveniently cover the plant for the winter. Most often there are recommendations up to the second bud located above the ground. As practice shows, this is the best option.
- Mulching the tree trunk circle.
After completing all agrotechnical activities, clematis should be lightly watered. That’s it, the process of replanting it in the fall can be considered complete. Next is shelter for the winter; this topic is discussed in detail in this article.
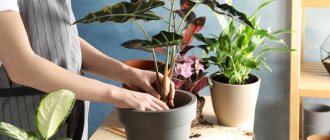
Reproduction of clematis by division, layering
An old plant can be replanted in parallel with division. A large bush is carefully dug up and divided with a knife or hatchet into groups with several shoots. They need to be planted as quickly as possible, as they do not tolerate drying of the roots well. It is better to do this in spring or autumn, because in summer the vegetative plant will be very sick.
Video about division.
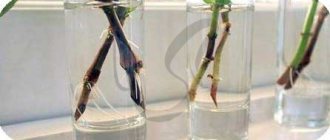
Clematis are cut when the buds form, around May or June. Step-by-step instruction:
- Cuttings are taken from the middle, mature part of the shoot, mainly with one internode and two full buds. 1-2 cm of shoot are left above them, 3-4 cm below it.
- Root in light soil or in a neutral composition - perlite, vermiculite, in cups, pots or in open ground. In the latter case, the seedlings are placed in the shade of trees. In all cases, provide proper watering and shelter in the form of a small greenhouse.
Harvesting cuttings
- When the plants sprout, the greenhouse is gradually opened slightly, accustoming the cuttings to more harsh conditions. After watering, the young plants are mulched; the tops of those that have grown to a height of 10-15 cm are pinched off so that they do not stretch into one shoot, but form a lush bush.
- The seedlings are transplanted to a permanent location next year. In the first season they must maintain contact with the maternal root. For the winter, young seedlings in open ground will have to be insulated so that they can survive the cold. The seedlings are sprinkled with earth, peat and covered with spruce branches.
It is even easier to propagate clematis by layering. To do this, a healthy shoot from last year is dug into a groove several centimeters deep, pressed to the soil with “slingshots” and watered regularly.
Buried layer
By autumn, a separate plant with its own root system develops from each internode. The ends of the cuttings (20 cm) are not covered, but pinched after new shoots begin to grow from the buds. Young plants are planted next spring without damaging the young root system.