Loading…
Loading…
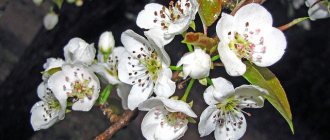
Admire the Talgar beauty pear in front of you - descriptions and photos cannot convey the taste and aroma of the fruit. But imagine the warm heaviness in the palm of your hand and the aroma emanating from the ripe fruit. This miracle is stored all winter and becomes even tastier. Just don’t be late with harvesting. Plant the Talgar Beauty pear variety in your garden - this tree has many advantages!
Description and distinctive features of the Talgar Beauty variety
Talgar beauty is a fast-growing variety of domestic selection
To develop this variety, seeds obtained by pollinating the Forest Beauty pear were used. The author of the culture is A. N. Katseiko. The variety has a breeding number - 1–20/13 and is zoned in the North Caucasus region. The Talgar beauty is widespread in the Stavropol and Talgar regions, as well as in Ukraine.
The characteristic features are as follows:
- A medium-sized tree with a pyramidal hanging crown, grows up to 3 m.
- The bark is prone to peeling and has a gray color. Medium foliage. The shoots are straight, there is no pubescence.
- The buds are conical, large, and not covered with hairiness. The leaves are a rich dark green color, have a smooth surface, and are slightly concave. The shape of the plates is egg-shaped, the edges are jagged. The ovaries are formed on the ringlets.
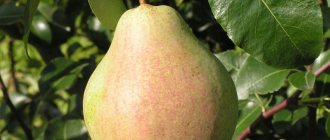
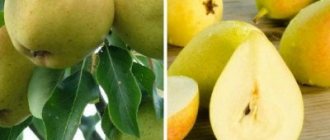
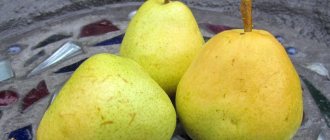
- The fruits are large, their weight is 140–200 g. In isolated cases, pears weigh 250 g. They have an elongated bottle shape. The skin is oily with a shiny surface. The color is yellow, a significant part of the fruit is covered with a red blush. Subcutaneous points are green. And on the part of the fruit that is illuminated by the sun, they acquire a white color.
- Some fruits do not have a funnel, while in other pears it is very small. The saucer is relatively narrow. Open cup.
- The pulp has a cream color. It is juicy, fine-grained, crispy. The taste is sweet, there is a characteristic aroma. According to the tasting scale, it is rated 4.6 points out of 5.
A distinctive feature of pears is their high resistance to drought and frost resistance. In addition, the variety resists fungal infections well.
Video: review of an adult tree
Advantages and disadvantages
The variety is famous for its impressive number of advantages
Talgar Beauty has a significant number of positive properties. But the disadvantages of this pear are minor.
Table: strengths and weaknesses of the variety
| Positive traits | Flaws |
| Sweet taste | Loss of taste and formation of dark spots on fruits when harvested late |
| Attractive appearance and large fruit size | Crispy flesh |
| Winter hardiness | |
| Drought resistance | |
| Good transportability | |
| Long shelf life (until February) | |
| Immunity to scab | |
| Early pregnancy (4–5 years) | |
| Regular fruiting | |
| Resistance of ripe pears to shedding |
Video: review and characteristics of ripe fruits
Description
The variety is characterized by trees of medium height with a crown of medium density with long hanging branches. The bulk of the fruits are formed on the ringlets.
Fruit characteristics
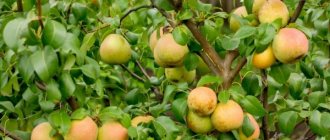
The fruits of the Talgar pear are much larger than average, weighing about 180 grams. Always level, regular pear-shaped, with a slightly beveled tip. There is no rustiness on the skin at all. The pulp is creamy, medium-dense, with a rich sweet taste. The collection of Talgar pear fruits begins at the end of September. If refrigerated, pears can be stored until February.
Fruiting is stable and very abundant. The fruits are set in whole clusters.
Pollinators
The description of the variety states that Talgarka is self-sterile, so pollinators must be planted next to it. For example, The Conference or Clapp's Favorite.
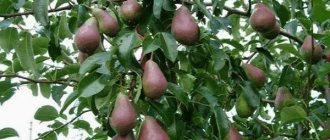
Photo of a Talgar beauty during the fruiting period.
Landing Features
Talgar beauty will bear fruit in the presence of pollinators
Talgar beauty is an unpretentious crop that takes root well even in unfavorable conditions. However, it needs pollinators. The varieties Lyubimitsa Klappa, Conference and Hoverla are suitable for this.
Planting can be done in spring in the second half of April or in autumn from early September to mid-October. In the first case, during the summer period the plant will have time to strengthen, which will help it endure the winter more easily.
Important! But for the southern regions this method should not be chosen. In hot climates, a young tree may suffer.
The second option also has its advantages and disadvantages. By autumn, a significant amount of moisture accumulates in the soil, which contributes to good survival of the tree and its intensive development in the spring. Also during this period there is a large selection of seedlings. But at the same time, trees planted in autumn are more difficult to protect from rodents. In addition, there is a possibility of freezing of the roots.
Important! If fruit trees were previously grown on the site, pear trees can only be planted after 4–5 years.
To successfully grow pears on your site, several key requirements should be taken into account:
- The tree needs to choose sandy or loamy soil with an acidity pH of 5.0–6.5. The groundwater level should not exceed 2–3 m.
- Areas with peat, sandy and peat-bog soil should be avoided as they are unsuitable for pears.
- It is also necessary to ensure that moisture does not accumulate in the selected area.
- The culture should receive plenty of sunlight.
- Seedlings should be placed every 4–5 m, and at least 3 m should be retreated from buildings.
It is advisable to buy seedlings from a specialized nursery
For planting you need to select an annual or biennial plant. You can determine the age of a tree by external signs:
- in the first case, the height of the pear is approximately 1.2 m, in the second - 1.5 m;
- a two-year-old seedling has trunk branches, at least three side shoots 25–30 cm long and a central conductor.
The thickness of the trunk should not be less than 1 cm. If the root system of the plant is covered with growths, it is better not to purchase it. Also, you should not buy dried seedlings. Wrinkled bark indicates that the tree was dug up a long time ago.
Important! You can pinch off a small piece of bark. A healthy tree has a green layer underneath. Brown color is characteristic of a non-viable seedling.
The pit for planting must be prepared in advance
Before planting, you need to prepare a hole 50–60 cm deep and 100 cm wide. The soil should be removed in layers: remove the top fertile soil and throw it to one side, and the bottom soil to the other. Then fertilizers are added to the hole. The process is completed within a week for autumn planting or in the fall if the work is planned for spring. You can only use the top layer of soil 30 cm thick. It is mixed with two buckets of compost, a similar amount of sand, a glass of superphosphate and 3 tbsp. l. potassium sulfate.
Important! For better air exchange, it is recommended to loosen the bottom of the pit with a pitchfork and make notches on the walls; do not smooth them with a shovel.
For pears you need to choose fertile soil
The landing itself is done as follows:
- A wooden stake is driven into the prepared hole at a distance of 15 cm from the middle. Such support will help the seedling to form a trunk correctly. Nutrient soil is poured into the bottom in the form of a mound.
- If there are dry shoots on the seedling, they should be cut off with pruning shears.
- The tree is then placed in the hole. The root collar (the place where the trunk meets the root part) should be placed 3–4 cm above the surface level, since the soil is prone to subsidence.
- Now the hole can be filled with nutrient soil. In this case, it is recommended to shake the plant a little to prevent the formation of voids.
- Next, lightly trample the soil and water the pear with 20–30 liters of water. To do this, dig a hole around the tree at a distance of 20–30 cm, which is then sprinkled.
- The tree trunk area is mulched with humus, sawdust or peat.
- Finally, the pear is tied to a peg.
Video: rules for planting pears
Tree care
After all planting work is completed, the tree will need some care: watering, fertilizing, pruning. Timely implementation of all activities will allow you to enjoy a generous and tasty harvest in the future.
Watering rules
Watering is an integral stage of tree care
When watering, you need to moisten the soil to a depth of 50–70 cm, since moisture absorption by the roots occurs precisely at this level . To achieve the desired result, a certain amount of water should be used. And also prepare 10 cm deep grooves around the plant, which are dug along the projection of the crown. It is not recommended to apply moisture to a flat surface. Watering can also be done mechanically. It consists of using rotating sprayers that spray droplets, creating a rain effect. After watering is completed, the grooves are filled up, and the surface of the soil is covered with a layer of mulch 10 cm thick. This will help prevent the evaporation of moisture and the appearance of weeds within the tree trunk circle.
Table: pear watering schedule
| Period | Water consumption |
| After flowering | 50 l per 1 m2 |
| At the stage of ovary formation | |
| After harvest | |
| In October or early November | 100 l per 1 m2 |
Fertilizer application
Systematic feeding of pears will allow you to enjoy a tasty and abundant harvest in the future.
Every year the pear is fed with mineral compounds and every three years with organic matter. Fertilizers are supplied into ring holes 30 cm deep.
Table: feeding schedule
| Application stage | Nutrient elements |
| After flowering, then after 2 weeks | The tree is sprayed with a solution of 20 g of urea and 10 liters of water. |
| During spring digging and in mid-June | Ammonium nitrate: 50 g for a tree up to 2 years old, 70 g up to 4 years, 100 g up to 6 years, 150 g up to 8 years, 200 g up to 10 years, then 300 g each. Fertilizer is applied to the tree trunk area when loosening the soil . |
| In September or early October |
|
Tree pruning
Scheme of pear crown formation
In order for the pear to have the correct crown shape, thereby increasing the volume of the harvest, it needs pruning. The scheme is as follows:
- In spring, pruning is done before buds open. The temperature should not fall below 8 ° C, since under these conditions the pear tolerates this procedure better.
- A year after planting, the conductor is shortened by 25 cm. Then, 5–7 developed lateral branches are selected from the crown, located at an angle of 50. Excess shoots are cut into a ring, since at this level there are tissues that have the ability to quickly recover.
- In the fall, during October, damaged and diseased shoots are removed.
- Next, the lateral increments are shortened annually by a third, and the conductor by 20–25 cm.
- You also need to remove branches growing in the inner or upper direction.
Damaged areas are treated with garden varnish to speed up their healing. You can buy it ready-made or make it yourself. To do this you will need 200 g of wax, 100 g of rosin, 100 g of animal fat. All components must be melted over low heat, mixing into a homogeneous mass. Then the composition is simmered for 10 minutes and allowed to cool. Garden varnish is stored in oiled paper.
Video: pruning workshop
Preparing for winter
After leaf fall, the pear is prepared for winter:
- First, plant debris is removed.
- The soil around the trunk is watered, dug up to a level of 15–20 cm and mulched.
- The surface of the trunk and side shoots is cleaned of non-viable bark, sprayed with a disinfectant solution of 600 g of iron sulfate, after which the cracks are sealed with garden pitch.
- Then they are covered with whitewash with a layer of 2–3 mm. The mixture is prepared on the basis of 2 kg of lime, 400 g of casein glue and 400 g of copper sulfate.
- At temperatures below -30°C, it is recommended to wrap the barrel with burlap.
Growing rules
Main activities when growing pear trees:
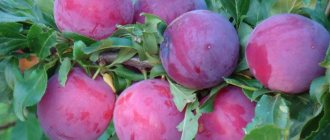
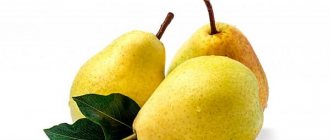
Ripe pears of the Talgar beauty variety, ready for picking
- Watering. As the soil around the seedling dries out, it is watered at the rate of 2-3 buckets per tree. Adult plants are watered in June, during the period of active growth, and in August, during the fruiting period. Water consumption per tree is 25-30 buckets. The best way to water trees is with a sprinkler.
- Mulching. The tree trunk area is covered with wood ash, peat or sawdust every year. In summer, mulch prevents moisture evaporation, and in winter it serves as a warming cushion.
- Feeding . In the spring, in the second year of planting, the seedlings are fed with saltpeter (15 g per 1 m2). And in the fall, add a mixture of humus (5 kg), superphosphate (50 g) and potassium salt (40 g). To do this, make a trench around the trunk and add fertilizer mixed with soil into it. Regardless of the stage of tree development, such fertilizing is carried out annually.
- Trimming. From the second year of life, a crown is formed for the plant. First, select the most developed side branches that grow perpendicular to the stem, leave four of them, and cut off the rest. The branches are cut so that their ends are at the same level, and the central conductor rises 20-30 cm above them. After pruning, the sections are treated with garden varnish. Trees are pruned in early spring, before the sap begins to flow.
- Covering . Before frost, the trunk of a young tree is treated with lime or special paint and insulated with agrofibre, cotton cloth or paper. This will protect the trunk from cold and rodents. In spring, whitewashing is repeated to protect the plant from sunburn and parasites.
- Protection. To prevent diseases and repel pests, every year the pear is sprayed with a 3% solution of Bordeaux mixture or iron sulfate.
Talgar beauty is a grateful plant, and with proper care it can please with the first fruits (3-5 pieces) already in 2-3 years of life; the plant bears full fruit in 4-5 years.
Diseases and pests
Talgar beauty is resistant to scab. But with proper care it can resist other fungal diseases.
Table: diseases typical for the Talgar beauty
| Diseases | Symptoms | Treatment options | Prevention |
| Bacterial burn |
| The tree must be destroyed and the soil treated with copper sulfate (3 tablespoons per 10 liters of water). |
|
| Rust | Formation of orange round spots on the upper side of the leaves. | Spraying before flowering and after completion of this stage with a 1% solution of colloidal sulfur or Bordeaux mixture. | Removing and burning fallen leaves. |
| Black cancer | The appearance of dark depressed spots, cracks on the bark, drying out of the bark and death of shoots. | Removing damaged bark and treating the wood with 1% copper sulfate. | Whitewashing the trunk, preventing damage. |
Diseases of culture (photo)
Bacterial blight affects foliage and young shoots
Pear rust appears on the leaves Black cancer provokes the death of shoots
Table: pear pests
| Pests | Signs of damage | Destruction methods | Prevention measures |
| Aphid |
| Treatment before bud break with Karbofos (60 g per bucket of water). |
|
| codling moth | Formation of round holes in the fruits and rotting of the pulp. | Spraying with the insecticide Aktara (8 g per 10 l) or Aktellik (2 ml per 2 l). | Destruction of fallen leaves and fruits. |
| Medyanitsa |
| Burning of plant residues. |
Photo gallery: insects attacking a tree
Medyanitsa leads to wilting of leaves and fruits
The codling moth spoils the harvest
Aphids oppress pear leaves, slowing down its development
Harvesting
From the fruits of this variety you can prepare desserts, baked goods, preserves and jams, drinks and other goodies.
The fruits reach ripeness in late September, and they reach consumer status during October-November. The pears are placed in boxes, the bottom of which is covered with paper, after which they are sprinkled with wood shavings. They are laid diagonally or in a checkerboard manner. The rectangular method should be excluded, since it does not protect the fruits from pressure. Fruits are laid in 2-3 layers. The top row is covered with paper, then sprinkled with shavings, then again with paper.
In the basement or cellar, the storage period for pears is two months. At 0–2°C and humidity 85–90% they can last until February. The shelf life can be increased by removing pears when they are not ripe. The fruits of the Talgar beauty are distinguished by their strong placement on the branches; they do not fall off even in strong winds.
Compotes, jams, and baking fillings are prepared from pears of this variety. They are canned and consumed fresh.
Important! Despite the fact that the fruits of the Talgar beauty are well retained on the shoots, it is not recommended to harvest later than expected, since overripe pears lose their taste and the flesh becomes brown in color.
Reviews
Ekaterina Samoilova, Moscow
At one time, I didn’t believe the words of experienced summer residents and fell for the description of the Talgar Beauty pear variety and photos with reviews of the fruit as very sweet and juicy. One winter was very warm and the tree survived it, but the next one was frosty. I no longer have Talgarka. This is partly my fault. I should have wrapped the pear tree for the winter, but I didn’t think about it. People advise grafting Talgarka onto a rowan tree to prevent the roots from freezing, and insulating the pear scion for the winter. I'll try this method.
Silestina Mironova, Krasnodar
I really liked the Talgarka pear from the description and photo. And the reviews were quite good. So I bought myself a dozen pear seedlings of this variety, since I have a large garden. Only 7 survived. The trees were two years old, so the wait was relatively short. At the age of five, pear trees brought me my first harvest. The Talgars really turned out to be as they are described. And the trees bear fruit every year. At the same time, there is always a lot of fruit on them. I had to establish connections with sellers at the market so that at least part of the harvest would be taken away.