Loading…
Despite the fact that currant planting material is sold in nurseries, many people prefer to propagate it themselves. This is especially true for the most valuable specimens. When cutting
Loading…
in one year they get the required number of new bushes that have all the advantages of the mother plant. There are several effective ways to propagate this crop:
- rooting of lignified cuttings;
- propagation by green cuttings;
- rooting of cuttings.
Hello, dear readers!
If you want to replace old currant bushes that are already poorly bearing fruit on your plot or simply increase the number of bushes on your plantation, then you do not have to buy seedlings from nurseries.
You can propagate your favorite currant varieties yourself, while significantly saving your budget.
In addition, you can always ask for a few branches of the varieties you like and have already tested from your friends or neighbors. I don't think they will refuse.
Now let's talk about what methods of propagation of currants and briefly get acquainted with them.
For gardeners, the problem of currant propagation in modern times is much more acute than even a few years ago. New diseases are emerging and dangerous pests are becoming more active.
To get and collect a lot of fragrant berries, you need to pay close attention to this event.
- Remember - a rich harvest begins with healthy seedlings obtained through competent selection!
Currants are bred in various ways, and although this process is not so complicated, many gardeners, especially beginners, make a number of mistakes in the reproduction of the crop.
Our article will help you understand the choice of method for obtaining strong young animals.
Peculiarities of propagation of different types of currants
There are a number of subtleties and nuances when propagating different varieties of currants. If they are engaged in black, then all methods of reproduction are suitable. There are also species that require exclusively dividing the bush or planting a partner for pollination.
You should carefully select a method if you decide to propagate red and white currants.
Complications arise when working with old or golden ones, since these types are sensitive to all measures:
- Red variety. The best method of propagation is from lignified branches. The procedure is prescribed for the summer, when the cuttings have green leaves.
- Black currant reproduces well by all propagation methods.
- It is recommended to plant the white species with lignified cuttings. Select the middle of the shoot of annual shoots for planting. The time of work is autumn.
- Old shrubs are propagated by dividing the bush. Choose shoots that are between one and three years old.
Propagation of currants by seeds
Experienced gardeners do not recommend growing black-eyed beauty using this method; seed selection is used by specialists to develop new species.
The culture obtained from seeds is not stable in terms of its own biological characteristics: the taste and size of the berries can deviate in any direction (most often for the worse).
As a rule, seedlings do not receive the qualities of the mother plant.
- But you can experiment! This method helps you acquire improved, new plant configurations for your garden plot. Subsequently, they are bred vegetatively.
When the bush begins to actively bloom, shake it often (but very carefully). By doing this you will achieve better pollination and an increase in the number of ovaries, fruits and seeds for currant propagation.
The action plan is:
- In the summer season, we look for bulk berries and select the strongest and largest ones.
- We wash the fruits under running water and soak them there for some time.
- We carefully select the seeds, place them on a paper sheet and dry them well.
- We hide the seeds until the spring season.
- In March, we begin to prepare the material for sowing: soak it for 20 minutes in a weak solution of potassium permanganate.
- They are sown in a wooden container/box filled with fertile soil.
- Immediately after sowing, cover them with a layer of soil, water them and cover them with film (you can use glass). We put it in a shaded place.
- We regularly wipe the glass or film from condensation and moisten it by spraying.
- As soon as we see young shoots, we remove the covering. We move the containers closer to a bright place and keep them at room temperature.
- When the currant cuttings reach a height of 15 cm, we plant them in different pots.
- After the onset of stable warming (the second decade of May), young currants can already be planted on the plot (before planting, the plants are hardened off 8-10 days, arranging for ventilation).
We prepare planting holes measuring 40x40 cm and place them in one row, a meter apart, in a sunny area.
As soon as the sprouts are planted, water them generously. We moisten our plantings until the seedlings take root and begin to actively grow.
General tips: how to plant and grow currants
Everyone understands that planting a blackcurrant bush is not enough. We still need to make a lot of effort to grow shrubs that will give a generous harvest.
To do this, you must fulfill a number of conditions that blackcurrants impose on the environment:
- illumination;
- smooth terrain;
- weeding;
- application of organic and mineral fertilizers;
- mulching;
- annual pruning;
- abundant watering;
- foliar feeding.
Competent and timely care will lead to active growth and development of black currants. Then the bush will give a decent harvest of berries and will live long and fruitfully.
5 / 5 ( 1 voice )
Propagation by lignified cuttings
This method is much more efficient and effective. With its help, it is possible to obtain several magnificent, strong petioles from one annual branch at once.
Cuttings are collected in spring and autumn. In the spring, currant propagation is usually done along with pruning the bush.
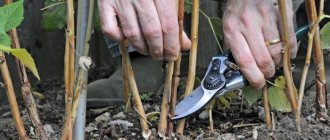
Cuttings are cut only from healthy annual shoots. We are looking for branches with a diameter of 6-9 mm and a length of about 25-30 cm for pruning.
The branches should have healthy, undamaged buds. Cut the branches with a sharp knife or pruning shears at a distance of 1 cm above the bud (apical cut).
We also need to completely remove the non-woody top. The part under the lower bud is cut off with an oblique cut.
- Propagation of currants by cuttings occurs by the formation of roots in the area between the cutting nodes and the buds.
The material is planted in a “cutting box” prepared in the fall (it looks like a V-shaped pothole). The pit is filled with a mixture of fertile soil, rotted manure and compost.
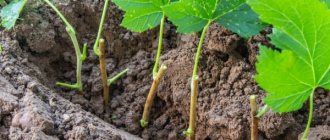
Cuttings are planted in early spring 20 cm deep (2-3 buds should remain above ground level), a distance of 10-15 cm is maintained between each seedling.
- Before planting, the soil is carefully dug up and moistened (wet soil promotes faster development of roots). The surface is mulched with rotted humus or peat to a layer of 3-5 cm (mulch will perfectly retain soil moisture).
Helpful advice. You can use a dark film to cover the plantings. It will save not only the moisture of the soil, but also protect the young cuttings from weeds.
Holes are cut into the covering over the young seedlings to monitor the propagation of currants and their development.
- This is how blackcurrant varieties are bred. But it is better to postpone the selection of red species to the beginning of October. If you propagate red currants later, you may lose some of the planting material.
When planting seedlings in spring before the start of autumn, gardeners receive already well-formed young shrubs.
They are transplanted from “cuttings” to their permanent place. Weaker plants can be left for next season.
Planting cuttings
If you harvested currant cuttings at home, you can think about the planting site, fertilize and prepare it in advance. The main condition: space (at least one and a half meters), which the culture loves.
The hole preparation must correspond to the dimensions: 30 by 40 by 30 and 40 cm. The depth varies depending on the length of the root, but 35-40 cm is considered the standard.
Before planting, the bottom of the planting hole is sprinkled with potassium-phosphorus fertilizers. We must not forget that during soil preparation there is already organic matter. The composition of fertilizer mixtures is selected depending on the type of soil.
The currant seedling should be placed in the hole at an angle (45 degrees) and filled up. Compact the embankment with your hands so that no air gaps form.
Propagation of currants by green cuttings
If you haven’t kept up with breeding the beauty with woody petioles, it doesn’t matter. It is possible to hold such an event with non-lignified green branches.
Please note that the desired material must be flexible enough to not break when bent. The reproduction procedure is carried out in the following steps:
♦ Material procurement. It is best to go looking for twigs in the early morning on cool days.
If the weather is cloudy or rainy, it allows you to prepare cuttings for propagating currants at any time.
The length of the branches should be at least 15 cm with 3-4 leaves.
- Place the upper edge above the bud outermost from the top of the shoot (2 cm above it), the lower edge - under this bud a little lower. When you plant the branch in the ground, trim off the lower leaves.
Before planting, you need to soak the planting material in a growth stimulator (you can use butyric indolinic acid or “Heteroauxin”). We keep our shoots in this composition for about a day.
♦ Planting cuttings and care. The branches need to be planted in greenhouse conditions under a cozy film.
We plant the petioles 4 cm deep in the soil. The soil consists of equal parts of peat, sifted sand and mature compost. After planting, cover the seedlings with plastic bottle tops or glass containers.
- Our cuttings need to be sprayed regularly (they need constant, high humidity). Every day, moisten the shoots themselves 5-6 times when propagating currants for 3 weeks.
Hide the young plant from the sun's rays for the first time. After a few weeks, the cuttings will take root firmly.
At this time, we will reduce the frequency of watering and begin to feed the plantings with nitrogen-containing additives.
After a month, the young seedlings can already be exposed to the sun (opened).
The petioles are grown in planting holes in the spring, and by autumn they can already be transplanted to a personal plot.
This method is used for breeding aromatic berries of any kind.
Reproduction of black currant by cuttings, layering, dividing the bush, in spring, autumn and summer
Many years ago, relatives who are fond of gardening brought me a good blackcurrant bush. They said it was the Golubka variety. We really liked the currants - there are a lot of berries, they are large and sweet.
I managed to propagate it to 10 bushes (there was simply no room for it in my small plot near the house). My fellow villagers stood in line for my currants. I was happy to distribute rooted cuttings, but for some reason no one accepted them, or they did not grow well.
Almost all summer residents grow currants.
There are several reasons for this:
• The berry is tasty and loved by everyone;
• Benefit for health;
• Use for compotes, jams, pie fillings, etc.;
• Unpretentiousness in cultivation and care.
By the way, I tried to plant currants in the dacha, there was plenty of space there, but they didn’t grow. Which bushes began to produce small berries, incomparable to the mother bush. I think there are two reasons for this: different land, less suitable for black currants, and lack of watering.
Now we are dealing with water supply issues at the dacha, and I am again thinking about expanding the currant plantation; after all, it is in demand and provides a good income, which is far from unnecessary in our family.
Propagation of currants by apical cuttings
The green apical petiole is the upper part of the young annual growth. This method of reproduction is quite complex and troublesome.
To successfully carry out such an event, you need soil prepared in advance and special equipment capable of creating in the place where the petioles will live an air humidity of 90% and soil humidity of 80%.
- For the soil, it would be ideal to use a mixture of sown purified river sand and peat in equal parts.
The prepared substrate is laid in a layer of 3-4 cm on peat-humus or turf-humus soil.
The process itself occurs in the following stages:
- Procurement of material. Petioles for propagating currants need to be prepared at the moment when one-year-old shoots acquire the necessary flexibility. The best time for this is the beginning and second half of June.
- Cutting. The necessary branches are cut off early in the morning. They are kept moist until planting. The length of the planting material should be about 10-12 cm. The lower cut is made under the nodal bud (where the wood feels denser to the touch).
- Rooting. Planting of petioles is carried out in a greenhouse or greenhouse. Under favorable living conditions (the required air/soil humidity), roots will begin to form within two weeks.
- Care. We water young shoots often, make sure that not only the soil is wet, but also the plant itself (spray regularly). As soon as our roots begin to grow, the intensity of watering should be reduced, but watering will have to be more abundant. During this period, increase the time of ventilation of the plantings.
A month after planting, the seedlings will begin to actively grow. At this time, they need to be fed with liquid fertilizers once every 2-3 weeks.
You can use complex additives (“Zdraven Turbo”, “Fertika Lux”). They are diluted in a teaspoon per 5 liters of water.
Gradually the concentration should be increased (up to a tablespoon per 10 liters of water).
All feeding should be stopped in mid-August. And next fall (stronger petioles can be planted in summer or spring) our shoots will be transferred to their permanent place in the garden.
Don’t forget to prepare the planting areas with the dressing mixture and water the young currants generously at first.
Growing planting material in winter
In winter, lignified cuttings prepared in the fall are rooted. All types of currants reproduce well in this way. The method is good, but too troublesome; in winter there is barely enough time to grow seedlings of vegetables and flowers. However, very good strong seedlings grow from winter cuttings. The planting material prepared in the fall is heated for 6-7 hours at room temperature, then placed in water and placed in a bright place, but protected from direct sunlight. After 10-12 days, roots begin to form on the cuttings. When the largest root reaches a length of 1.2-1.5 mm, the planting material is transplanted into bags (can be planted in pots, but when transplanting from a bag, the currant roots are less damaged than when transplanting from a pot), after making holes for water drainage. Rooting currant cuttings in winter. The soil for planting should be ordinary garden soil, but in no case nutritious soil (currants cannot tolerate high concentrations of salts), otherwise the rooting process will be greatly delayed. Plant without burying the lower buds; they should remain above the surface of the ground. The main thing at this time is not the growth of side shoots, but rooting. The seedlings are not covered with anything. In the first 5-7 days, water once every 2 days, the soil should be the consistency of dough. After a week, watering is reduced, bringing the soil moisture to normal, and watered as the earthen clod dries out. The seedlings are planted in early May, by which time they will have grown to 50-60 cm. The bags are cut before planting so as not to injure the roots. If currants grow in pots, then fill it with water and carefully remove the bush. The rooted cuttings are planted immediately in a permanent place. Planting is done obliquely, deepening the seedlings by 10-12 cm. Further care is the same as for adult bushes.
Selection by layering
Layering propagation of currants is excellent for breeding all varieties of the crop. The method has a very important advantage: the survival rate of seedlings in this case is 100%.
It is carried out by dropping 2-3-year-old cuttings from the mother plant in the spring.
- To achieve the best survival, the shoots are placed in dug grooves to a depth of 10-15 cm. The holes are made in the form of rays extending from the mother currant. They are carefully sprinkled with soil. The trenches are filled with a mixture of rotted humus, compost and peat in equal parts.
To ensure reliability, the cutting branches from which we want to get young plants are pinned with small wire or wooden pieces (they need to be bent in a V shape and sprinkled with soil on top).
When the young shoots get stronger, settle in and begin to grow, the potholders can be removed.
By autumn, young, not yet strong roots will produce cuttings. At this time, they should be carefully separated from the mother bush.
And next spring, transplant new plants to permanent places.
- Propagating black currants this way will only take a year to produce a new plant. But the white and red forms will need more time for this (about 3 years).
Before this important event, the soil around the shrub chosen for cuttings must be thoroughly loosened, nutritional supplements added and watered abundantly.
Reproduction of currants by layering can be carried out in three variations:
♦ Horizontal. The most common and popular methods. The event should be carried out before the leaves begin to bloom.
Select a healthy, vigorous bush that produces regularly and abundantly. Then pick up a 1-2 year old twig and bend it to the ground.
- Pre-prepare trenches for shoots (the groove should be located radially and have a depth of 5-7 cm). Fill it with a nutritious mixture of organic and mineral fertilizers.
Place the twig (the top should be cut off) in the prepared groove and pin it with a bow. Our cuttings will need to be sprinkled with soil twice:
- When the shoots grow 12-15 cm.
- 2-3 weeks after the first hilling.
Regularly moisten them by sprinkling them with damp soil (especially in dry, hot weather), remove weeds and mulch the ground.
We will dig up horizontal cuttings after they are thoroughly established in the ground and turn into independent, strong seedlings (usually this happens in September-October).
♦ Vertical. These shoots will produce more new plants when currants propagate. They begin to grow from buds located in the lower zones of the bush.
We choose a healthy crop and cut off the main part of the branches (10 cm from the soil level). Such radical pruning stimulates the active growth of fresh branches.
- The vertical version is especially suitable for growing redcurrant varieties; its branches are not so elastic and do not bend well to the ground.
As soon as the vertical layers grow more than 20-25 cm, the soil around them will need to be loosened and half-covered with well-moistened soil.
Care consists of timely loosening of the soil and watering. In the fall, already rooted plants can be trimmed and transplanted to another place.
♦ Arc-shaped. With the arcuate method, the branch for propagation is bent to the ground in the form of an arc.
The most convex arched part of the shoot is placed in a prepared trench (its depth should be about 7 cm and diameter 35 cm) and secured with arches.
The upper part of the arcuate layer does not stop its growth and development above the ground level.
In the fall, the rooted branch is cut off with pruning shears, carefully removed along with the earthen lump where the roots are located and planted in a permanent place.
The disadvantage of this method is that this method can only give gardeners one new plant.
Landing
Currants bear fruit for up to 15 years, but the peak harvest occurs in the 6-7th year of growth. Most varieties of this plant are self-fertile, but large berries ripen if several varieties are planted in one area.
The crop can be planted throughout the growing season, but experienced gardeners recommend carrying out such an event in September-October. This will allow the seedlings to take root before winter, and their growth will be activated in the spring.
Selecting a location
The choice of place for planting a crop should also be approached responsibly, since the wrong choice can negatively affect the harvest.
Primary requirements:
- moist, but not swampy place;
- location – lowland;
- lighting is bright, since not all varieties tolerate shading.
Attention! When choosing a location, it is worth considering that the crop does not like strong winds, so it is recommended to plant it along the hedge.
The choice of soil also matters. Loamy soil is a good nutrient medium for currants and promotes its rapid rooting.
Preparation of planting material
For planting material, seedlings or cuttings are used. When planting seedlings, it is recommended to perform the following steps:
- Trim the above-ground part into buds.
- Plants that were planted in the fall should not be touched until spring; the roots should be covered with soil.
- When planting in a hole, sprinkle the roots halfway with soil, water generously and fill to the top with soil.
Planting by cuttings allows you to obtain new varieties, so breeders often use it.
It is necessary to take cuttings from the shoots of annual plants or from the roots. Immediately after cutting, soak the edges of the cutting with paraffin or garden varnish. Such actions will protect the branches from moisture loss. Then divide the cuttings by variety and store them in film or paper until planting. Before planting, the edges treated with paraffin or varnish are cut off with a knife.
Important! The thickness of the cutting should not be less than 8 mm.
How to plant a shoot?
Planting of shoots is carried out as follows:
- Sort the shoots into groups by thickness and plant them evenly. Maintain a distance of at least 70 cm between cuttings. If plants are planted in rows, then the minimum distance between them should be 20-30 cm.
- Landing is carried out in a windless area.
- The soil must be watered generously before planting.
- For better growth, fertilize the soil with a layer of humus.
- After planting, compact the soil around the shoot.
Then you need to make sure that the soil does not dry out, loosen it and weed it regularly.
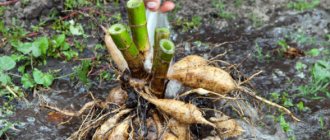
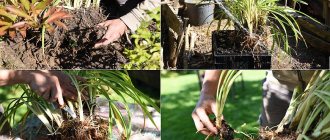
Propagation by dividing the bush
Carrying out this method of propagating currants will be more difficult than separating cuttings from the bush. But this method is faster, and the procedure does not require additional measures for stronger rooting of seedlings.
- Experienced gardeners recommend using this selection method if you need to get new plants as soon as possible, but there is absolutely no time for this.
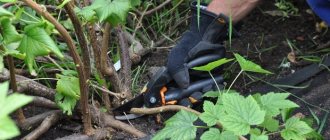
Currant bushes must be divided with a saw or sharp pruning shears, making sure that each section of the crop has a sufficient number of developed branches and roots.
And keep in mind that the chances of the separated parts of the plant taking root well are much less than with the same cuttings.
You can divide the shrub for propagation in the autumn and spring months. This is usually done when transplanting currants to a fresh place.
The plant is carefully dug out along with the root system, the roots are freed from the soil. Based on the size of the mother crop, the bush can be divided into 2, 3 or 4 parts.
- Do you know how to get a better feel for how many parts a plant can be cut into? Move the bush slightly to move the roots and branches and listen to your feelings. You will understand by vibration where those zones are located in which the bush should be pruned for propagation of currants.
Before doing this, free the crop from old, frail roots, shorten all young shoots to 30 cm.
Plant the separated parts into prepared planting areas and water them thoroughly. The harvest from new plants can be obtained after a year (currants need time to recuperate).
To more clearly present this method of propagating currants, I suggest watching a short video on this topic.
How and when to propagate currants: timing and methods
All warm seasons of the year are suitable for propagation of currants.
In other words, if for some reason you did not have time to propagate currants in the spring, then this can be easily done in the fall.
The optimal time, as a rule, depends on the chosen method of propagation of currants:
- Layers can be added in drops both in early spring (April) , when the buds are just beginning to swell , and in late summer and autumn (August-September) .
However, in the spring you can even dig in cuttings on which the buds have already blossomed (you just need to remove the leaves at the place of digging).
- Green cuttings are planted in the soil at the beginning of summer , and lignified ones - in the fall (or spring, if there is a desire to store them for winter).
- Reproduction by dividing the bush can be carried out both in early spring and late autumn
.
Advice from experienced gardeners
How to propagate currants without mistakes. If you are new to this business, remember one important rule: the healthier and stronger the offspring are, the richer and more abundant the harvest should be expected from them.
It was guided by this statement that agricultural technicians were able to develop and obtain elite varieties of currants.
Regardless of how you propagate your fragrant pets, monitor the conditions under which they are kept (get rid of weeds and pests in a timely manner, monitor temperature conditions, watering, loosening, and fertilizing).
And then your efforts and care for the black-eyed beauty will pay off in full with a bountiful, delicious harvest!
I found another wonderful video about currants, which briefly talks about all the stages of the life of this delicious berry, including its reproduction. Please have a look. In the following articles we will talk about diseases and pests of our currants.
See you soon, dear readers!
Blackcurrant: planting and pest control
Landing dates
The best time to plant currants is mid-September - mid-October. Why is spring planting worse than autumn planting? Currants enter the growing season as one of the earliest among berry crops; its buds bloom already at a temperature of +4 – +6 degrees. In Siberia, this is usually April 19-20, although there are years when the growing season begins much earlier.
Nadezhda Nazaryuk, Candidate of Agricultural Sciences, breeder
The buds are blooming, but it’s still impossible to go into the garden - it’s damp, dirty, it’s impossible to dig. Therefore, planting is postponed to the end of April - beginning of May.
Weeds are removed from the site of future currant planting, and a planting hole is prepared 35-40 centimeters deep and the same width. Before planting, add a bucket of humus to the hole; you can also add mineral fertilizers containing phosphorus and potassium.
Nadezhda Nazaryuk
Never use manure in its pure form. And never place the root system even on humus, not to mention mineral fertilizers, so as not to burn it! Be sure to mix the humus with the soil.
There is no need to overdo it with fertilizers, otherwise the plant will become fatty and you will not get a harvest.
How to plant a seedling correctly?
Currants like to plant inclined, at an angle of 45 degrees. It is better to tilt the seedling from north to south. So, dig a hole or groove, depending on how much space allows you, place the seedling in the hole at an angle of 45 degrees and deepen it 5-8 centimeters. “But this is conditional, you can deepen it by 10 centimeters,” adds Nadezhda Ivanovna
Why is deepening needed? There are no buds on the roots of black currants, unlike raspberries. If you plant a seedling high without deepening it, the currant will grow like a tree.
Nadezhda Nazaryuk
But you need to remember what currants are! Currant is a shrub. And the faster you form a bush with 20-25 branches of different ages, the faster you will get the harvest.
Nadezhda Ivanovna would have buried the seedling in this photo to the second “slingshot” from the bottom - then there would be quite a lot of buds in the ground.
Nadezhda Nazaryuk
They tilted it, buried it, covered it with soil, now it’s imperative to compact it and trample it down. If planting is done in the fall, then watering is done depending on weather conditions; If the soil is dry, be sure to water it. And if planting is carried out in the spring, then watering is required in any soil condition.
However, as Nadezhda Ivanovna says, watering will not hurt in any case - it will help compact the soil so that there are no air voids in it that can dry out.
Before planting, it is advisable to place currant seedlings, like seedlings of all other fruit crops, in water overnight, especially if planting is done in the spring.
Nadezhda Nazaryuk
Some of the seedlings that you buy from producers are stored in storage in warehouses. Of course, the seedlings lose their quality, and in order for them to be saturated with water, they need to be placed in water for a day or at least overnight.
Seedling pruning
After planting, seedlings must be pruned. Don't spare the plant! Pruning is done so that shoots emerge from the buds. With proper pruning, next year a shoot will start from each bud.
Pruning stimulates the growth of shoots, the bush forms faster, and thus you will get a harvest faster. Many varieties of modern selection are early-bearing, and the harvest is produced already in the second year after planting.
At the Research Institute of Horticulture of Siberia named after. Lisavenko’s seedlings are pruned in the fall, “planted and pruned.” If for some reason you don't do this, prune in the spring.
Two or three buds are left on each shoot.
Research institute scientists recommend not to neglect pruning in the future. Both sanitary and rejuvenating.
Currant propagation
Currants are propagated in different ways: seeds, cuttings, layering. When growing currants from seeds, remember that you will not get a variety, but a seedling of the variety. The most reliable way to propagate currants for amateur gardeners is propagation by layering.
In early spring, you need to bend a branch of a good, healthy bush to the ground and secure it, pin it with hooks. Each bud will shoot: one, two, three. These cuttings will grow until the fall, and in the fall you can separate them from the main, mother bush. Layers obtained in this way can be planted in a permanent place in the fall.
In production, cuttings are first planted in a school, and after a year strong seedlings are obtained.
Currants are also propagated by woody cuttings. The best time to take cuttings is September. The cuttings are cut the size of a pencil, 18-20 centimeters, they can be planted immediately, they can be buried in a pile and stored until spring.
Currant pests
Ognevka
Last year there was an outbreak of the moth pandemic in Siberia; amateur gardeners came to scientists, brought twigs with dried berries, and asked for help. What protective measures should I take for next season?
There are no varieties of currants resistant to moth. One moth caterpillar can destroy 15-16 currant berries or 5-6 gooseberries, so the best thing to do is to keep it away from the bush. The butterfly is small, inconspicuous, and usually gardeners do not even notice its departure.
Nadezhda Nazaryuk
The moth flies out in the spring, lays its eggs in small currant buds, then in larger ones, then in flowers and even in small ovaries.
Therefore, it is necessary to fight it before the plant blooms, when the buds are just emerging. At this time, you can dilute a bucket of clay or silt to a creamy state and pour it into the center of the currant bush. It will spread, dry and form a shell that will not allow the moth to fly out.
The moth overwinters directly under the currant bush. We must remember that a currant bush with a diameter of one and a half meters has the same volume of root system. In red currants, the diameter of the root system is twice as large as the diameter of the bush, while in black currants the root system is located exactly under the bush.
A clay shell is not the only way to prevent the moth from flying out. The soil under the currant bush can be covered with thick cloth, roofing felt, you can mulch it with a thicker than usual layer of humus - not 5 centimeters, but 10, you can hill up the bush like potatoes - rake soil on it.
Nadezhda Nazaryuk
These agrotechnical measures will prevent the moth from flying out.
If you did not have time to apply these measures, and the currant blossomed before you protected yourself from the moth, inspect the ovaries on the bush more often. Among the small green berries you will see black ones. Take a closer look at such a berry - you will see a small hole on it. All such berries must be collected and destroyed: burned or drowned in a container of water.
If there are a lot of such prematurely black berries, the currants can be treated with the following preparations:
Fitoverm is a biological product
Actellik is a pesticide
But treatments make sense when the caterpillar has just appeared and is very small. In the future they are useless.
Treatment with both biological preparations and pesticides is carried out only in the early morning or in cloudy weather, never in the heat and sun.
In the fall, after harvesting, it is recommended to loosen the soil under the bushes so as not to touch the root system, which in currants is located close to the soil surface.
Nadezhda Nazaryuk
This must always be remembered: for currants - shallow loosening
Bud mite – one blackcurrant bud can contain up to 8,000 mites. This small one is visible only under a microscope. How to determine that it has penetrated the kidney?
Nadezhda Nazaryuk
If normal buds are ovoid, reverse ovoid or slightly rounded, then buds affected by the bud mite are rounded. In the spring, when normal buds begin to bloom, the vegetative bud leads to the formation of a leaf blade, the generative one produces a flower, the bud in which the bud mite has settled does not produce either flowers or leaves - it increases in size and becomes even more rounded, because the mites grow and feed plant juices.
The affected kidney looks like a small head of cabbage. The spread of the bud mite occurs during currant flowering, and the affected buds need to be collected even earlier. They can be seen already in the fall, and in the spring you certainly can’t go wrong.
The buds must be collected, burned or buried deep in the ground - the main thing is to prevent the mites from spreading. But since the wind carries ticks over a distance of 300 meters, the collection of affected buds must be carried out in all neighboring gardens.
Currants can be treated with preparations against bud mites only before or after flowering.
Nadezhda Nazaryuk
This applies to all fruit and berry crops: no spraying is carried out during flowering.
There are quite a few blackcurrant varieties that are resistant to bud mite. Consider this quality when planting crops.
Gall aphid
One of the easiest ways to prevent gall aphids is to plant blackcurrant varieties that are resistant to this pest.
During the summer, several generations of gall aphids appear. Colonies of these small insects settle on currant leaves, suck the juices out of them, the leaves become deformed, and swellings - a halo - form. The redness or browning that we see on the leaves is a protective reaction of the plant.
Gall aphids are more difficult to control than other pests.
Nadezhda Nazaryuk
If there is not much of it, the leaves can be torn off, but all the leaves cannot be collected - secondary growth will begin, which reduces winter hardiness; the next year the plant may reduce winter hardiness or even die.
Therefore, the best thing to do is to grow resistant weeds. If we talk about NIIS varieties, these are Zabava, Rita, Poklon Borisova, Hercules, etc.
You can treat the bushes with drugs against aphids, but if the degree of damage is weak, you can put up with it; there is no direct connection between the yield and damage by gall aphids, of course, if the bush is not very damaged.
As a preventive measure against bud mites and gall aphids, many people use hot water on the bush at a temperature of 75–80 degrees, even 95 degrees is acceptable. This procedure is carried out in April. Before the buds open. With this treatment, the pest eggs die.
Nadezhda Nazaryuk
This treatment is a shock to the plant, so it is carried out no more than once every two years.
Powdery mildew
Nadezhda Nazaryuk
Sometimes part of the leaf blade affected by powdery mildew is killed, and thus the plant prevents it from spreading further.
The main recommendations for the prevention of powdery mildew are to plant varieties that are resistant to it, do not water the plant from above, only under the bush (with the exception of refreshing watering in extreme heat in the morning or evening). Planting in the right places where the plant will be ventilated helps to avoid powdery mildew. If the plant is ventilated and the bush is not thickened, powdery mildew practically does not occur.
Spraying with mullein infusion helps fight powdery mildew.
Powdery mildew, which has affected the bush to a weak degree, does not affect the yield. Powdery mildew affects red currants less than black currants.
Nadezhda Nazaryuk
As for diseases and pests of currants, there will be fewer of them in a high agricultural background.
At FORUMHOUSE you can learn how to prune fruit trees, chat about blackcurrants with other gardeners, and get acquainted with our collection of preparations, including currants.