Propagation of cherries by cuttings: pros and cons
Propagating cherries by cuttings has its advantages and disadvantages. Cuttings are the process of rooting small cut shoots with 3-4 buds. In order to get a larger number of trees of the varieties you like, you can propagate the existing trees on the site.
Propagating cherries by cuttings is not as difficult as it might seem at first. The cuttings take root well and grow quickly. Ease is the first advantage of this propagation method.
Another big advantage is that plants obtained from cuttings completely retain all the properties and qualities of the mother tree from which they were cut. Rooted cuttings grow very quickly. After three years you can expect fruiting.
Naturally, the advantage of cuttings is their low cost.
However, this method of propagating cherries is not without its drawbacks . Of all the cuttings planted, half do not take root at all. Planted cuttings require watering using the micro-sprinkler method.
In addition to cuttings, there are other methods of vegetative propagation of cherries. One such method is the propagation of cherries by root suckers.
Using cuttings, when to plant in summer or autumn
Propagating cherries by cuttings is not difficult. If you follow some rules and conditions, you can achieve good results and get several new cherry bushes without buying it.
Propagation of cherries by root cuttings
In summer, cut cuttings from cherries. Cuttings should be harvested in the morning or evening. They should be hard and reddened. The upper cut is above the bud, and the lower cut is under the bud with a distance of 1 cm. The cuttings are 30 cm long. All undeveloped leaves should be removed. Place the cut cuttings in water.
To speed up the rooting of cuttings, add a product like Zircon to the water. It will help better engraftment.
Prepare a place for rooting cuttings. For the process to go well, you need to:
Now we begin to plant the prepared cherry cuttings. Planting should be done at a distance of 8-10 cm. To a depth of 3 cm. Place the cutting vertically. It is best to do this in the evening.
Cover the area with plastic wrap. This will protect the plantings from sunlight and create a greenhouse effect for them, which will speed up their establishment.
During the first time of planting, it is recommended to water and ventilate from time to time. After two weeks, the seedlings will have roots. After another two weeks, the cuttings take root completely. Continue caring for young bushes until next spring. Care consists of weeding, loosening and watering.
You can propagate cherries from cuttings not only by planting them in the ground at the dacha, but also at home. To do this, take containers of sufficient depth. Fill them with loose soil. Plant the prepared cuttings in containers. Cover the plantings with film or another transparent container. Keep the film on until the cuttings are completely rooted. Please note that plantings must be ventilated.
Propagation of cherries by cuttings: choosing the appropriate material
For propagation, take the tops of last year's shoots or current year's shoots with a diameter of several millimeters. It is recommended to take cuttings from branches that are on the south side of the tree. The shoots should not have time to become stiff. They take shoots whose lignification has just begun.
Before you start cutting cuttings, you need to carefully inspect the tree. The branches from which cuttings will be taken should be free of traces of diseases and pests. Careful selection of planting material is the key to healthy, abundantly fruiting plants in the future.
In addition to cuttings, you can use root shoots. It is important not to confuse them with root suckers, which are already small trees.
Root shoots are small sections of the root on which there is a growth bud.
Root shoots are more convenient than cuttings in that they do not require rooting; the root is already there. It is important that the mileage increases. Root shoots make good seedlings.
Finding root shoots is a very long and labor-intensive process. To get just a few seedlings, you will have to disturb the root system of many trees and do a fair amount of shoveling work.
Propagation of cherries by green cuttings
Green shoots will grow well. They are called so because their upper part is green. They spread more easily than root shoots. It is advisable to take green cuttings from young trees. The older the tree, the worse the survival rate of the cuttings will be.
Some people often wonder whether it is possible to take cuttings for propagation from shoots growing near the mother tree. This can only be done if it is known for sure that the mother bush did not grow from a graft. For grafted trees, this method of propagation is unacceptable.
Advice from experienced gardeners
When propagating cherries, experienced gardeners do the following:
- 15 days before cuttings, the location of the cut is determined on the selected shoot. The base of the future cutting is wrapped with black electrical tape to a width of 4 cm. The area isolated from the sun becomes discolored, and cell degeneration occurs in it. Next, the protection is removed from the cut shoot and it is planted as usual. This increases the chance of rooting and successful reproduction by 30%.
- Green cuttings for propagation are cut from young trees, since rooting strength decreases over the years.
- To avoid burns of foliage on green cuttings when fertilizing after the procedure, they are watered with clean water.
- The cut is made using a sharp knife, holding the shoot suspended.
- The planting sites for root cuttings are marked with pegs.
Harvesting cuttings
Taking cherry cuttings is a streamlined process. During harvesting, it is not recommended to take cuttings from several bushes of different varieties at once; cuttings can easily be confused. Therefore, you need to finish one tree first and then move on to the next one.
It is recommended to take cuttings early in the morning or in the evening. It is advisable to do this in cloudy weather. Having chosen a good, healthy branch, it is cut into several parts. To cut cuttings you need to take a sharp knife or razor. If you cut cuttings with a dull knife, their vascular system will be damaged.
All cut cuttings must be tied into bunches and a tag indicating the variety should be hung on each bunch.
Propagation of cherries by cuttings: the right time to take cuttings
Cuttings can be taken from cherry trees throughout the summer. Many gardeners do this from early spring until autumn. The most favorable time to start cutting shoots is the end of May. By this time, the cherry blossoms end.
The first spring cuttings are cut from the tops of last year's shoots. It is advisable that there are no ovaries on them. In summer, it is preferable to take cuttings from the current year's shoots. Autumn cuttings are taken after the leaves have fallen from the cherry tree. This usually happens at the end of October.
Selection of ready-made seedlings
When purchasing seedlings, by looking carefully at their roots, you can determine how they were grown.
If the root is straight and rod-shaped, then the plant was grown from seed. The root system of the seedling is fibrous - it was obtained using vegetative propagation. And if a bend in the trunk is visible a little above the root collar, then the seedling has been grafted.
Features of cutting cuttings
Procurement of seedlings has its own characteristics. Before you start taking cuttings, the mother tree needs to be watered abundantly. This is done a couple of days before harvesting; the cherries are watered generously. This is necessary so that the wood tissue is well saturated with moisture.
If cuttings are cut in summer, then after cutting they need to be soaked for one and a half to two hours in clean water. After soaking, their lower ends must be treated with Kornevin solution. The cuttings can then be planted in the nursery. Cuttings cut in the fall are processed and stored.
The length of the cut cuttings should be on average 10 cm. Each cutting should have three or four buds. Under the bud, 5 mm lower, it is necessary to make a straight cut so that the first roots begin to form. An incision is also made above the upper kidney; it should go in the direction where the kidney is facing.
All leaves must be removed. Then the cuttings need to be placed in water. To make rooting happen faster, you can add some means to the water to speed up root formation.
If the cuttings cannot be planted immediately, then you need to spray them with water, preferably using a spray bottle, and pour them into a plastic bag or wrap them in film.
Vaccination
You can simply and effectively propagate cherries by grafting. To do this, you will need wild or young trees grown with your own hands from seeds. They must be 2 years old. You can plant the varieties that the summer resident likes on them. Cuttings should be harvested in the spring or at the very beginning of winter. The vaccination is done before active sap flow begins. As a rule, this time falls in mid-March.
In order to propagate cherries, shoots with a diameter of 0.5 cm or more must be cut from the mother plant. They are immersed in clean water for several hours. Each cutting must contain at least 4 buds. After this, an oblique cut is made at the end of each. In the rootstock you should carefully, using a sharp knife, make a split into which to insert the cutting. Treat the grafting site with garden varnish or a paraffin-wax mixture and cover with a plastic bag until shoots begin to sprout.
Expert opinion
Stanislav Pavlovich
A gardener with 17 years of experience and our expert See also When and what to feed cherries
Ask a Question
Important! If the grafting site is not treated, it will quickly dry out and all the work will go down the drain.
Propagation of cherries by cuttings in summer - rooting
In summer, cuttings are rooted in open ground. You can root directly in the soil, or in water. It is better to do this in the soil, there are more nutrients there, there is air access, so the cuttings take root better and faster. In winter, you can root cuttings in an apartment or on a heated balcony.
To root at home, you need to prepare containers and fill them with pre-prepared soil. It is necessary to plant the cuttings in these containers. Containers with cuttings should be covered with transparent film. This is done to create a greenhouse effect. It is important not to forget to regularly lift this film and ventilate the cuttings.
Planting cuttings
Humidity is of great importance for rooting cuttings, so it is advisable to immediately stock up on glass jars and plastic wrap. They will be needed in order to create an optimal microclimate for the cuttings.
If you plant cuttings in June, they will take root in September. However, not every cutting can enjoy rapid growth after rooting. Often their growth processes are severely inhibited. Therefore, they need to be transplanted to a permanent place no earlier than after two years. In winter, to provide the cuttings with protection from frost, you need to cover them with vegetable tops.
The growth and development of cuttings that are planted in February occurs much faster. By spring they will have already put out roots and can be transplanted into open ground.
Light soil is best for rooting cuttings. To prepare the soil mixture, you need to take one part of ordinary garden soil, two parts of river sand and part of peat. You can add a little fertilizer to this soil mixture, for example, 20 grams of superphosphate per kilogram of soil mixture. Everything needs to be mixed well.
Choosing a landing site
You should not plant cuttings in open sun, as it can burn them. It is better to choose partial shade as a planting location. Cuttings must be protected from the wind. A shaded area on the south side of the house is suitable. In order for plants to grow and develop well, they must have enough nutrition. There is no need to plant them too close to each other. The more free space there is between them, the better they will grow.
Propagation of cherries by cuttings: how to plant correctly
Cuttings should be planted in the soil to a depth of no more than 3 centimeters. When planting, cuttings should be positioned vertically. The lower bud should be completely in the ground. The soil around the cuttings should be lightly compacted and then watered. As soon as the water is absorbed, mulch with peat.
By cuttings
Rooting cuttings is another type of vegetative propagation. The shoots are harvested in June. To do this, select branches that have already begun to become woody and have acquired a reddish color at the base. With very young and green cuttings the procedure may not succeed.
Expert opinion
Stanislav Pavlovich
Gardener with 17 years of experience and our expert
Ask a Question
Important! It is advisable to carry out work in the morning or evening, in cool weather.
Felt cherries are propagated by pre-prepared cuttings, the length of which is about 30 cm. After cutting, the planting material is left in water. A root formation stimulator is also added there according to the proportion specified in the attached instructions. Each branch should be immersed in liquid by 15 mm. They are kept in this state for 18 hours.
In the spring, sand, peat and superphosphate are added to the bed intended for rooting cherry cuttings. It is advisable to plan landing in the morning or evening hours, but in no case during the day. To root the cutting, it is driven into the ground at an angle of 45 degrees and light shading is provided. You can build a small greenhouse so that the seedlings take root better.
This agricultural technique for growing new cherries is practiced in nurseries and brings excellent results. As soon as the planting material forms a root system and begins to grow, it can be sent to a permanent place of growth. As a rule, this is done in the fall or spring of the next season.
Expert opinion
Stanislav Pavlovich
Gardener with 17 years of experience and our expert
Ask a Question
Important! In winter, young trees require additional protection from the cold.
In order for a grown cherry to bear fruit, a pair must be planted nearby. It does not have to be a tree of the same variety, but the flowering dates should be identical.
Caring for cuttings
The faster the cuttings grow, the sooner you can wait for the first fruits to appear. To stimulate plant growth, you need to regularly fertilize them with complex fertilizers and spray them with growth stimulants. This must be done 3-4 times a season, alternating medications.
The first feeding of the cuttings should take place approximately a month after planting. For the first feeding, urea, potassium chloride or superphosphate are suitable.
After rooting, we must not forget about the cuttings; they require constant care. Every other day, the plants need to be watered ; the soil should not be allowed to dry out, but excess moisture is also harmful. The optimal amount of water at first will be 10 liters per square meter. Gradually, watering can be reduced. Once the cuttings grow into small trees, they can be watered several times a season.
During the first 2-3 weeks after planting, the cuttings should be kept under film . Every day the film must be lifted in order to ventilate the cuttings.
Young cherry trees can be destroyed by pests or diseases, so the seedlings need to be treated . Frail plants especially need care and attention. Preventative treatments for diseases are simply mandatory.
To combat insect pests, some gardeners install traps consisting of special sweet, sticky mixtures. These mixtures are capable of attracting insects.
How to root a cherry branch at home
If cherry propagation is planned for early spring or autumn, then the only option is to sprout a branch at home. The home growing algorithm is quite simple:
- First of all, you need to prepare a pot or container for the plant if you plan to plant several cuttings at once.
- The container is filled with nutritious soil, consisting of turf soil mixed with humus, and a complex mineral fertilizer is added - superphosphate, nitrogenous fertilizers, ash.
- The soil is properly moistened, and then the cutting is buried vertically to a depth of about 3 cm. The distance between individual shoots should be about 10 cm.
Immediately after planting, the shoots are covered with polyethylene to create a greenhouse effect and grow cherries from a twig, and placed in a warm place. From time to time the shoots need to be watered and ventilated. With proper care, it will take about 2 weeks for roots to appear, and the same amount of time will be needed for the shoots to take root properly.
After this, the containers with the cuttings can be placed in a lighted place and you can continue to care for them until the end of spring, watering and feeding them once every 2 weeks. The film can be removed from the shoots after the roots appear.
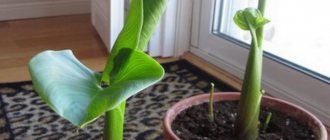
Cuttings can be carried out indoors in a container
Other ways to propagate cherries
Another vegetative method of propagating cherries is propagation using root shoots . This method is only suitable for propagating trees that were not grown on rootstock.
This is done in the spring. For propagation, it is advisable to take root shoots growing as far as possible from the mother tree. Such shoots will take root better in a new place. Also, if you start digging root shoots too close to the mother tree, you can damage its roots.
First you need to select suitable shoots, then you need to carefully remove the soil at their base and use a sharp knife to separate them from the root system of the mother tree. The cut site is coated with garden varnish, and the roots are sprinkled with earth. Thanks to the presence of their own roots, such seedlings take root very quickly.
If you separate and plant them in the spring, by autumn they will already be full-fledged plants with their own root system.
Cherry propagation by seeds
Cherries can also be propagated by seeds. When propagated by seeds, the properties of the mother plant may be lost. Before sowing, seeds must be stratified . Stratification is the treatment of seeds at low temperatures. The seeds should be mixed with slightly damp sand and placed in the refrigerator for 1-2 months.
Seeds are planted in April. The planting depth is 3-4 centimeters. Most often, cherries are grown from seeds in order to then use these seedlings as a rootstock.
In industrial nurseries, the method of propagating cherries using grafting is popular. This method is much more effective than cuttings. Plants develop and grow faster; grafting allows you to quickly increase the number of plants.
Reproduction by layering
A simple way is to propagate cherries by layering. Cherries are propagated by horizontal and vertical layering.
When propagating by horizontal layering, take a branch and bend it to the ground. In this position it is fixed using a special pin. The place of fixation is sprinkled with earth and watered with water.
During propagation by horizontal layering, the ground part of the bush is cut down. This should be done when the cherry is at rest. When the first shoots begin to appear, they will need to be earthed up. This is done repeatedly; the height of the mound of earth should be within 15-20 centimeters. Once the shoots are in the ground, they will begin to take root. After a year, it will be possible to separate the shoot and plant it in a permanent place.
How to grow cherries from pits
Cherries are propagated by seeds (pits) if it is necessary to obtain cherry plants that bear fruit and are frost-resistant, regardless of the quality of these same fruits.
Collect and prepare seeds
To isolate seeds from cherry fruits, these same fruits need to be collected and prepared.
| ADVICE If you want to get plants to harvest from them in the future, collect only the largest fruits, eat them, and use the seeds of the most delicious fruits to obtain planting material. Don’t be surprised by this advice; in fact, even on a plant of the same very good variety, there can sometimes be fruits that differ in weight and even taste characteristics. |
After collecting and separating the seeds from the pulp, they additionally need to be washed and disinfected very well, placed in a weak pink solution of potassium permanganate for 1/4 hour, and then stratified, otherwise they will not sprout in the year of sowing, but after a couple of years, or they may not sprout at all.
Stratify seeds
The most difficult thing in this matter is probably stratification, I’ll tell you about it in more detail.
| Stratification lasts 60 days, always at low but positive temperatures, otherwise if the seeds freeze, the seed embryo will die. |
- You need to take a glass jar the size of the number of seeds, steam it well, add sawdust - preferably pre-steamed or pickled, which is even better, and mix them with the seeds in a ratio of 1:1 or 1:2, if there are a lot of seeds.
- The jar should not be filled to the brim. The best option is to fill it 2/3 full.
- Next, all that remains is to cover it with a plastic cover and you can bury it in the garden to a depth of 1 m, after which you place a signal peg on the surface so that you don’t have to look for this place in the spring.
As soon as the snow melts, in the spring, you will need to dig out the jar, shake out the contents and plant the seeds in pre-prepared beds with loose and nutritious soil. Often, after such stratification, some of the seeds already crack and sometimes even germinate, which means that seedlings will appear on the soil surface very quickly.
Plant seeds
You shouldn’t sow seeds too deeply after stratification; 1.5-2 cm is enough. If you sow without stratification, which is also quite possible, you will have to wait longer for seedlings, but the depth needs to be increased to 3 cm, this depth will protect the seed germ in winter. in the event that they do not germinate in the first season and will have to spend the winter in this state.
| Soil for planting cherry pits |
- The area where you are going to sow the seeds must be prepared in advance so that by the time they ripen and the seeds come out of them, the soil is completely ready.
- The soil should be dug up very well (at least as much as a shovel full) and fertilizer should be added with approximately 12 kg of humus and 1 tbsp. nitroammophoska per m².
| Cherry pit planting scheme |
As for the seed sowing scheme, stratified ones should be sown with a distance of 15 cm between the seeds and 20 cm between the rows, and those that are sown without stratification can be sown twice as thick between the seeds, but you should also leave 20 cm between the rows to make it easier to cultivate the soil further.
- The seeds are sown in shallow furrows, placing them at a distance of 4-5 cm from each other and retreating approximately 1/2 m between the rows so that in the future it will be convenient to care for the seedlings and seedlings.
- The seed sowing depth is 2 cm on dense soil and 3 cm on loose and sandy soil.
| Stages of planting cherry pits |
- The seeds are covered with nutritious soil (usually the top layer of soil, but you can also use a mixture of soil and humus in equal parts),
- water thoroughly (a bucket of water per 1 m², pouring from a watering can with a nozzle with small holes so as not to wash out the soil),
- mulch, for which it is best to use humus, but you can also use sawdust in a 2 cm layer.
Care for seedlings
Further care of the seedlings is very simple and intuitive, the soil must be loosened periodically, weeds must be removed, the seedlings must be watered, and in the spring you can feed them with nitroammophoska in dissolved form in the amount of a teaspoon per square meter.
| Caring for cherry seedlings |
Next year, when friendly shoots should appear in the spring, care consists of periodic weeding, watering and applying small doses of fertilizers.
- The seedlings need to be watered as the soil dries, not allowing it to dry out too much, but also turning the soil into a swamp, which cherry trees are very afraid of. Usually a bucket of water is poured per 1 m² once a week, but if it is hot and there is no rain, then it is quite possible to pour 2 buckets of water.
- As for fertilizers, seedlings in the spring can be fed with nitroammophos dissolved in water in the amount of 1 tbsp. per bucket - this is the norm for 1 m², then you can do without fertilizing.
In the autumn, the bed with both sprouted seeds and seedlings that have grown over the season, as well as seeds that have not yet sprouted, needs to be covered with snow by throwing more of it. If in your region there are strong winds in winter and not enough snow, then throw spruce branches that perfectly retain snow; as a rule, no other shelter is required.
Approximately in the second year, the seedlings can be transplanted to a permanent location.
Replant to a permanent location
A couple of years after the emergence of seedlings, the seedlings can be transplanted to a permanent location. Theoretically, this can be done in the fall, already in the year that sprouts appear on the soil surface, but this is risky; it is better to wait another season.
| Seedlings can only be replanted in spring! |
___________________________________________________________________
REPRODUCTION OF FELT CHERRY
Features of cuttings depending on the type of cherry
Not all cherry varieties are capable of rooting.
Well-rooted (80–90%) include:
- Shubinka;
- Zhagarskaya;
- Dawn of the Volga region;
- Vole.
The following varieties take root moderately (up to 50%):
- Fertile Michurina;
- Half fat;
- Apukhtinskaya;
- Dessert Volga.
Depending on the region
In the central zone and southern regions of Russia, where there is stable snow cover in winter and the ground does not freeze much, cuttings are planted in the soil in August.
In harsh climatic conditions, planting is carried out in early June. For the winter, young plants must be protected from frost.
Reproduction by shoots of the root system
Propagation of cherries by shoots is considered one of the easiest ways. This method is most often used by gardeners in the Urals and Siberia. Trees grown in this way have the ability to recover faster after freezing. Such plants have higher winter hardiness.
To avoid overgrowth of unnecessary bushes, varietal or own-rooted bushes are taken for propagation by shoots. In such cherries, plants similar to the mother ones will grow from the shoots.
Reproduction of cherries by basal shoots
The disadvantage of growing cherries from shoots is that they begin to bear fruit later than grafted ones. Infestation of row spacing with growth. But despite all the shortcomings, this method is easy to propagate and it is possible to obtain excellent, winter-hardy plants.
Choose a bush that has less growth around it. Among her, choose a developed and strong one, which is 1-2 years old. It is not worth taking older plants, because they feed on the mother bush and, as a result, have a weak root system. Also, shoots that are located closer than 1 m are not suitable.
The shoots are harvested in the spring before the buds open or in mid-autumn. You should work in cloudy weather.
Cut off the root that comes from the mother bush. Leave the bush in place until it develops its own strong root system. The above-ground part must be shortened by approximately ? Part. Fertilize a couple of times during the growing season. Regular watering is required. The next year, plants with a strong root system are transplanted to a permanent place, and the rest, weaker ones, are grown.
How to choose planting material
Cherry cuttings taken from the top of annual green shoots have the best survival rates. They should be cut in early June - during the period of active growth. It’s easy to check whether a shoot is suitable for cutting planting material. If the selected shoot does not break when twisted onto your finger, you can safely cut the stem from it. The optimal length of a branch intended for rooting is 5-7 cm.
There should be two buds on the cutting. Of course, the cut branch must be healthy and without damage. After pruning, approximately 1.5 cm of cutting length should remain under the lower bud. The leaves should be shortened by half. The top of the branch is cut directly above the bud.
Propagating cherries with pits is generally a simple procedure. In this case, planting material is taken from the best fruits.
Growing Chinese Cherry
Chinese or felt cherry is a small shrub whose height does not exceed two and a half meters.
Chinese cherries will bear fruit only if planting is done correctly. The Chinese variety of this fruit tree takes root well in sandy loam soil and light loam. As for acidity, it should be neutral. In case of acidic soil, liming is carried out. To grow this variety, it is necessary to perform competent propagation.
Chinese cherry can reproduce as follows:
Reproduction using seeds is considered the most accessible and convenient. Seeds need to be collected from ripe fruits, planted in a box filled with sandy soil, then placed in a cold basement for stratification to take place.
As for cuttings, the raw materials must be prepared in early July, when the fruiting period ends. The shoot needs to be trimmed, the foliage removed, and planted in a shaded bed. It is advisable to ensure good air humidity. This variety of cherry has good resistance to common diseases. It must be protected from the following pests: codling moth, aphids and scale insects.
Recommendations regarding soil composition
Of course, propagation of cherries will be more successful when cuttings are planted not just in turf soil, but in a special substrate. A mixture of garden soil and humus in a 1:1 ratio is very good for rooting cut branches. You can also use peat with perlite or expanded clay.
It is worth pouring a mixture of a slightly different composition into the bags. It is usually prepared from garden soil and sand in a 1:1 ratio. This mixture is poured into each bag in a layer of 9 cm. It is advisable to add another 2 cm of ordinary washed sand on top.