Step-by-step instructions: how to carry out the procedure correctly?
There are only three ways to propagate this indoor plant: cuttings, dividing the bush and seeds.
Seeds
It is important to immediately clarify: propagation of spotiphyllum by seeds is a very painstaking process, since it is difficult to carry out independent pollination of a flower to obtain seeds, and even more so to implement the necessary conditions for obtaining seedlings. Even half of the freshest seeds will not sprout
Procedure:
- Prepare drainage at the bottom of the selected container/pot.
- Fill the remaining space with peat and sand soil (proportions 1:1).
- Scatter the seeds evenly over the substrate in the container and sprinkle them with a little soil, no need to compact them!
- Cover the pot with glass or a plastic bag to create a greenhouse effect.
- Place the seeds in a room with a temperature of 24 - 25 degrees.
- Condensation should be removed from the bag or glass daily, and the seeds should be ventilated.
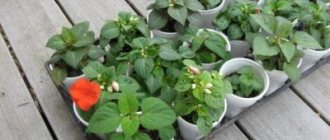
- With the appearance of the first leaves, it is necessary to plant all the seedlings in different pots.
Cuttings
Cuttings are called leaf rosettes, which are young leaves near the base of a newly formed plant. There are two cases: when there are roots and when they are not. In the first case, the cuttings are already ready for planting in the ground (how to plant spathiphyllum?).
Procedure for cuttings:
- Place drainage at the bottom of the container.
- Place the shoot with rhizome in the pot.
- Sprinkle it with substrate (the composition is described above).
- Water the plant with a moderate amount of water at room temperature.
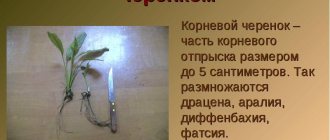
When the cutting does not have a formed rhizome, it must be placed in water mixed with activated carbon crushed into fine crumbs and kept there until roots appear.
After this, you can follow the instructions indicated above, but with some reservations: the soil should be made of perlite, sphagnum moss and high-moor peat, and you also need to temporarily create a greenhouse over the cutting until it finally gets stronger. If necessary, you can transplant it into another container.
Below is a visual video about planting spathiphyllum cuttings:
Dividing the bush
This method is the simplest, most effective and therefore very popular among gardeners.
An adult plant can be quite easily divided into several parts, moreover, these parts already have a formed rhizome, unlike most cuttings used for these purposes. Also, dividing a bush can be used to thin out a very dense plant for aesthetic reasons. The excess parts are simply carefully cut off, and what needs to be left sits as described below.
Procedure:
- Before the procedure, an adult plant must be watered to soften the earthen lump.
- After removing the spathiphyllum from the pot, rinse the roots with water.
- Cut the rhizome with a sharp knife and sprinkle the cut areas with activated carbon.
- If necessary, remove dried or rotten roots and leaves.
- Expanded clay drainage is placed at the bottom of the pot, which can retain enough moisture to moisturize the roots.
- A part of an adult plant is placed in the container.
- The remaining space is filled with soil (you can use a mixture of peat and sand or ready-made soil for aroid plants).
- The substrate must be moderately compacted.
- Water the plant with a small amount of water.
There is no need to deepen the root neck of the flower very much, otherwise you may not wait for it to bloom at all.
We invite you to watch a visual video about the propagation of spathiphyllum by dividing the bush:
Features of flower propagation
Features to consider when planting:
- Spathiphyllum needs a special substrate . It should be loose and light, similar to the one in which the plant lives in nature.
- The pot for spathiphyllum should be small , since in a large pot the plant will not bloom for a long time. Flowering will not occur until the roots have captured the entire volume of soil.
- Planting is best done in the spring , since at this time there are always children on the mother flower and they are easy to separate.
Reproduction by dividing the bush
This method is very convenient and easy to perform. For an adult spathiphyllum, it is also useful, as it “thins out” the dense thickets of a mature flower. The plant grows very quickly and numerous young rosettes absorb all the nutrients from the soil, depriving the mother plant. Dividing the bush as necessary has a beneficial effect on the further growth and development of spathiphyllum.
To carry out the procedure for separating young plants, it is necessary to follow the recommendations of experienced gardeners.
Dividing the bush should be done in early spring, before the start of the growing season. The root system of each division must be very strong and without damage. A delenka is ready for independent growth if it has at least three leaf rosettes that are already well developed. When planting, the root collar of young plants should be at the same soil level as that of the mother bush.
The flower container for planting young spathiphyllum should be small in volume, because in deep and wide pots the root part will actively develop, and this will lead to rapid growth of the leaf part and a delay in the flowering process.
The division of the root system of an adult plant must be carried out with minimal trauma to the roots and the entire flower as a whole. Before starting the procedure, it is recommended to thoroughly water the soil in the flower pot, which will make it easier to remove the flower along with the earthen lump and give the roots time to absorb moisture in order to reduce their fragility.
After removing the plant, you need to carefully wash all the roots from the soil and, if possible, untangle them. In this form, the root part will be easier and more correct to divide
It is recommended to sprinkle the cut areas on the roots with crushed or activated charcoal and leave to dry for a while.
Before planting each division, you need to carefully inspect them and remove dried or rotten parts of the root system and leaves. Each young plant is planted in a small individual container
Fragile roots need to be spread over the surface of the soil and carefully sprinkled with soil mixture, and then lightly compact the soil
Soil composition: leaf soil (1 part), peat soil (1 part), turf soil (1 part), coarse river sand (1/2 part). For planting divisions, you can also purchase a ready-made soil mixture intended for plants of the Araceae family.
Reproduction of spathiphyllum
We discussed the intricacies of caring for the hero of the article. Let's consider the propagation of spathiphyllum. This procedure is simple.
Method one - cuttings
Vegetative propagation methods are applicable to many plants, including dieffenbachia, croton, dracaena and spathiphyllum. This is the most popular method of propagating spathiphyllum due to its simplicity.
- At the base of a full-fledged plant, “babies” appear, which are a leaf rosette with roots. When spring comes, carefully separate them. The main thing is that the roots do not break. To root the resulting cuttings, use perlite or damp sand.
- To ensure that spathiphyllum propagates without trouble, be sure to cover the new bush with a perforated transparent cap. Otherwise, the cutting will have to be ventilated.
- As soon as the root system gets stronger and grows, move the young plant into the ground. I talked about the composition of the substrate at the beginning of the article. Provide the flower with standard care.
Method two - dividing the rhizome
Spathiphyllum can also be propagated in a way that involves dividing the root system. This approach ensures 100% survival rate. However, inept actions of a beginner can lead to the death of the mother plant. For this reason, experienced gardeners resort to this method.
- The operation of dividing the rhizome is carried out in the spring. This time is best for transplantation procedures.
- Using a sharp knife, carefully divide the rhizome into parts, and treat the sections with charcoal. Subsequent steps are similar to propagation by cuttings.
Method three - propagation by seeds
You can also get a young spathiphyllum plant using seeds, but this is an unreliable method. Practice shows that it is possible to propagate a plant at home using seed material, but not every attempt ends in success.
- It is necessary to artificially pollinate the flowers, which is not always possible. The seeds are characterized by low germination and it is problematic to obtain sprouts.
- I recommend sowing seed material in a container with a sand-peat mixture, which must be covered with a piece of glass. Control air humidity and ventilate the sprouts, otherwise they will suffocate. It is easier to propagate spathiphyllum vegetatively.
Interesting fact: it is impossible to propagate spathiphyllum by rooting a leaf. If you put a leaf in a container of water, it will not grow roots and will rot. It will end the same way if you stick a leaf into the soil. Since the seed material is not very suitable for this purpose, it is better to propagate by cuttings or by dividing the root.
Temperature
The owner of female happiness does not need to change habits if the plant is in the living room: 22 degrees Celsius is an excellent temperature for growth. Variation of a few degrees lower or higher is acceptable.
Temperatures below 16 degrees can slow down the growth of spathiphyllum. At temperatures below 12-10 degrees, rotting of the soil and roots may begin.
Draft is also not the best friend of spathiphyllum, as well as almost any indoor plant.
Ventilate the room carefully, making sure that the pot with the plant is located
In summer, you can take spathiphyllum to the balcony/terrace/garden: usually the plant tolerates such a “vacation” well.
Photo of spathiphyllum in the interior
Requirements for conditions of detention
If there is too little light, the foliage will change in an unfavorable way. Although it thickens, it becomes shallow and stretches out. Successful reproduction, as well as flowering, which in favorable cases is pleasing with its duration, are in question. New plants do not take root if there is insufficient lighting.
spathiphyllum flower - home care, the secret of success
At home, I want to both propagate spathiphyllum and get stable flowering and a healthy appearance. The solution is to comply with natural conditions. In addition to choosing a window sill, you can add lighting with a regular lamp. The plant perceives it favorably.
Attention ! In summer, it is advisable to keep potted plants on the balcony or in the garden, choosing a somewhat shaded place to protect the greenery from burns.
There are other requirements that ensure favorable breeding of spathiphyllum:
- Room temperature. When it drops by less than +18°C, development stops. Spathiphyllum and its shoot require 22 or 23 degrees for survival. The issue can be solved with a mini-greenhouse.
- Drafts lead to disease even in an adult plant; young plants will especially suffer from them.
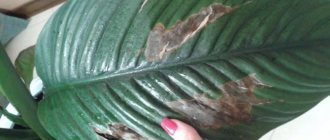
- Significant soil moisture is required, without drying out, otherwise the leaf will droop. But excesses and stagnation of moisture lead to the death of the roots. In this case, the foliage becomes covered with dark spots.
Young seedlings are very sensitive to moisture regime. Trauma can also destroy her. The natural growing environment is humid air conditions. In the room, the plant will require spraying. It will reproduce better in a greenhouse. Natural ways to increase the plantation are the growth of rhizomes. New rosettes form at the base of the plant, and natural seeding also occurs after flowering.
How to properly divide spathiphyllum when transplanting
The easiest way to propagate a flower is by dividing the bush. But not everyone knows how to properly divide spathiphyllum when transplanting. For an adult plant, this action is useful, since in this way it is possible to remove a large number of young rosettes that take nutrients from the soil.
Replanting a flower requires a lot of space, since everything will be covered with soil.
It is recommended to carry out the process of dividing the mother bush in the spring, before the growing season begins. For good development, the delenka must have leaf rosettes. It is worth trying not to damage the root system too much. The root collar of a young plant should be at the same level as that of the mother.
Note! It is necessary to carefully select the size of an individual pot for the plant: in a large pot the root system will develop intensively, which will delay flowering. It is recommended to choose a medium-sized container so that not only the leaves develop
Before starting the procedure, you need to water the plant generously to remove the flower along with a lump of earth. This will also help cause less damage to the root system. It is worth carefully rinsing the roots from the soil and untangling them. In this case, the separation will be easier to carry out. The cut areas need to be treated by sprinkling with charcoal or activated carbon and leaving to dry for a while.
It is recommended to purchase soil for planting aroid plants or mix it yourself. For this you will need:
- coarse river sand;
- peat;
- leaf soil;
- turf.
The rhizome of each division must be inspected and all dead parts removed.
Each plant is planted in individual pots, spreading the fragile roots over the surface of the soil and carefully covering them with soil. Only after this is it necessary to carefully compact the soil
You can mix the soil for spathiphyllum yourself
It is recommended to follow the step-by-step propagation instructions so that the flower subsequently takes root faster. But, if you like spathiphyllum, propagating the plant will bring joy, regardless of the complexity of the process.
Flower transplant
Plants under 5 years of age are replanted annually, then replanted only when the root system is visible outside the drainage holes. The flower is placed in a pot that is small in volume and depth. This is due to the fact that in a large container the soil will begin to turn sour without waiting for the plant’s root system to grow in it. The container for transplantation needs to be selected slightly larger than the previous one.
If the height of the flower is up to 40 cm and the diameter of the pot is approximately 20 cm, replanting may not be necessary, and sometimes only refresh the top layer of soil in the pot. Before transplanting, spathiphyllum is watered. If you want to get a beautiful plant with large leaves, then the side shoots are removed, since a lot of the energy of the flower itself is spent on them. A drainage layer of about 2 cm is poured into the prepared container, then a few centimeters of fresh soil are added.
Spathiphyllum is planted together with a lump of earth on the roots, filling all the existing voids in the container around it. If planting is done in moist soil, then there is no need to water the plant heavily after that. For better adaptation, the plant is not watered for 3 to 4 days, only sprayed.
Caring for spathiphyllum at home
The key points in care are choosing the location of the plant, lighting, moisturizing, fertilizing and treating the plant. When problems arise, spathiphyllum signals illness and deterioration by its appearance. To identify problems in a timely manner, you need to carefully monitor the structure of the leaves, root system and soil quality.
It is necessary to carefully monitor the structure of spathiphyllum leaves
Caring for spathiphyllum is a rather controversial issue, because the owners are divided on the degree of difficulty of care. But if you follow the recommendations, you can easily decorate your home with a blooming and healthy plant.
Watering
In the spring and summer seasons, the plant needs to be watered 2 - 3 times a week; in winter, the amount can be reduced to 1 time. Watering should be done from above, intensively moistening the entire earthen ball. It is worth using only distilled water or standing water for 24 hours.
The photo shows spathiphyllum soil
The soil should not be excessively wet, as this will lead to rotting of the root system. As for the fall and winter seasons, do not water the plant before going to bed if cold temperatures are forecast at night. Spathiphyllum reacts negatively to wet, cold soil.
Temperature
Spathiphyllum is one of the heat-loving plants and actively develops only at temperatures above 18°C; the ideal temperature is considered to be 21-23°C, and the maximum is 28-32°C. In the winter season, if you do not water, a decrease to 13°C is acceptable, but only a short time at this temperature is recommended. A cold window sill and open windows will also not have a beneficial effect on spathiphyllum, because the plant is afraid of drafts. It is not recommended to place the plant near the battery.
Humidity
Spathiphyllum does not tolerate dry air
Spathiphyllum does not tolerate dry air and often needs additional moisture. In particular, in winter, heating reduces air humidity by 15 - 20%.
Therefore, spathiphyllum requires regular spraying and refreshing of the leaves with a damp sponge. In addition, you can place containers with water near the plant or put a layer of wet expanded clay/pebbles on the tray; the water flowing onto the tray through the drainage holes will evaporate and create an additional increase in air humidity.
Lighting
Spathiphyllum prefers daylight and diffused light; an eastern window will be the most acceptable option. The lack of natural light can be replaced with an artificial light source in the form of a lamp and a bright room, because the advantage of spathiphyllum is that it can fully develop even away from windows.
If you want to place the flower on the south side, then it needs to be additionally shaded. If you place the plant in direct sunlight, you may encounter the problem of yellowing leaves.
Top dressing
To properly feed a flower, you need to follow the rules:
- When buying a flower in a store, it is better to do without feeding for the first two weeks;
- It is necessary to feed during the active growth period and reduce feeding in winter;
- The composition of the feeding must correspond to the growth phase;
- Mandatory watering of the soil before and after fertilizing.
Transfer
Young spathiphyllum feels great if it is replanted annually in the spring. Plants that have reached five years of age should be replanted when roots are visible in the drainage hole. Each subsequent pot should be only a little larger than the previous one, because if you transplant it into one that is too large, the roots will grow and you risk not seeing flowering.
Spathiphyllum transplant photo
If your spathiphyllum variety does not allow for growth up to 30 - 40 cm, you can choose a pot with a diameter of 20 cm. Drainage should be placed at the bottom of the pot. The soil mixture should consist of turf, leaves, humus, peat and sand.
Simultaneously with transplantation, it is convenient to propagate spathiphyllum by division.
Fertilizer
To feed spathiphyllum, you can alternate mineral and organic fertilizers. An effective option is liquid specialized fertilizers for aroids; familiarize yourself with their composition, choose one with a lower content of nitrogen fertilizers. It is recommended to apply fertilizers 2 times a month during the period of active development with the arrival of spring and until the end of summer.
During flowering, the plant does not need fertilizer, but it is better to feed it at the end of this process. You should not get carried away with fertilizers, because there is a risk of burning the root system with excess fertilizing.
Spathiphyllum: how to grow “female happiness” at home (INFOGRAPHICS)
Breeders have not ignored this flower and, as a result, a huge variety of spathiphyllum varieties on the shelves of flower shops. Dutch flower growers have especially tried here, as they export this plant, and very successfully
This plant is classified into five groups:
- Hydnostachyon Liebm.
- Massovia C.Koch. Includes Spathiphyllum cannofolia.
- Spathiphyllopsis Teijsm. & Binn.
- Amomophyllum Engl. Includes the species Spathiphyllum profusely flowering.
- Spathiphyllum Schott in Schott & Endl. Includes Spathiphyllum charming, Spathiphyllum spoon-shaped and Spathiphyllum Wallis. It is also used as an international scientific name.
Let's look at the most cultivated varieties:
This species is distinguished by the fact that it has a creeping stem, on which up to 40 leaves can be located at the same time. Other species do not have stems at all; the leaves grow from the roots, forming a bunch.
- Height from 50 to 60 centimeters.
- The leaves are lanceolate-oval, leaf length 15–20 centimeters, width 9–12 centimeters.
- The height of the flower is 10–12 centimeters.
- Peduncle 25 centimeters.
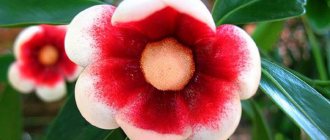
It is also called Royal. The flower has some differences from the flowers of other species. The inflorescence is initially yellowish, and towards the end of flowering it turns black. The bedspread does not change color. It is twice as long and wider than the inflorescence, the shape is slightly concave, and looks like a sail filled with wind.
- Height 100 centimeters.
- The leaf is oblong, glossy, dark green, wavy along the edge, width 15–20 centimeters, length 30–40 centimeters.
- The inflorescence is white.
- The shape of the bedspread is oval.
The most undemanding among spathiphyllums. Flower growers even grow it in an aquarium, but in such an environment it grows very slowly. It can stay in the aquarium for only a few months, then it needs to be transplanted and returned to its previous way of life, this time out of water.
• Height 25 centimeters. • The flower is white, the shape is narrow and long, three times larger than the spadix. • The leaf is dark green.
• The inflorescence is white, turning green towards the end of flowering.
This species is the most beloved by breeders; it has about 40 varieties. These include the following well-known varieties: “Chopin” (Chopin), “Mozart”, “Sweet Silvio”, “Cupido”, “Sweet Pablo”, “Sweet Benito”, “Sweet Lauretta”, “Sensation”, “Picasso” , “Domino”, “Sweet Chico”, “Bellini”, “Strauss”. The height of these plants is from 30 to 70 centimeters. And the variety of colors and shapes complicates the selection process; you want to buy everything at once.
There are also miniature varieties of spathiphyllum. Their names are also no less famous: “Quatro”, “Tango”, “Alana” and the result of Thai breeders “New one”.
Tall spathiphyllum hybrids also look very impressive, these include: “Sensation”, “Giant”.
When shopping, pay attention to those suppliers who harden off their plants before putting them on store shelves. After hardening, it will be easier for the plant to cope with the stress of changing its place of residence, and it will be better to acclimatize to new environmental conditions.
Your apartment for a plant is nothing more than a new and unknown environment, and it is not always adapted to a particular indoor plant
After hardening, it will be easier for the plant to cope with the stress of changing its place of residence, and it will be better to acclimatize to new environmental conditions. Your plant apartment is nothing more than a new and unknown environment, and it is not always adapted to a particular indoor plant.
When are leaves removed?
The procedure is carried out in the following cases.
If the leaves turn yellow
If the tips are visually dry and brown, but the leaf is elastic and green, then the air is dry or the substrate is overdried. Using sharp scissors, cut off the dried areas, capturing up to 0.5 cm of healthy tissue. If the entire leaf has turned yellow, remove it too (it will dry out anyway). As experienced flower growers say: “Everything that has turned yellow will not turn green again.”
It is important to stop the yellowing process itself - protect from the sun, optimize watering, etc.
If the lower tier turns yellow and dries out
- If the lower leaves turn yellow and then dry out, do not worry. These are natural processes of aging and withering. Trim off dried leaves immediately.
- If, after regular pruning, a lot of dried residue has accumulated at the base of the rosette, it must be removed immediately. They interfere with the formation of new sockets.
- Dried shoots are removed mechanically (it is better to spray the area with a spray bottle first) - one by one, remove in layers of 1 fragment in a downward direction. At the same time, the green stalk is held so as not to damage healthy tissue. The procedure is carried out carefully and carefully; dry parts should not be pulled out abruptly.
Reproduction by shoots: easy even for beginners
Cuttings are one of the most popular methods of flower propagation at home. Without harming the main plant, you can get offspring in the shortest possible time. Young spathiphyllums develop quickly and soon begin to bloom. This method allows you to rejuvenate old plants or replace annual specimens.
At the base of an adult spathiphyllum, small leaf rosettes are formed, which acquire their own root system. When carrying out a planned transplant of spathiphyllum into a new container, carefully separate these rosettes from the adult plant, being careful not to damage the thin roots. If the rosette has roots, plant it in a permanent pot.
Under natural conditions, the flower “female happiness” grows near rivers, lakes, and other bodies of water. In such places, the soil contains a large amount of rotted remains of branches, leaves, and peat. Spathiphyllum prefers light, loose, moist soil with neutral or weak acidity.
Adding slaked lime, ash, and dolomite flour will help reduce acidity. When planting a young plant, purchase universal soil for aroids or prepare it yourself.
The composition of the soil for spathiphyllum includes:
- garden soil;
- leaf humus;
- peat;
- charcoal to prevent rotting of the root system;
- coarse river sand to increase air and water permeability;
- rotted manure.
All components, except sand, are added in an amount of 10% by weight of the earth. You can take more sand. To eliminate the possibility of infection, it is necessary to disinfect the soil ingredients with a strong solution of potassium permanganate or calcine them in the oven.
Place a layer of drainage at the bottom of the pot so that moisture does not stagnate in the soil.
Plant cuttings with roots in the soil, water with settled soft water at room temperature.
Cover the cutting with thick transparent polyethylene, a glass jar or a cut plastic bottle - set up a greenhouse. This is necessary to maintain constant temperature and humidity. Place the container in a warm, bright place away from drafts and direct sunlight.
Make small holes in the film or bag for ventilation. Remove the glass jar briefly every day to prevent condensation from accumulating. When the rosette gets stronger, remove the cover, constantly increasing the time. This will allow the young spathiphyllum to adapt to indoor conditions.
Often, inexperienced gardeners have a question about whether the leaves of a home plant of the araceae family take root or not. Many tried to do this and came to the conclusion that spathiphyllum cannot be propagated by leaves, because in water it does not form roots, but rots.
How does the “female happiness” flower reproduce?
Let's look at all the ways exotic plants can be propagated at home.:
- seed (through growing seedlings);
- cuttings (rooting cuttings);
- department of child sockets;
- dividing the bush (dividing the adult rhizome).
There are no difficulties in breeding spathiphyllum. The procedure is quite simple and does not require much time, effort or preparation.
Still, some features of each method should be taken into account.
Description of the spathiphyllum plant
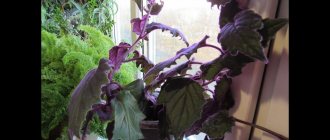
The bush has no stems; small leaves grow directly from the roots, forming thick green tufts. The roots are quite short. Small tubercles are visible on the stem bud. These are aerial roots, characteristic of plants of the Araceae family. The leaf blade is oval-elongated, pointed, with a noticeable midrib.
What does the plant look like?
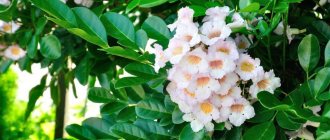
The lateral veins are also clearly visible. Small flowers form a white spadix on a long peduncle, around which on one side there is a white oval blanket with a pointed tip. The name spathiphyllum reflects the specific appearance of the flower: in Greek, “spatha” means bedspread, and “phyllum” means leaf.
The graceful flowering of spathiphyllum lasts several weeks, from mid-spring to July. Some varieties bloom from late March to early autumn. With good care, the plant also produces flowers in the fall.
If spathiphyllum does not bloom for a long time, replanting, carried out in accordance with the correct recommendations, will activate the vitality of the plant. For popular indoor culture, the dormant period begins in October and lasts until January. At this time, ensure a temperature of at least 16 ° C and infrequent watering. With high air humidity, flower stalks are created in winter.
For the successful development of spathiphyllum, the following requirements must be met:
- constant high air humidity;
- moderate watering so that the substrate is constantly slightly moist;
- abundant spraying, since the plant comes from tropical forests;
- location in an area of diffused light or artificial lighting, but not in direct sunlight;
- Northern exposure or placement on attached platforms near windows is preferable;
- comfortable temperature within 20-23 °C.
Important! If spathiphyllum is constantly in deep shade, the leaves become small
How spathiphyllum reproduces by dividing the bush (rhizome)
Spathiphyllum is a perennial plant that, with good care, produces large growths over the year, thickening the container. Therefore, large bushes are divided annually, which produces good propagation material.
Thus, for propagation, it is enough to plant spathiphyllum, and the plant takes root well, quickly forming new rosettes. It is better to divide in the spring or autumn, when spathiphyllums can be replanted.
In order to divide the rhizome, you need to remove the spathiphyllum from the pot and clean the root system from the soil. Using a sharp, sterile knife, cut the rhizome into pieces, each of which should have its own core (growth point). The cut areas must be treated with charcoal or a dark solution of potassium permanganate to prevent them from rotting.
We will tell you what to do if the spathiphyllum leaves turn yellow.
What to do if yellow spots appear on the leaves of alocasia is written here.
From this article you will learn what to do if the leaves of your anthurium dry out.
During the procedure, you need to try not to damage the fragile roots of the plant; they need to be carefully untangled and distributed over a planting container with slightly moistened soil of the appropriate composition. You can find out what it should be like here. In this case, it is necessary to provide a good drainage layer.
A pot for spathiphyllum is needed so that it matches the size of the plant’s root system (9 – 15 centimeters), since plants planted in large containers do not flower for a long time. It is better to choose containers that are low and wide, similar to bowls.
Pots with seedlings should be filled with glass jars and placed in a warm, shaded place. The cover must be removed regularly to ventilate the plants. After the plants take root and new young leaves appear, the jars must be removed and the young spathiphyllums placed in a permanent place of growth. With proper care, seedlings bloom within a year after transplantation.
Possible problems and difficulties
When growing spathiphyllum, the following problems are possible:
- Drying and curling of leaf tips
. The main reason is low humidity or low temperature in the room. - Pale leaves
. This phenomenon occurs when the light is too bright. It is necessary to move the container with the flower to another place, and remove the affected leaves. Otherwise, the process is irreversible. - Black spots on leaves
. This problem occurs if the root is sick. In most cases this occurs due to excess moisture. It is urgent to replant the flower and clean the root system. An unbalanced diet can also affect the development of blackness on leaves. If you overdo it with fertilizing, then do not replant. - Lack of flowering
. This occurs as a result of over-fertilization. Also, the lack of flowers may be due to the roots filling the entire container of the pot.
You can read more about spathiphyllum diseases in.
Rules of care
There are some requirements and recommendations that must be followed. This will allow the plant to take root and develop well after transplantation. Let's take a closer look.
Selecting a location and temperature
For a young plant, it is very important to find a place in the room where there will be no direct sunlight or shade. Indirect light is best
Then the bush will quickly grow.
In spring and summer, the air temperature in the room should not be higher or lower than 22 - 23 degrees Celsius. In autumn and winter, you can lower the temperature a little, but not below +16.
If the room is cold (below +10), then the spathiphyllum will die. Do not allow drafts, the plant does not like this very much.
Features of watering
- Water to moisten the soil should be settled and at room temperature. It is necessary to moisten the soil abundantly in spring and summer. Especially during the flowering period and in dry weather.
- During the hot season, there is no need to wait for the soil to dry out; water several times a week. The soil must be constantly moist. But it is also not recommended to flood young bushes.
- It is undesirable for water to get on the flowering part of the plant when spraying. But in the summer, it is necessary not only to moisten the soil twice, but also to irrigate the leaf plates of the flower using the rain method. Remember that he loves humidity and water.
- In winter, you can reduce the number of waterings to once every 7 days.
Feeding and fertilizer
The plant needs mineral fertilizers in the spring and summer. They need to be diluted at the rate of 1 g per 1 liter. Before fertilizing, you always need to moisten the soil in the pot.
It is not recommended to apply fertilizers during the period of active flowering. And before it you can feed it with potassium and phosphorus. These substances promote flowering. After transplantation, it is also not recommended to feed the flower.
If the plant does not want to bloom, then this indicates excess fertilizer. Also, it may be time to replant the plant, since the roots are already cramped in the old pot.
How to grow spathiphyllum from seeds yourself
If it is not possible to purchase ready-made spathiphyllum seeds, then you can get them yourself by artificially pollinating two existing neighboring plants. Small seeds are found in bright green berries.
It is advisable to plant spathiphyllum immediately after collecting planting material, since its germination rate decreases very quickly . Even from fresh seeds, only fifty percent of seedlings can be obtained. Therefore, when purchasing seeds, you need to pay attention to their expiration date.
When planting seeds, they are evenly distributed over the moist soil and lightly pressed. They are then sprinkled with a very thin layer of perlite and covered with plastic wrap or covered with glass to maintain constant soil moisture.
The container with the plantings is placed in a room with an air temperature of 23 to 25 degrees, opened daily for ventilation and humidification for ten minutes. A week after germination, the cover can be removed.
After the seedlings reach a height of five centimeters, they are transplanted into separate shallow pots with a diameter of no more than nine centimeters in order for the root system to develop quickly. Containers with young plants should be placed in a warm place with good but diffuse lighting.
There should be no drafts in the room where the seedlings are located, which can lead to the death of shoots that have not yet matured.
After three months of growth, you can make the first fertilizing with a weak solution of the appropriate fertilizer. You can read how this is done here. Spathiphyllums, propagated by seeds, with proper care and maintenance, bloom three years after sowing.
Spathiphyllum: home care
Now let's figure out how to care for spathiphyllum at home
For good growth and flowering, it is important to maintain optimal humidity, temperature, provide sufficient watering and lighting, as well as timely pruning, replanting and fertilizing.
Lighting and temperature
The flower needs sufficient lighting, so south-facing windows are ideal
It is important to protect the bush from sunlight, because in diffuse lighting conditions it blooms much longer. In the shade, the leaves of the plant become dark green in color, and there may be no flowers at all. In summer and spring, the temperature in the room with the flower should not fall below 18 degrees
The optimal temperature is 22°C. In winter, the bush feels good at a temperature not lower than 16°C, but if the room is colder than 10 degrees, the plant may die. Cold drafts have no less detrimental effect on the flower.
In summer and spring, the temperature in the room with the flower should not fall below 18 degrees. The optimal temperature is 22°C. In winter, the bush feels good at a temperature not lower than 16°C, but if the room is colder than 10 degrees, the plant may die. Cold drafts have no less detrimental effect on the flower.
Watering and air humidity
To moisten the soil, use water that has been standing for 24 hours. In the warm season, provide abundant watering. Watering should occur as the top layer of soil dries. In winter, the frequency of soil moistening is reduced, but it is not allowed to dry out. The remaining liquid from the pan is drained so that the roots do not rot.
Spathiphyllum requires regular spraying. To maintain optimal humidity, moistened expanded clay or pebbles are poured into a tray with a pot, and the pot is placed on top. In summer, the plant is given a shower of warm water, because when sprayed twice during the day, the tips of the leaf blades will dry out. When spraying water on a flowering plant, make sure that moisture does not get on the cob and the cover.
Soil requirements
The flower feels good in a substrate made from a mixture of humus, river sand, leaf soil and peat, taken in equal proportions. To improve the penetration of air and moisture into the soil, add pine bark, brick chips or charcoal. The mixture will be soft, nutritious and quite loose.
If you decide to prepare the substrate yourself, then the following options are suitable:
- Turf soil - 1 part, leaf soil - 1.2 parts, the same amount of peat and half a part of coarse sand.
- In equal proportions, take turf and leaf soil, as well as peat, sand, humus and charcoal.
- Mix leaf soil, humus, sand and peat in equal proportions, add a little crushed pine bark and charcoal.
Fertilizer and feeding of spathiphyllum
Fertilizing spathiphyllum at home takes place from early spring to early autumn. During the winter, they stop feeding the soil. The exception is plants with flowers, which are fertilized once a month. If the bush blooms in the warm season, then it is fed with a special mixture for flowering plants, which is applied 2-3 times a month.
Mineral fertilizers are used as fertilizing, which are recommended to be diluted in soft, settled water. It is advisable to alternate feeding with organic and mineral mixtures. In the first case, mullein is used in a concentration of 4-6%. Usually a weakly concentrated nutrient solution is prepared on the basis that 1-1.5 grams of the mixture are taken per liter of water.
About domestic spathiphyllums, propagation by cuttings, shoots, leaves, seeds
Spathiphyllum is a popular indoor flower that not only pleases the gardener with its appearance, but also purifies the air in the room. The plant is unpretentious, does not require careful care, and almost every owner knows how to propagate spathiphyllum.
How does spathiphyllum reproduce in natural conditions?
The flower has gained popularity due to its ease of care and beautiful appearance. If you like spathiphyllum, there should be no questions about how to propagate it; it’s worth seeing how it copes with it in natural conditions.
What does a spathiphyllum flower look like?
For your information! This plant grows best in swampy forests and on the shores of a warm lake or river. This is due to the fact that the plant loves a humid climate; even temperature is not such an important criterion. It reproduces by seed.
What determines the characteristics of reproduction at home?
Spathiphyllum has a special structure: the flower does not have a stem at all, so the leaves and flowers grow directly from the ground. Because of this, some types of reproduction are not available, and some care is also required.
A flower in a pot requires special conditions
You should pay attention to the growth of the flower in natural conditions. It does not like direct sunlight, but in the absence of light it may stop blooming. The air humidity should be high enough for the spathiphyllum to feel good. At the same time, it is worth watering the flower if the soil is completely dry, since otherwise the leaves will begin to rot at the base due to water retention.
Step-by-step guide to propagation from cuttings
Spathiphyllum Domino flower - home care
When asked how easier it is to propagate spathiphyllum at home, flower growers answer - with cuttings. They are leaf rosettes that separate from the adult plant. If they have small roots, then they can be immediately planted in the soil, and if they are absent, you can get the root part yourself.
Reproduction of spathiphyllum by stems
From the stems
Taking a shoot from spathiphyllum is not so difficult: you need to carefully cut off the leaf rosette from the mother plant. The following steps should be followed:
- Place drainage at the bottom of an individual pot.
- Place the shoot containing the rhizome into the pot. In this case, you should carefully straighten the roots in the pot.
- It is recommended to hold the shoot while the substrate is poured into the pot.
- Pour water at room temperature.
Important! If the shoot does not have formed roots, you need to help the spathiphyllum acquire them. It doesn't require much effort, but success is guaranteed.
From leaves
Not everyone knows how spathiphyllum reproduces, so if you like this flower from friends or relatives, you should not ask for a leaf to germinate the plant at home. This propagation method is not suitable for this type of flower.
How to germinate spathiphyllum shoots in water
Spathiphyllum - replanting after purchase and during seating
It became clear how to take a spathiphyllum shoot, but nothing is clear about rooting. First you need to prepare the water in which the process will be carried out, since regular tap water will not work. Spathiphyllum requires a certain acidic habitat with a pH of 5 or 6.
Note! The secret to success is the use of activated carbon. It is this that needs to be crushed and added to water.
Rooting spathiphyllum in water
Rooting a shoot is not difficult: you need to place it in a container with water and coal and keep it there until roots appear. But subsequently it is required to plant it only in certain soil. The soil should be prepared from sphagnum, peat and perlite. It is also recommended to keep the new plant in a greenhouse until the cutting gets stronger. After this, it will be possible to transplant the flower to a permanent place.
Instructions for growing from seeds
Yucca flower - propagation at home
Propagation by spathiphyllum seeds is the most labor-intensive process. This event takes a lot of time and effort. It is recommended to purchase seeds for sowing at a specialized store. At the same time, it is worth paying attention to the expiration date: half of even fresh seeds may not sprout.
Obtaining flower seeds
Important! Spathiphyllum seeds quickly lose their similarity, so they need to be sown immediately after collection. To ripen, they will need to be pollinated by an adult flower that is in the flowering stage.
For sowing, use a small container (you can use a plate). It is recommended to mix the soil from sand and peat, taken in equal proportions. It is worth sowing in moist, but not wet soil, and place the container in a greenhouse. The greenhouse needs to maintain a temperature of about 25 °C. Watering is required using a spray bottle. When seedlings begin to appear, it is worth starting to ventilate from time to time, since excess moisture can contribute to the appearance of mold.