Most people associate tulips with spring and the holiday of March 8th. They are one of the first to bloom after winter. Tulips are often found on store shelves even out of season.
Usually, for the holidays, flowers are grown in large quantities in a greenhouse, where it is easy to create suitable conditions for the plants. However, it is possible to grow tulips in a pot at home even without special equipment. The main thing is to know the basic nuances of agricultural technology, correctly calculate the planting time and observe the temperature regime.
Is it possible to grow tulips at home in a pot?
Although tulips are not indoor plants, you can grow them on a windowsill or balcony all year round. To produce large quantities of flowers for sale, you will need a greenhouse, but several pots of plants can easily be obtained at home.
It is important to properly prepare the bulbs for planting and maintain temperature conditions throughout the entire cultivation.
Selecting suitable varieties
Not all varieties are suitable for growing tulips in pots. They must meet a number of requirements:
- Size. Low-growing or medium-growing varieties are suitable for forcing at home. Larger specimens will have little space in the planting containers.
- Timing for discarding flowers. Early varieties are preferred - this will allow you to get buds as early as possible.
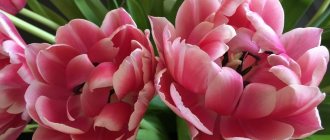
- Characteristics. Simple and double tulips, plants with large and small buds, single-colored and multi-colored are suitable for growing on a windowsill. It is advisable to buy plants that are resistant to disease and cold.
There are many varieties suitable for forcing at home. These include:
- Apricot Beauty;
- Parade Record;
- Miles Bridge;
- Aristocrat;
- Fringed Elegance;
- Negrita;
- Confux;
- Lustige Witve;
- Christmas Marvel;
- Temple of Beauty;
- Scarborough;
- Eric Hofsue;
- Apeldoorn;
- London.
These varieties are suitable for growing even on a window in spring, summer, winter and autumn. They meet all the specified characteristics and are easy to care for.
Attention! It is not advisable to choose exotic varieties with an unusual color (brown, purple, etc.). They are demanding of care, and growing them at home will be difficult.
Bulb selection
It is important to choose not only a suitable variety, but also planting material. The quality of the bulbs determines whether they will germinate and whether the plants will get sick. Pay attention to the following parameters:
- Size. The ideal bulb diameter is 3-4 cm. Smaller planting material will take a long time to germinate. Children are not suitable for forcing out.
- Density. The bulbs should be firm to the touch. If juice comes out when pressed, it means the planting material is spoiled. The suspiciously low weight also indicates low quality.
- Scales. Brown, not very dark shade. Elastic to the touch. The shell of the bulbs that were left in the ground is too dense and hard.
- Appearance. The bulbs should be free of stains, mold and other signs of infection. The absence of serious damage is also important. The planting material should be smooth to the touch. Select specimens of round shape and uniform color.
- Dontse. Dense and hard to the touch. The presence of tubercles is required, from which the roots emerge.
- Stem. Only a small tip should be visible from the bulb. It is important that there are no stains, mold or damage on it.
Pay attention to these signs both when purchasing and when independently collecting planting material. In the second case, it is important to know how to get high-quality bulbs:
- The buds are cut off immediately after they open, not earlier.
- The bulbs are dug up when the stems and leaves of the plant turn yellow.
- When growing tulips, they feed them. This ensures the supply of sufficient nutrients to the planting material.
Bulbs are purchased from July to September. During this period, it will be possible to obtain the highest quality copies and have time to prepare them.
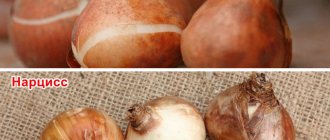
Selecting bulbs for planting
large specimens, dense, heavy and, most importantly, absolutely healthy, are suitable for planting for forcing .
The bulbs should be size 10/11 (first cut) or 12/12+ (extra size), the numbers on the packaging indicate a circumference of 10-12 mm, a diameter of 35-40 mm.
The heads must be heavy in weight ; their weight is not allowed less than 25 grams (lower weight indicates that it does not contain a flower bud). The larger the bulb, the more powerful the plant and the larger the flower.
Optimal growing conditions
In order for tulips to develop properly and the buds to turn out high-quality and bright, it is important to provide the plants with optimal conditions:
- Temperature. At the initial stage of planting, tulips are placed in a place with a temperature of +7°C. When the shoots appear, the pots are brought into a room with temperatures of +12...+18°C. At lower and higher values, the buds will not be as beautiful. If the fluctuations are significant, the plants will begin to hurt.
- Lighting. If daylight hours last less than 12 hours, it is recommended to use backlighting. It is advisable to choose special phytolamps. In winter, daylight hours for tulips last 9 hours. Until germination, plants are kept in a dark room. With a lack of light, the flowers turn out pale.
- Humidity. The optimal indicator for the crop is 80%. In winter, if the room is heated, use a humidifier to create optimal conditions.
It is not difficult to create optimal conditions for growing tulips in an apartment. Although these colors often require additional lighting, it does not need to be very bright.
Advice. If you don’t have a humidifier, place a damp cloth on the heater and make sure it doesn’t dry out.
Choosing a place for forcing
Usually flowers are placed on the windowsill, since near the window the plant is illuminated by the sun. In this case, you cannot open the window during cultivation, since tulips cannot tolerate drafts.
If there are several lighting fixtures for plants, the pots are placed in any other place in the apartment. Containers should be located at the maximum distance from heating devices.
It is best to grow tulips on a glass heated balcony. In this case, you won’t even need lighting fixtures if the plants have enough natural light.
General information about the cold life cycle
Growing tulips at home, in conditions of limited volumes of soil for their root system, is called forcing. At the same time, the growth of green mass and flowering are ensured by the nutrients stored in the tulip bulb. Forcing itself is an extreme method of cultivation; after it, the bulb requires at least two years to restore its generative properties.
Another feature of forcing is the small number of daylight hours in the autumn-winter periods and short daylight hours. This involves using light sources during the active growing phase. In some cases, it becomes necessary to provide not only light and heat, but also the required air humidity.
Wonderful garden patio decoration
In our climate, most plants are dormant in winter. At the same time, they do not just “sleep”, surviving the winter, but form within themselves the organs of the next season’s plant, which, after awakening, begin to grow. Without this process, the plant will not sprout in the spring; therefore, if the bulb has not gone through the hibernation period, you cannot grow a tulip from it.
Consequently, the life cycle of a tulip under natural conditions must necessarily include this period. In tulips, the formation of stem and bud primordia occurs at low temperatures. Thus, in order for a tulip to rise, it must be kept for some time in conditions corresponding to natural ones.
Gorgeous composition
But that’s not all: if you store the bulb in natural conditions, then leaves form in it first, and only then, at lower temperatures, flowers. We don’t need leaves (their growth can be stimulated with fertilizers, or they will form during the growth of the flower), so we immediately move on to the flowers. To do this, after the formation of the rudiments of the plant organs, the bulb must be placed not in normal conditions, but in those under which the flower will form.
The bulbs must be in the temperature range from +5°C to +9°C. And their storage time at this temperature is several months. Depending on the variety and temperature, it lasts from 16 to 22 weeks.
Preparatory work
Before growing tulips at home, a number of preparatory work is carried out. Whether the plant will bloom by the right time depends on how correctly they are performed.
Planting material
Preparing planting material is the most important part of growing tulips. They begin to work with bulbs immediately after purchase or collection. Follow step by step instructions:
- Calibration The bulbs are sorted by size, putting large ones in one pile and small ones in another. The finer the planting material, the later it will germinate.
- Temperature fluctuations. The planting material is first kept at a temperature of +30°C, then the indicators are reduced to +9°C. In such conditions (usually in the vegetable section of the refrigerator), the bulbs are stored until planting.
- Cleaning. The bulbs are peeled and checked for mold and dark spots.
- Disinfection. Planting material is soaked for half an hour in a light pink solution of potassium permanganate.
Container and soil
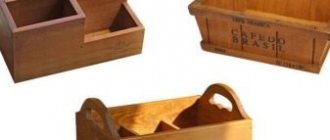
To grow tulips, it is important to choose the right container. The bulbs are planted close to each other, the width of the container is determined depending on the number of bulbs.
It is not recommended to plant tulips in deep pots. For large specimens, choose a container with a depth of 30 cm, for small ones - 20 cm.
Ceramic pots are best suited for flowers. They allow air to pass through and are saturated with moisture, preventing the soil from drying out and reducing the likelihood of liquid stagnation. Plastic containers do not have this property.
Important! There must be drainage holes in the bottom of the container.
Soil options:
- Hydrogel. The substance absorbs moisture, so plant roots constantly receive the optimal amount of liquid. The filler comes in different shades and looks attractive even in transparent containers. If tulips are grown for sale, this soil option is not suitable due to the high costs.
- Sand. In such a substrate the risks of moisture stagnation are minimal. However, the liquid here evaporates too quickly. A lot of attention will have to be paid to fertilizing.
- Soil mixture. This is the best option for growing tulips at home. To prepare the soil, peat, sand and garden soil are mixed in equal proportions.
- Water. Tulips can also be grown in water, but in this case the risk of bulb rotting increases.
The soil and containers are disinfected: poured with boiling water or a dark pink solution of potassium permanganate.
Diseases and pests
The most dangerous for tulips are mushrooms. They penetrate into the flower bulb itself and destroy it. The cause of fungal diseases is high humidity. You can dry the onion incorrectly, without observing the temperature regime, then it will initially become diseased. Or you can plant an onion and care for it incorrectly, then inflammatory processes will begin to appear in the soil.
Because of the fungus, the flower becomes weak, sluggish, and may shoot out its arrow and not bloom. The most dangerous fungal infections are gray rot, white rot, typhullosis, root rot, and fusarium.
Some types of rot can be combated, but if others are detected, it is unlikely to help the plant.
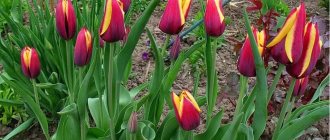
Viral diseases are also dangerous for flowers. Unfortunately, there is currently no treatment for viral infections such as variegation and August disease. In the case of variegation, spots and stripes are observed on the petals. Previously, it was believed that this was a new variety of tulips and gardeners even tried to breed similar flowers in large quantities, however, today it is reliably known that petals affected by the virus take on a different color. It can be brought in by birds, insects, including those living in the ground, and even by humans themselves when cutting a flower (if, for example, the juice from a diseased tulip gets onto the stem or petals of a healthy one).
August disease manifests itself in the form of an ugly curvature of the stem and leaves of the flower. The virus affects the growth and development of tulips. Both the bulb itself (rotting will be visible on it) and the stems and leaves (light spots will be visible on them) may be affected. This virus is transmitted from the weeds on which it constantly lives. Unfortunately, affected bulbs cannot be cured and must be destroyed.
It is important to use high-quality soil and bulbs when planting and, in case of doubt, to correctly determine what exactly is affecting the bulb in order to prevent further spread of the flower disease in the pot.
Bacteria and microorganisms, as well as insects that live in the ground, are no less dangerous for tulips. Depending on what symptoms are observed in the tulip, appropriate treatment is taken. This can be either spraying or watering the plant with the necessary solutions . You may also need to add ash, magnesium, and sodium.
The disease weakens the flowers and disrupts the cycle of its life. Even after releasing the arrow, the tulip may not bloom. If the flower grew strong and yellowness began to appear on its leaves, pay attention to whether you have changed the location of the plant or whether it is in a draft. Be sure to check whether the flower has enough sunlight and whether the lighting is normal for it. This is the first reason for yellow and weakened leaves, provided that before this the tulip grew strong and healthy.
It is important to identify the cause of the disease and eliminate it as early as possible. Otherwise, you may not wait for these beautiful flowers to bloom. Indoor flowers feel when they are grown with love, when they are properly cared for. They will gratefully respond to your efforts with beautiful, fresh, bright and large flowers.
To learn how to grow tulips at home by March 8, watch the following video.
This article was co-authored by Lauren Kurtz. Lauren Kurtz is a naturalist and horticulturalist based in Aurora, Colorado. Currently managing the sustainable water garden of the Aurora Municipal Center (Water Conservation Department).
Number of sources used in this article: 15. You will find a list of them at the bottom of the page.
Planting dates and technology
Tulips are grown at home all year round. To get the buds out by the right time, it is important to correctly calculate the planting time. On average, 3-4 weeks pass before rooting, and 16-18 weeks from rooting to flowering. These dates are given for early tulips; for later varieties the indicators change.
To calculate the planting date from the time by which they should bloom, take away the rooting time and the period from it to flowering. There are average landing times for major holidays:
- for the New Year and Christmas - in the first half of September;
- for Valentine's Day - in mid-October;
- by March 8 - at the end of October or beginning of November.
In a pot, tulips bloom for more than 2 weeks. Cut buds remain fresh for no more than a week.
This is interesting! Stores sell bulbs ready for forcing. They are planted in the ground immediately after purchase.
Before planting tulips, prepare the bulbs, soil and containers. Then we begin to root the plants:
- A layer of drainage is poured onto the bottom of the container. 2/3 of the volume is filled with soil.
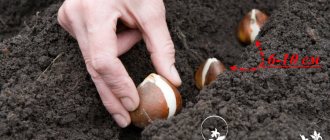
- The bulbs are placed at a distance of 2-3 cm from each other. Some gardeners plant them close to each other. The planting material is lightly pressed into the ground.
- The bulbs are completely covered with soil. The soil is moistened with water at room temperature.
Until the first shoots appear, the containers are kept at a temperature of +8...+10°C and a humidity of 75%. When the planting material germinates, the temperature is reduced to +1...+3°C.
3 weeks before the expected flowering, the tulips are moved to a dark room with a temperature of +14°C. After 4 days, the plants are transferred to a bright place (or additional lighting devices are turned on) with a temperature of +18°C.
Preparing the bulbs
If you buy seed material in a store, then most often the bulbs are calibrated, processed and ready for planting. But it still wouldn’t hurt to check each onion for damage during transportation or any other incidents.
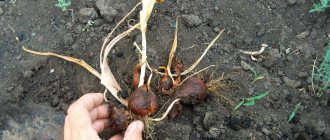
If you take material from your own garden bed, then you need to dig up the bulbs after flowering and the plant has completely dried out (somewhere in June-July). Having thoroughly cleared the husks and soil, select only large bulbs, 4-5 cm in diameter and weighing 30-50 g, then place them in a cool place to undergo a dormant period. This could be in the basement or on the bottom shelf of your refrigerator. The air temperature should be approximately 5 degrees Celsius. This is necessary so that the bulbs are properly prepared for flowering, because under natural conditions they form buds only after “hibernation”. In this way we can “deceive” them and force them to bloom in the middle of winter or whenever we want.
Before planting, the bulbs must be placed in a weak, warm (25-27 degrees) solution of potassium permanganate for 30-40 minutes to destroy harmful microorganisms and pathogens of various diseases.
The seed is ready. Where should I plant it?
Further care
Caring for tulips does not take much time. It consists of timely watering and fertilizing.
Plants are moistened every day, morning or evening . Use settled water at a temperature of +8…+12°C. It is not poured on leaves, peduncles and stems of plants.
For the first 2 weeks, regular watering is alternated with the addition of a calcium nitrate solution (20 g of the drug per 10 liters of water). Twice during the entire growing period, tulips are fed with special fertilizers for bulbous plants, diluted according to the instructions.
It is important not to use concentrations higher than recommended doses and not to apply fertilizer too frequently. This will damage the roots and reduce the chances of the plants flowering.
Possible difficulties
At home, tulips rarely get sick if the soil, bulbs and containers have been treated. Pests do not fly into the apartment in winter.
Although caring for tulips is not difficult, novice gardeners often make mistakes. This causes the following problems:
- The buds are dry and feel like paper. This problem occurs when there is not enough fresh air or the temperature is too high.
- Drooping flower stalks indicate elevated temperatures in the place where the tulips are grown.
- Weak flower stalks are a sign of calcium deficiency.
- Planting material does not take root. The problem occurs when air humidity is low.
- The bulbs rot if the tulips are watered with warm water.
- Tulips do not form flower stalks. This indicates that too fine planting material was used.
If the described problems occur, all negative factors are eliminated. Usually this is enough to restore proper plant development.
Proper care of young flowers after planting
Before the first shoots appear, the plantings need to be watered regularly. The irrigation regime depends on the amount of natural precipitation and soil composition.
After germination, watering continues. You only need to pour water at the root so that moisture does not get on the leaves and stems. At the same time, you should feed the plants with potassium, nitrogen and phosphorus fertilizers.
When flowering is complete, the wilted leaves must be removed. The stems are cut off when they turn yellow. In the fall, you need to dig up the bulbs, dry them and send them for the winter. But if the climate allows, they can simply be left in the ground, and the flowers will sprout beautifully next year.
Proper spring planting of bulbous bulbs leads to the fact that they bloom with bright buds already in this season. You can learn more clearly about planting tulips in the ground in the video.
Advice from experienced flower growers
Recommendations for growing tulips at home:
- To speed up flowering by 2-3 days, the room temperature is raised to +20°C 3 days before the desired time for buds to appear, and the soil is moistened with water at room temperature.
- Bulbs with different periods of ejection of flower stalks are planted in a pot in layers. The later the flowering period, the deeper the planting material is buried.
- To obtain good material for the next planting, tulips continue to be cared for even after cutting off the flower stalks.