Livestock » Horses
0
2196
Article rating
Kira Stoletova
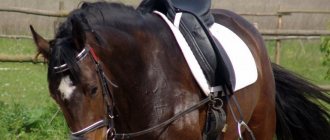
From the outside it seems that riding a horse is not so difficult, but already the stage of harnessing the horses becomes an insurmountable barrier for many novice riders. The most important part of the harness is the horse’s bridle; it is put directly on the horse’s head.
Horse bridle
Let's look at what a horse bridle is, which bridle is considered the most suitable, and whether a rope halter can be used. You also need to understand what the main differences between the subtypes of bridles are and what the concept of “horse halter” means.
A halter is an indispensable product when walking cattle
A proven device that can be used to control a steer without any problems is a halter. Thanks to this product, you can turn the head of the cattle in the required direction. To make a halter for a calf, take a canvas collar and attach a crossbar to it. In the middle of the muzzle we attach a ring to the collar to connect a leash to it. In this case, the animal’s head should easily fit into the resulting hole.
The device fastens behind the ears and allows the goby to drink water and browse grass. When put on, the crossbar is adjacent to the muzzle, and a dog leash is attached to the ring, which allows you to lead the calf in the direction desired by the owner. The principle of operation of a halter for animals is the same as a ring in the nose of cattle, but without the slightest pain. The sizes of all parts are selected individually for each individual.
Problems and their solutions
A horse is a wayward animal, with a character, and if it doesn’t want to, it can take a lot of time to put on a bridle. Tall horses like to throw up their heads, which makes it very difficult to put on a bridle, because it is impossible to even reach and throw the reins, let alone put the bridle on. In this case, you need to pet the horse and talk to it in a calm voice. It is better to hide the bridle behind your back; you can offer a treat. Even the most harmful horse will reach for a treat.
It happens that a horse becomes mischievous and will never take the bite into its mouth, clenching its teeth tightly. Experienced horse breeders use this method. You need to put your finger in the horse’s mouth, where there are no teeth, and press on the lower jaw with your finger, while its reflex is triggered, and it briefly opens its mouth. But during this time it is necessary to have time to put a bit in her mouth and tighten the bridle. You can also insert the bit along with a treat, sugar or carrots, but it is better to achieve this with patience and perseverance and then give the horse a treat.
Horses have a good memory and next time they may not take the bit until you give them a treat. This can lead to the formation of incorrect habits in the horse; you must always remember that in this union the person should be the main one, not the animal.
Video: How to put on a bridle
What types of bridles are there?
Photo of a snaffle bridle
There are two main types of bridles:
- snaffle;
- bitless.
In this case, the headband with a snaffle is distinguished between snaffle bits (that is, they contain one separate bit) and mouthpiece ones (they come with two bits, with one of them revealing a whole rod). If we compare these two types, bit bridles are characterized by softness, since basically the bit consists of two fingers and two or one connection. Therefore, as a result of pulling the rein, the bit folds into a U shape, making it more anatomical. It should be noted that the mouthpiece is mainly used only by experienced riders who are able to transmit much more complex commands for, for example, dressage.
The mouthpiece headband is characterized by the presence of two bits
A cowboy bridle for horses is also known, which is made of fairly thin straps that allow the cowboy, in case of a break, to repair it himself if he is away from the saddler.
Horse in a cowboy bridle
Cowboy headbands are divided into single-ear and slotted. The occipital strap of the latter is made of a solid piece of leather, with corresponding slits for the ears, hence the name. This type of sewing makes it impossible to pull off the bridle. A single-ear frenulum is characterized by the presence of separate loops that fit on both ears. The reins of this type of bridle are not secured together in order to protect the horse from becoming entangled if they end up on the ground.
Bridles without a bit are also used, for example, a hackamore - a specific device that allows you to control a horse without bridling it. It turns out that such bridles are an excellent option for animals that have certain problems with the oral cavity.
The hackamore is used without a capsule, so the pressure falls on the bridge of the nose and is quite painful
The hackamore is used without a capsule for the horse, so the pressure falls on the bridge of the nose and is quite painful, which is why they are recommended for use only by experienced riders. There have been cases when the rider did not calculate the force, and as a result, the fragile bones of the bridge of the nose were broken. It should be borne in mind that the longer the hackamore's arms, the greater the pressure applied.
For horses that are calm and obedient, ordinary rope halters are used. Reins are attached to them on both sides.
Rope halter
A bridle for a horse without a bit is also known - the side pull - roughly speaking, the same thing as a halter, only the tightening force of the capsule is much stronger and the reins are attached on both sides. In the West, side pull is mainly used on young horses before putting on a bit; similarly, beginners work with such a bridle, because even despite inept handling, they will not be able to harm the horse, as this can happen with the use of iron. But I repeat once again that such a bridle is only suitable for a calm horse; it will not hold a restive animal.
Side-pool bridle
Cook's bridle is another type of bitless bridle, invented by the famous English doctor Robert Cook. She became the subject of great controversy among horse breeders.
The thing is that this horse bridle puts pressure on the nose, ganache, and also on the back of the horse’s head. Design features and abundant contact with the head can lead to very strong pressure.
Structure
Bridle structure for a horse:
- Reins - 2 ropes of equal length that are attached to the bit and drive it.
- The noseband is the mechanism that holds the bit in the horse's mouth. Located in the area of the bridge of the nose.
- Cheek straps are a connecting element that connect all parts of the bridle into a single structure.
- A poll strap is necessary to prevent the harness from flying off the horse's head.
- Chin strap - previously used to stabilize the bridle, is absent in the new type of harness.
- The forehead protector is an aesthetic detail that serves as decoration.
- The guard is an additional element, used as needed.
There are many types of bridles. Each variety has distinctive features and is used depending on the purposes and conditions. Even a small detail affects functionality and mode of operation.
Bridles, depending on the structure and weaving pattern, are divided into 5 types. Let's consider each type in detail.
Snaffle
This type is classic and is optimal for beginners in horse riding. The structure of the bridle is simple, and its application is universal. The equipment can be used for horse riding and training, for equipping young horses.
A mandatory element of this headband is an iron, also known as a snaffle. Not all types of bridles are equipped with nosebands; this feature depends on the manufacturer and does not affect functionality.
Mouthpiece bridle
It differs from a snaffle bridle in that an additional mouthpiece (iron) is inserted into the horse’s mouth and another pair of reins is attached. When using 2 types of iron while riding, the rider gives more precise commands to the animal. Therefore, the mouthpiece bridle is used when equipping animals for law enforcement services.
A mandatory element of such a bridle is the noseband. Other elements: straps for the forehead and chin area, cheek strap, bit and mouthpiece, chain for attaching the mouthpiece, reins of the mouthpiece and bit.
Cowboy bridle
The design of the cowboy headband does not imply the presence of a bit and a mouthpiece, a capsule, but is also based on a system of 3 belts. These bridles are made from thin webbing so that you can repair them yourself in the field.
Depending on how the neck strap is designed, cowboy harness is divided into 2 subtypes:
- Slotted - in a thick leather belt, 2 slits are made for the ears of the horse.
- A belt with a long hole for the horse's ears. The sizes for horses of different breeds, ages and genders are different. Therefore, to ensure that the product does not cause inconvenience to the animal, measurements must be taken from each horse separately.
Bridle for walking
Often used for long horse rides or transitions and travel, when horses must be watered. This feature is considered an advantage of this type.
To remove the bit from the horse's mouth and give it water, you need to perform simple steps. This version of the bridle is considered a mixed type of standard headbands and halters.
Hackamore
The design of this type of headband does not include iron. There is also no noseband, which reduces the impact on the horse's jaw, but increases the pressure on the forehead and bridge of the nose. It is recommended to use a headband in case of injury to the horse's oral cavity or on trained and conditioned horses. Not recommended for use by horseback riding enthusiasts.
The hackamore, like the cowboy bridle, is divided into 2 subspecies:
- English - consists of belts for the lips and bridge of the nose. The carrying belt must be used with a padding pad. The role of cheek straps in this subtype is performed by metal parts.
- The German hackamore is distinguished by a modification: instead of a portable belt, a metal part is used, and a mouthpiece chain is present. This headband model is equipped with elongated cheek straps that increase pressure on the bridge of the nose.
This type of horse equipment, such as a bridle, has undergone many years of changes and has become more convenient, reliable, but also complex at the same time. Therefore, before you make a bridle for a horse with your own hands, you should study the theory in detail, understand the structure and features of the equipment.
We must not forget about safety precautions. You should definitely learn how to saddle a horse and put on bridles and halters correctly.
The bridle is one of the main pieces of horse equipment needed for riding. It is simple to use, and it is not difficult to do it yourself if you know the principle of operation and the sequence of actions. This will be discussed below.
The structure of the bridle
Let's look in more detail at the structure of the frenulum. The first part is a strap on the back of the head, it is needed to ensure that the entire structure does not fly off the horse’s head. The lower straps, located on the cheeks, or cheek straps, play the role of a connecting element, as they connect all the straps to each other, making the bridle a single device. The last strap, the chin strap, has recently been abolished; it is almost impossible to find it in the new type of bridle. Previously, its function was to stabilize the product on the horse's head.
What is a capsule? The noseband is the mechanism that holds the bit in the animal's mouth. Naturally, the horse wants with all his might to get rid of the bit, which interferes with normal swallowing of saliva and chewing, and blocks the normal functioning of the tongue. To prevent her from spitting out the bit, a noseband was invented. Its place is located in the area of the bridge of the animal’s nose.
Principles of bridle structure
What is a forehead protector? This detail has more of an aesthetic meaning. Horse breeders make a beautiful decoration from a forehead, decorating it in every possible way with ribbons, sequins, stones and rhinestones, everything is limited only by a person’s imagination.
The last part of the bridle is the reins. Everyone has ever seen what they look like in a photo or video. These are 2 ropes or ribbons of the same length, attached to the horse’s bits. You can buy them ready-made in a specialized store or make them yourself. It is with the help of the leash that the bit is activated and the horse performs the required actions.
Horse halter
Horses are very sensitive. For horses with particularly sensitive skin, a basic halter is used, which has a full bridle set, but without a bit.
It is used to tame a horse, take it out of the paddock and keep it on a leash. A halter for a horse is made of leather or special braid. When exposed to rope harness knots, the horse submits in order to get rid of unpleasant sensations. For a halter, choose a nylon or yacht rope of a certain thickness, but due to the slipperiness of nylon, it is problematic to sew a harness from it. A more advanced leather halter consists of a muzzle (nose), chin, cheek and poll straps and a buckle or carabiner for fastening. The halter is worn when the animal is taken out of the pen to secure it in the stall. It is convenient for controlling the position of the horse's head. Due to its structure, putting on this harness is much easier than a bridle.
When walking a stallion, you need to hold the reins tightly near the head and walk on the left side of the animal. At the same time, the horse must be parallel so that the horse can show its character, make an unexpected jerk to the side, hit or step on the rider, or go beyond the bounds of decency. This type of equipment is mainly used for animals with a calm and obedient disposition.
How to make a bridle for a horse with your own hands
You can make your own bridle and halter. Let's look at how to make these accessories. When making a bridle for a horse with your own hands, first sew the cheek straps to the head straps. Prepare the safety rings and chin strap. A occipital strap and a forehead protector are made. Then all the components are fastened together. If desired, treated with a water-repellent compound.
The halter is constructed using simple knots. To ensure the correct size, measure the circumference of the nose below the cheek bones. The size varies from 50 cm to 70 cm for different breeds of horses. The product needs to be made a little larger in size so that it does not rub the delicate skin of the animal. The horse should not be cramped, but care must be taken that if the fit is loose, he cannot stick his hoof into the resulting space. The halter was developed by Voeikov A.B. more than seventy years ago, but is still relevant today
Safety
The halter has increased strength as it is made from a single piece of rope. To ensure safety, this harness is made to be breakable with a leather insert in the upper part. The part is replaceable, fastened with clasps, and if the animal gets caught on a fence or tree, it bursts under high pressure. This saves the horse from injury or even death. Therefore, beware of leaving your horse unattended to avoid injury or accidents.
Care
Most bridles are made of leather, which requires special care. After using the bit (iron), you need to take it in your hand and rinse it with clean water, wipe the inside and outside of it with a rag to remove sweat and dirt. The headband is thoroughly cleaned and lubricated with a special fatty cream, or regular fat, regularly once a week. The bridle ribbons are simply washed with water. With proper care, the harness will serve faithfully for many years of equestrian sport.
How to choose a harness
In the minds of the ancient Slavs, when buying a horse, they also bought harness. It was believed that this way the animal would get used to the new environment better and faster. When choosing equipment, you need to look at the country of manufacture. For riding and show jumping, German and Dutch bridles are best suited. For trotters, it is worth buying an Italian-made harness. For horse racing, eventing and young stock racing, German or Russian. It is better not to take harnesses from India. The bridle should not be selected only by appearance and when buying a harness, you should listen to the advice of experts.
It is necessary to take into account the individual characteristics of the animal’s structure, breed, character, intended purpose and measure the exact size. There is a concept called “degree of freedom”. To determine it, you need to count the holes on the corner belt. Their number will be the degree of freedom. The accessory may be a little larger, but not smaller for complete reliability and emotional comfort of the horse. A correctly selected headband, according to veterinarians, prolongs the life of a horse because the raised poll and tucked back relieve the horse's front legs and shoulders, which are overloaded with the rider's weight, from the load.
When working with an animal, a person is responsible for his actions and should be humane and caring. The horse should not suffer due to the owner’s inattentive and incompetent approach to this issue.
How to dress correctly?
How to put on a halter correctly? In order for the product to fit correctly, it is important to follow all recommendations.
Let's describe the whole scheme step by step:
- The first thing you need to do is to carefully inspect the halter to see if it has cracks or other damage, or if it has changed in size. Leather halters last longer than those made from rope.
- Stand on the left side of the animal and show a friendly attitude.
- With a sharp movement of your hand, throw a chombur around the horse’s neck, and then unfasten the top strap at the back of the head.
- Start straightening the lead ropes after the chumbur, if you are using a rope halter, then place the bridle itself directly on the horse’s head, then close the carabiner.
When working with an animal for the first time, you should not make sudden movements while throwing the chumbur. Also, you should never show your fear: horses feel it. It is better to wait for the time when the horse is more inclined.
Traditions and rituals
Since ancient times, people have attached special significance to many household items. And the bridle was no exception. And since the horse was a person’s most active assistant a hundred years ago, this item was endowed with various magical properties. Therefore, different peoples have many rituals in which this attribute is present.
First of all, bridles are in demand in traditional wedding rituals. For example, among the Turkmens they threw it over the bride’s clothes, and the groom tried to use these ropes to remove the headdress from his future wife. This ritual is intended to remind you of the obligatory submission of the other half.
The bridle is an object for ritual actions among the Turkmen
In Rus' it was believed that this item was able to protect the wedding procession from the evil eye. When the sorcerer left the newlyweds’ courtyard, he went to the stable and blew on the bridle. It was also not customary to buy a horse without this item. It was believed that this would make it worse for her to get used to the new home. The Kazakhs put a bridle in the boy’s bed every day. According to their beliefs, such a ritual will help raise their son to be a good horseman. After receiving baptism, Ossetians performed this ritual for some time. A bridle was placed in the hand of the deceased man and the horse was led around the grave.
The Russians also had a wedding ceremony with ammunition.
Manufacturing process
Using the measurements from the compiled table, you need to tie four regular knots in sequence at one end of the rope.
- Again, using the measurements, you need to fold the rope into a loop and tie a regular knot from it, such as the one usually tied on shoelaces. The loop should be approximately ten centimeters long.
- Now the left nasal knot is tied from the loop. It is made double, as described above.
- Next you need to tie the right double knot, moving from the left. After tying this knot, the halter will have two pieces of rope parallel to each other and tied between the left and right nose knots. They must be the same length.
- The next step in making a halter is to tie a double throat knot. Using the dimensions in the table, you will need to tie the knots so that the distances between the right nose knot and the throat knot and between the left nose and throat knots are the same. The length of the ropes on both sides will be different, so the difference in length must be corrected.
- Next, a double knot is tied in the horse's right ear from the throat knot. The halter should already have the proper shape. It is necessary to check all the dimensions of the resulting product against the table; they should not diverge much.
- The next step is to tie the two long parts of the halter with a regular knot. You will get two loops about ten or twelve centimeters long. You should not tighten the resulting knot before the halter is tried on the horse.
- Now the ends of the ropes must be cut so that they are the same length. If the rope is synthetic, the ends are melted with a lighter. You can leave the ends of the rope untied or tie the two ends, for example, with leather.
Stages of tying
Manufacturing stages
When starting work, be sure to look at the sewing patterns and the result you should get. Study the structure of the frenulum. And start sewing.
- Take measurements on the horse's head. From the corner of the mouth, you need to use a tape measure to measure the length along the cheeks, draw it to the ears, go around the horse's head and bring the measuring tape to the second corner of the mouth. Add 10 cm of reserve to the resulting length and count the amount you need on the belt. This way you can make the first elements - 1 neck strap and 2 cheek straps. But it will be in the form of one continuous tape.
- Start making a strap for the frontal area. It will be short enough, so you can take a completely worn, torn belt. To determine the correct length, you need to attach a measuring tape to the animal’s right ear and stretch it in a straight line to the horse’s left ear. Add 10 cm to the result again and measure the desired length on the belt.
- Using the same principle, you need to make a blank for the chin strap. Having taken measurements of the horse, add another 4-5 cm. Since this element should sit freely on the horse.
- Now take the prepared loops and thread the forehead strap through them. Then place it on the cheek strap. There is no need to stitch this junction as the strap on the horse's forehead should move freely.
- Securely, using several seams, sew the chin strap to the two cheek straps. See the diagram for the exact placement of the straps.
- Take the snaffle and cheek straps. They need to be threaded into snaffle rings on both sides. The ends are sewn together.
- Now you need to decide on the length of the reins. The standard size of this element is from 120 to 150 cm. Consider how it will be more convenient for you to control the animal. Both ends of the reins must be securely attached to the snaffle rings.
Your homemade horse bridle is ready! It is recommended to try the equipment on an animal before use.
Advice. Instead of loops, you can install buckles on all belts. This will be a very convenient way to adjust the length.
How to make a halter for a horse with your own hands?
Buying horse harness is always a big financial expense, but as for a halter, anyone can make it with their own hands, spending about 2 hours on the work. The procedure includes only three steps:
- Taking measurements.
- Search for materials.
- Manufacturing process.
Important! You should not use a side pool unless you are an experienced rider. Inept use of this model can lead to a fracture of the bridge of the equine nose.
Sizing
To determine the size of a halter for your horse, you need to take measurements of its head. How to measure your head:
- chin – width + 3 cm;
- forehead – width + 10 cm;
- from the ear to the corner of the mouth, from the back of the head to the corner of the mouth and along the cheek + 10 cm;
- The length of the reins is at your discretion.
An ordinary tailor's centimeter is suitable for measurements. Start the measurement line from the mouth, up through the back of the head and down the cheek, then along the other cheek and down to the opposite corner of the mouth.
Materials and tools for work
All you need:
- rope (for kob size – 6.7 m, for full size – 7.3 m);
- scissors;
- ruler or tailor's centimeter;
- a marker that will be visible on the rope of your color;
- a lighter to singe the edges of the rope on cuts.
The choice of material depends on you, as does the color of the rope, be it black, blue or rainbow.
Learn how to make your own horse blanket.
Manufacturing procedure
Stages of creating a rope halter:
- Measure the required length on the rope - for kob size - 90 cm, for full size - 1 m. Do not cut, put a mark in this place with a marker.
- At the marked point, tie the first knot - take the long part of the rope in your right hand and throw it over your left hand, threading the edge into the resulting loop towards you, stretching the entire rope to the end. All subsequent nodes will be identical to this one.
- Mark with a marker the next segment from the knot - for kob - 22.5 cm, for full - 25 cm and make a second knot. The mark should be to the left of the formed node.
- The next section for the kob is 25 cm, for the fulla it is 27.5 cm, make the third knot.
- Next for the kob - 82 cm, for the full - 87.5 cm and the fourth knot.
- Further for kob – 25 cm, for full – 27.5 cm, but the knot will be different. From the measuring point, fold the rope in half and tie a not very large loop, 5 cm to the knot. This loop will be used to tie the neck strap of the halter.
- Measure a piece of length for kob - 25 cm, for fulla - 27.5 cm. Find the longest piece from the previous ones, take its end and attach it to the new mark.
- Find the end of the rope and through the slightly loose knot, pull all the remaining rope through to the end. Throw it over the knot, pass it back and through the loop of the new one, stretching the entire rope until a new knot is formed.
- Pull the outer marks so that they meet the last knot (on both sides). Tighten areas without marks.
- Attach the rope for the fastening belt to the previous section. Loosen the knot slightly, pass the end of the rope through the bottom hole in the middle of the knot towards you, pull all the remaining rope through this hole, pull it up, throw it over, moving the rope over the top of the knot and bring the tip under the bottom into both loops at the same time as pulling.
- Move the marks on the rope to the knot in the same way as the previous point and tighten the knot.
- The next length for the kob is 82.5 cm, for the fulla - 87.5 cm. Fold the resulting halter over your left hand, hanging it so that the two long pieces with knots are parallel and at the same level.
- Take the knot with the rope against the mark and do the same as in steps 8-11.
- The next knot at a distance for kob is 25 cm, for fulla – 27.5 cm. Perform the same steps as in step 13.
- The last piece for kob is 80 cm, for fulla – 85 cm. Cut off the excess and singe the ends of the rope with a lighter. It is not necessary to tie a knot at the end; you can glue it together by heating it with a lighter and squeezing it.
- Pull the long neck strap through the loop at the top. Place the soldered end of the rope under the loop on the side of the horse's cheek and thread it into the resulting loop, pulling it upward.
- Adjust the size of the halter with the long ends of the rope, making a loop for the chemburr. Tie with a simple knot.
We make our own equipment for horses
In nature, horses do not require any additional equipment. Pets need equipment that will allow the owner to easily control the horse and also protect the pet from the cold.
It is also important to remember about horseshoes; without them, domestic horses, unlike their wild counterparts, have a very difficult time. Fans of making their own everything necessary for their pet not only receive exclusive equipment for the animal, tailored individually to it, but also significantly save their budget
When made with high quality, homemade products are not inferior to purchased ones, and sometimes even surpass them.
Halter
A halter for a horse is necessary for convenient removal of the animal and direction of its movement. They put it on the head. A halter also allows you to secure a horse in a stall or in a pasture.
Externally, a halter looks like a bridle that does not have a bit and has one rein. Hold the horse by the halter strap on the left side in the cheek area. All human movements must be calm and not cause sudden jerks in the equipment.
Otherwise, the horse will become frightened and may cause serious injuries.
You can make a halter from leather or rope. The second option is preferable for pets with delicate skin. They make a halter after first taking measurements of their pet's head.
To make the item, you need to take 7 soft straps lined with fleece 4-5 cm longer than necessary (will be used for seam allowances). A carabiner clasp should be placed on the left side of the back strap. The straps are connected to each other according to the scheme using strong metal rings of sufficient size.
The leather will rub the skin on the horse's muzzle, and therefore the poll strap and the fastening strap must be hemmed with fleece, folded in half. Thick flannel will also work.
A halter is made from rope using knots. You need to take a soft synthetic rope of sufficient strength. There are different schemes for linking equipment, and you can choose the one that is most understandable for yourself. The process of making a halter from leather belts is quite complex, and if possible it is better to purchase it ready-made. The rope one can only be made independently.
Bridle
Unlike a halter, a horse bridle has a bit or snaffle - a special metal ring that is inserted into the horse's mouth. A bridle is required for riding. It is made with your own hands as follows:
- A piece of soft belt equal to 3 lengths is cut from one corner of the mouth to the other through the cheeks and back of the head, making a 10 cm allowance for the seams;
- A piece of the strap is cut off from ear to ear - it will be the frontal one. The allowance is also 10 cm;
- The volume of the chin strap is determined by adding 3 cm for the comfort of the horse to the length obtained after the measurement;
- Assembling the belts according to the instructions.
The reins are sewn to the bridle last, choosing their length depending on your own convenience. It will change according to the growth of the animal and the rider.
When choosing a ring for a bridle, you need to make sure that it fits comfortably in the animal’s mouth without touching the teeth. The mucous membrane of a horse's oral cavity is delicate, and it can be injured even with your fingers when putting on a bridle.
For this reason, it is important that the bit is smooth, without cracks or nicks. Every owner knows how to make a bridle for a horse with his own hands.
blanket
Horses cannot tolerate frost without harm to their health. To be in good condition, they need, like people, outer clothing, which is a blanket. The blanket looks like a blanket. There is no need to buy a ready-made blanket, because it is very easy to sew it yourself.
To obtain measurements the following are measured:
- Length from chest through legs (sides) to tail;
- Length of the back from the withers to the beginning of the tail.
When taking measurements is impossible, you need to rely on the average table used to sew blankets in workshops. A DIY horse blanket is as comfortable as possible for the animal.
Using a standard pattern, adjust it to the size of your horse. After this, all the details are cut out from the selected fabric (cotton for summer, wool for winter). You need to add 15-20 cm to the seams. First, all the elements are swept away, and then stitched on a sewing machine.
For a winter blanket, you also need to provide a lining. A fastener is made in the abdomen and chest area. At the discretion of the owner, it can be made of Velcro, buttons, carabiners (preferred) and large metal buttons.
Blankets should be summer and winter, as well as light wool, which are put on the animal if it sweats during work in cool weather. You can’t put on a warm blanket right away, but a light, slightly insulated one is necessary. As soon as the animal has cooled down, it is wrapped in warm clothes. Knowing how to sew a horse blanket can save you a lot of money.
Purpose
A halter is a bridle without iron and is a necessary item for stable use. It is put on horses to take the animal out of the stall, pick it up from the pen or put it on the junctions (leash). This necessary item is made using very thick braid or rawhide. Today, there are also decorative options that are widely used in shows.
Halter
To put a halter on a horse, it does not need to insert a bit into its mouth. To control the animal, a chombur is used in the form of a strong rope, which is attached to the halter with a carabiner. It is an indispensable tool for cleaning horses, especially those with an obstinate character or excessive ticklishness. To prevent the animal from accidentally injuring a person, a halter is put on it, then it is secured in the passage of the stable at the junctions, and only after that the necessary procedures are performed:
- cleaning;
- saddle;
- forging;
- veterinary activities.
What does it consist of?
If you look closely at this necessary device, you will see that it consists of several straps, namely:
- capsule (put on the muzzle);
- chin;
- buccal;
- occipital;
- carabiner or buckles to fasten.
Rules for dressing a halter
Halters are much simpler than bridles, and therefore, if you know a few simple rules, putting it on will not be difficult even for a beginner. The step-by-step instructions are as follows:
- Before putting on a halter, it should be carefully inspected for damage. All fastenings and straps must be in perfect order. Modern models have buckles or carabiners that are attached to the left side of the back strap.
- Before opening the door to the stall, the horse must be called so that the animal does not get scared. The animal must be handled calmly and, if possible, without sudden movements, especially if the horse is unfamiliar. Chombur is worn around the neck.
- The next step is to unfasten the buckle on the back strap.
- The halter is taken with the left hand, the right hand is thrown over the animal's head. The noseband fits over the muzzle, and the neck strap goes behind the ears. Only then can you fasten the buckles.
What else do you need to know?
There is no iron in the design of the halter, so there will be no total control over the horse. A special weave of threads that wrap around the horse’s muzzle like belts helps keep the animal tethered.
Due to the special structure of the halter, it is important to remember the precautions that will help protect both the animal itself and the person caring for it from injury.
In short, the outline of the rules required to comply is as follows:
- Even if the halter is securely fastened, the mare or horse should not be left tied for long periods of time. A horse is a strong and powerful animal.
- A horse should not be allowed to frolic while a halter is attached to it.
- You cannot buy products from hand; it is important to make a halter strictly according to individual measurements so that it fits the size and characteristics of the physiological structure.
- Ropes, even if braided in a special way, can injure a horse, so you should not keep him on a leash for too long.
How to make a bridle and halter for a horse with your own hands
It is useful for a horse breeder to know how to make a halter for a horse. You can make a bridle and halter yourself, from scrap materials. This is exactly what the gypsies do, as well as many rural residents.
How to properly wear bridles and halters
The product can be sewn according to a ready-made pattern. First you need to take measurements from the horse's face and neck. Correct sizes are very important. Next you need to master the technique of performing double knots. Tying a double knot is not difficult, but it is very strong. The correct design of a halter, made using a double knot, has the shape of the letter X. The material can be used as an ordinary rope. The only condition is that it must be as durable as possible.
A metal or plastic ring is sewn at the bottom of the structure. It will then be possible to attach junctions to it, which are necessary to keep the horse in the same position for a long time. This will make it much easier to hold the horse by the bridle. It will also be possible to attach a cord to this ring.
The finished halter can be decorated as desired. The main thing is that the decoration does not cause discomfort to the horse while moving (for example, stones with sharp corners should not be used for decoration). The decor should not cut into the skin or cause irritation. You should not place decorative elements in such a way that they make it difficult for the horse to see the road.
Modern stores offer a huge selection of products for horse breeding and equestrian sports. You need to be especially careful when choosing a bridle, then the horse will easily cope with its tasks, and the owner will be satisfied with it. If the bridle is of high quality, nothing will cause the animal discomfort while moving.
What is a halter?
This is a special device that serves as a reliable fixation when the horse is standing. For example, a halter will be useful when you need to wash a horse or carry out any medical treatment or routine examinations.
In addition, using a halter can greatly facilitate the movement of an animal over short distances, for example, from one stall to another or to a pasture.
Why does the product have this name? The fact is that this is an imperfect bridle, which lacks the most important element - the bit.
Recommendations when using a halter:
- You need to use a halter correctly, so if you need to lead a horse, you should keep the reins as close to the head as possible so that the horse feels that it is being followed, and not vice versa.
- When using a halter, you should always be on the left side. At the same time, it is necessary to keep pace with the animal, not falling behind, but not going ahead.
- You should always be on alert, because even the kindest animal can show character and give a person a good kick with its hoof.
Features of using a halter
Rope halters are most often used for the most delicate and sensitive horses.
The horse owner has a choice: purchase the product in a store or make it with his own hands at home; nylon threads or twine used in yachting are suitable for this.
Of course, if there are several animals on the farm, there is no need to talk about weaving a rope halter for a horse with your own hands; the easiest way is to buy a ready-made one rather than knit one.
Anyone who prefers this option should pay attention to the manufacturer Schleich; reviews of their products are mostly positive.
How to make a halter yourself, how to tie it correctly? Weaving a product will not be so easy, because the twine or thread will constantly slide in your hands, which will significantly complicate the weaving process.
It also happens that an animal categorically refuses to use store-bought halters, then a DIY halter will come in handy more than ever.
When creating it, it is possible to use a variety of weaving styles, but the most common is knotted, where each knot should be located at a distance of about 2-5 cm from each other.
How to make a halter with your own hands
So, from the beginning of the article it becomes clear that halters are necessary attributes for a stable. Of course, it must be individual for each horse.
You can make the necessary purchase in a specialized store or do it yourself. The second option is cheaper, and you can create a real individual masterpiece.
Sewing a synthetic model
Before you start sewing, you need to take measurements of the horse. Yes, this is a very important stage. A small model can cause discomfort for the pet, and if the halter, on the contrary, is too large, then it will simply fly off the head, and at the most crucial moment.
The advantage of synthetic material is that it is more practical for everyday use. Dirt and water are not a hindrance for such models; they can be washed at any time and restored to their original form, but this is much more difficult to do with leather.
Step-by-step instructions
- It is recommended to draw up a diagram with the correct sizes of all straps, of which there should ultimately be 7 pieces with allowances to make sewing easier.
- If the material is quite thin, it is recommended to make two layers of fabric.
- The belt, which will be the back of the head, must be equipped with a carabiner or buckle (at the request of the master). To be able to adjust the desired length, the strap is equipped with holes on the other side.
- The lower snoring belt must have a ring for attaching a chombur or cord to it.
- All belts are connected by rings. The capsule strap can also be provided with holes to fix its dimensions.
- It is recommended to sheathe the neck strap and noseband with fleece or velor so that the original material does not rub the horse’s skin.
Rope models
The main advantage of such a halter is its lightness, as a result of which the horse will practically not feel the straps on his muzzle, and they will not irritate him. It is not uncommon for young horses to react very violently to metal buckles that come into contact with the skin.
Even though the halter weighs almost nothing, this does not mean that it will not be possible to keep the horse under control. If the pet begins to pull the harness inappropriately, then the knots will begin to put pressure on those areas that are affected by a conventional harness. The unpleasant sensation will cause the horse to return to its original position. This method of influence helps to more successfully train a young animal to carry out commands.
Another name for such ammunition is halter. Before you start creating a halter, it is recommended to practice weaving double knots, which are distinguished by their strength, excellent fixation and will not put pressure on the horse’s skin. Before starting work, it is recommended to practice tying double knots on the rope that will be used to make a halter.
Rope halter
Step-by-step instructions:
- First you need to tie a simple knot without tightening the edges of the rope. One of the free ends is wound behind an already tied knot in such a way that another loop lies parallel to the one made. Now you can tie a knot inside the existing one.
- At this stage you can tighten the rope at both ends. In this case, the nodes should not move and remain at the same level. The result, if done correctly, should be an X-shaped structure.
- The halter can only be made after all knots have been successfully completed. Before starting work, it is necessary to take all measurements of the horse's muzzle and make knots in the places where they are needed.
A mandatory part of a horse's equipment is a bridle. It was invented a long time ago in order to control animals, to show where to run, what gait to take, and, of course, to stop.
Horses are considered one of the most intelligent animals, but without the necessary contact it will be very difficult for the rider. This process is carried out using an iron, which is inserted into the horse’s mouth (thanks to this detail, the horse understands the wishes of the rider). For the correct placement of the iron, a bridle is needed.
Bridle
Bridle and its components
As you can see in the photo below, the structure of the bridle varies depending on the model. Therefore, before acquiring a bridle, it is worth understanding the fundamental differences and use cases.
Snaffle headband
Types of bits
Voeykov's bridle
How to put on a bridle correctly
Snaffle bridle
Some horse breeders consider this type of bridle to be classic, which is not far from the truth. The snaffle variety is ideal for a beginning horse breeder. It is simple to implement and universal in use.
The snaffle equipment has straps:
- occipital;
- buccal with adjustment;
- chin;
- forehead;
As well as a bit and a noseband.
Important! The presence of ganache and forehead straps does not allow the criminal to fall into his eyes.
In the snaffle
This type of equipment is suitable for any type of riding and is used for training. As the name suggests, the snaffle is an essential component of this bridle. A carrying strap is optional for this model, so some manufacturers produce bridles without a noseband. This does not affect the technical characteristics of the bridle, but from an aesthetic point of view, such headbands look worse. In addition, replacing one type of noseband with another allows you to adjust the severity of the bridle.
Mouthpiece bridle
The main difference between this type of bridle is the presence of a mouthpiece that is attached to the bit. In addition to the bit, the equipment is complemented by a mouthpiece rein. This makes it possible to issue commands as accurately as possible. That is why mouthpiece bits are included in the uniform of animals serving in the mounted police.
Mouthpiece bridle
The mouthpiece variety consists of a standard set of belts, plus:
- snaffle;
- mouthpiece;
- two types of reins.
The composition includes a bit, a mouthpiece and a capsule.
Important! The mouthpiece variety must have a capsule.
Cowboy bridle
The peculiarity of the cowboy look is that it is adapted to any conditions. Traditionally, it consists of natural leather belts. The straps for this type are made thin, this allows you to quickly repair the harness in case of a break.
This type is divided into single-eared and slotted. The second option is distinguished by a wide angle belt, in which slits are cut for the ears. This option looks more massive, but protects the equipment from being pulled off. Unlike the slotted model, the single-ear model has loops of narrow leather cords for each ear.
Cowboy variety
The structure includes only belts.
Important! The cowboy variety does not require a noseband, but in various modifications you can find the use of a mouthpiece or a snaffle.
Another feature of the cowboy variety is separate reins. This trait is associated with the lifestyle of cowboys, which is particularly active. Driving fast over rough terrain and participating in rodeos often lead to falls. To prevent the animal from getting tangled in the reins and to be able to quickly get to its feet, the reins were divided.
Hackamore
This type of design does not include iron. Due to the absence of a capsule, the pressure on the jaw is relieved, but the load on the bridge of the nose increases. This type of equipment should only be used in cases of oral injury or on well-trained horses.
Important! The hackamore is a rather capricious harness that novice horse breeders need to use with an increased degree of caution.
Hackamore
Like the cowboy, the hackamore is divided into two varieties: English and German. The English hackamore consists of a portable belt, which must have a softening lining and a lip belt. Cheek straps in this variety are made of metal elements.
The German modification of the hackamore is different:
- a metal element instead of a nosepiece (German models are characterized by a rubber coating of the nosepiece and a sheepskin lining);
- mouthpiece chain.
German models have more elongated cheek elements, due to which the pressure on the bridge of the nose increases greatly.
German hackamore
Bridle for runs or side pull
In terms of external characteristics, it is something between a halter and the simplest types. The point is that the rider can quickly unbridle the horse, so the cheek straps of the side-pulls and the reins have a separate fastening.
Side pool
In addition, this type allows you to relieve the animal from excessive pressure from the equipment. You can free the horse by fastening the reins to the portable harness. Due to its high mobility and ease of handling, such a bridle is in great demand among riders who prefer long or multi-day trips. The side pull allows you to quickly turn the bridle into a halter, unfasten the bit and allow the animal to eat, drink and rest.
Horse bridle
A bridle for a horse is an equipment with the help of which the animal is controlled and is used in the horse's harness. There are several types of bridles: snaffle, cowboy, mouthpiece, hacker, western bridle, and racing bridle.
- Let's take a closer look at the simplest equipment for a novice rider: a snaffle bridle. The bridle on a horse's head is a bridle. The key distinctive elements are the poll, cheek strap, chin strap, browband, noseband, reins and bit. The occipital (head) strap holds the bridle on the horse's head. Cheek straps are located on both sides of the head and connect the bit rings and the poll strap, thanks to which the bit is held in the horse's mouth. The chinstrap holds the bridle on the head. The capsule limits the possibility of opening the mouth when acting on the bit-iron in the animal’s mouth. The snaffle consists of one or two fingers connected to each other. The horse is in pain and wants to open his mouth, but the noseband does not allow him to get rid of the device and he has to obey the rider’s hand. The reins are a long braid that goes to the bit, with the help of which the rider influences the horse.
- A cowboy bridle is made of thin pieces of leather, which allows you to quickly repair it yourself if it breaks. It can be single-eared or slotted. The neck strap of a slit harness consists of a piece of leather with holes for the ears so that the horse does not pull off the harness. In single-ear, a separate loop is used for each ear separately. The cowboy headband consists of three main straps - cheek, crook, chin and does not have a noseband; it uses both a snaffle and a mouthpiece. The reins are not connected to each other and the horse does not get entangled in the harness with its legs when falling to the ground.
- A mouthpiece and a mouthpiece rein are attached to the mouthpiece headband. A mouthpiece is a complex type of bit that consists of the bit itself and a special lever that acts on the palate and tongue of the horse. Very convenient for using two types of bits and two reins for better control of the animal. A capsule must be used. The headband consists of a headband, a forehead strap, a chin strap, a cheek strap, and a snaffle and mouthpiece strap. A mouthpiece, chains, a snaffle, snaffle and mouthpiece reins are used. This headband is used by experienced riders to perform dressage exercises.
- A hackamore (a bridle without a bit) does not use iron. The horse is controlled by applying pressure to the bridge of the nose, the poll and the chin fossa. This component of equipment is used for trained horses, or those with a mouth injury. Hackamore comes in English “Bluff” and German.
- The English one is made of a padded carrying belt, metal cheek pieces and a lip belt.
- The German is a rubberized metal nosepiece with sheepskin and a mouthpiece chain. Control occurs through the action of longer cheeks. The longer the levers, the greater the pressure will be. It should be noted that the Hackamore is a very painful harness. It is used exclusively by professional riders, as excessive pressure leads to fractures of the animal’s bones and cartilage. Not all horses respond adequately to pressure on the bridge of the nose.
- Western (show) headband is used in western disciplines. They are used without a capsule; instead of a regular forehead protector, a strap is used over one ear to hold the headband. Often such bridles do not have this belt.
- A racing harness combines a bridle and a halter, and if necessary, you can feed and water the animal by unfastening the bit. The cheek straps and reins are quickly unfastened and only the halter remains. The reins can be attached to a portable belt to simplify control and relieve the animal of unnecessary pressure. This type of headband is used on long hikes.
What is a bridle?
Photo:
A horse bridle is a means by which a mare is controlled. Externally, the bridle can be compared to the muzzle that we are used to seeing on dogs.
However, for horses, not everything is so simple: it is important to know which version of the bridle is best suited in which case and what is the difference between their structure.
The first thing you need to pay attention to is the bit. This is an iron part that should be in the horse’s mouth. It is the bit that allows you to turn and stop the horse in time, and also, if necessary, increase the speed of movement.
Of course, the animal experiences some discomfort, because a foreign object is in the way in the mouth. However, for a person, the process of controlling a horse is greatly simplified.
In addition to the bit, the following are considered mandatory standard elements of the bridle:
- belts that are located on the back of the head, chin and on both cheeks;
- capsule;
- forehead protector;
- reins.
What does it consist of?
Let's look in more detail at the structure of the frenulum. The first part is a strap on the back of the head, it is needed to ensure that the entire structure does not fly off the horse’s head.
The lower straps, located on the cheeks, or cheek straps, play the role of a connecting element, as they connect all the straps to each other, making the bridle a single device.
The last strap, the chin strap, has recently been abolished; it is almost impossible to find it in the new type of bridle. Previously, its function was to stabilize the product on the horse's head.
What is a capsule? The noseband is the mechanism that holds the bit in the animal's mouth.
Naturally, the horse wants with all his might to get rid of the bit, which interferes with normal swallowing of saliva and chewing, and blocks the normal functioning of the tongue.
To prevent her from spitting out the bit, a noseband was invented. Its place is located in the area of the bridge of the animal’s nose.
What is a forehead protector? This detail has more of an aesthetic meaning. Horse breeders make a beautiful decoration from a forehead, decorating it in every possible way with ribbons, sequins, stones and rhinestones, everything is limited only by a person’s imagination.
The last part of the bridle is the reins. Everyone has ever seen what they look like in a photo or video. These are 2 ropes or ribbons of the same length, attached to the horse’s bits.
You can buy them ready-made in a specialized store or make them yourself. It is with the help of the leash that the bit is activated and the horse performs the required actions.
Types of horse harness
It is important that the harness is of high quality and best suits the horse's size. In addition, it should be light and easy to repair.
Harness varies. According to its purpose, it is divided into:
- agricultural;
- transport;
- away
Agricultural, in turn, is divided into single-horse and double-horse.
A transport vehicle is designed to transport large weights, so it usually involves harnessing several horses (two, four, six, and so on).
The traveling harness refers to the front harness, so the number of animals in it may vary.
All types of harness are also divided into single-horse, double-horse and multi-horse.
For agricultural work, a single-horse harness is most often used. When harnessed in pairs, the horses can stand next to each other, or they can stand behind each other. Let's take a closer look at these varieties.
Bridle structure for a horse
Single-horse
Single-horse harness can be arced or arcless. As the name implies, it is used to harness one draft horse. The arc consists of: an arc, a collar, tugs, a supony, a shaft, a nurse, a saddle, a harness, a bridle and reins.
When using the arcless version, the function of the collar is performed by the harness, taking on the main weight of the cart. It also includes: belt throats, shafts, bridle, reins and so on. Another name for such a harness is shaft-and-line harness. Often, in this version, shorter shafts are used, which are attached not to a clamp (which does not exist), but to a saddle lying on the animal’s back.
Line-drawbar harness
However, especially if such a harness is used when pulling two-wheeled equipment, horses are often injured due to the fact that the drawbar puts too much pressure on the collar. To avoid this and increase the horse’s performance, experts advise wearing a saddle and tightening the lines with a saddle string.
Due to their absence, when braking, the cart often runs over the horse, so it must have its own brake.
Cart type of harness
Provides for harnessing four horses at once, standing next to each other. Nowadays it is rare, most often in staged shows. This type of harness belongs to the line-drawbar type. Using the central drawbar, the central pair of animals is harnessed, and the side ones (right and left) are harnessed with lines attached to the wagons.
Combined harness
When using this option, the selection of horses based on height and strength indicators comes to the fore. So, the roots must be tall and strong so that they have enough strength to hold the cart.
Trailing horses (in pairs or threes with the main ones) are harnessed using lines and are responsible for turning the entire carriage. Horses called outriggers are placed in front of the rootmen. They are also harnessed using lines. Their main task is to set the general direction.
Harness Zug
Nowadays this option is practically not used (except on various historical shows and when filming films).
This option refers to the trailing-drawbar option, when one or two pairs of indigenous animals are harnessed, and all the rest become outriggers.
Bibliography:
- A.P. Soldiers. Basics of animal husbandry. — 3rd ed. - M.: Agropromizdat, 1988.
- Animal husbandry // Great Soviet Encyclopedia: / Ch. ed. A. M. Prokhorov. — 3rd ed. - M.: Soviet Encyclopedia, 1969-1978. (Retrieved April 5, 2012)
- Animal husbandry - Wikipedia
Halter - what is it and what is it for?
A halter, in simple terms, is a bridle without a bit. It is a stable item, which is intended for leading horses out of stalls and corrals, as well as for keeping the animal on a leash. Halters are made of rawhide or special thick braid. Also today there are varieties of halters designed for show. As a rule, they are made from decorative materials using various chains and other decorations, as in the photo.
The halter is put on the head of a horse without a bridle and is used together with a chumbur. This is a rope or a halter made of braid. It must be used during breeding and cleaning of the animal. Also in the stables, special belts are attached to the halter for saddling and cleaning. They help to fix and control the horse in a level position.
Structure
So, the halter consists of the following elements:
- muzzle strap or noseband;
- chin;
- buccal;
- supine or occipital belt;
- buckle or carabiner for fastening.
You can see what each part looks like in the diagram and photo.
Important points
Always lead your horse by the reins with both hands. Hold your right hand at the base, closer to the horse’s head. This will allow you to unfasten the carabiner in any situation or hold the animal in place. With your left hand, hold the remaining part of the rein or cord. When leading the horse by the bridle, you should be to its left at shoulder level. Don't let the animal walk in front or behind you. The horse may step on your heel or get scared with all the ensuing bad consequences.
How to put on a halter correctly?
The structure of a halter is much simpler than a bridle, making it much easier to put on. Let's look at the detailed instructions.
- Take the halter and chomp, check its condition to see if there are any tears or broken fasteners. Be sure to see how it is secured. Modern halters usually have a top buckle or carabiner on the head strap, always on the left side.
- Approach the horse from the left side and greet it with a voice or a stroke so as not to frighten it. Do not make sudden movements if the animal does not know you. Then take a harness or cord and put it around the neck so that if something happens, the horse can be restrained.
- Unfasten the buckle on the shoulder strap. If the halter is not used for the first time, then there are abrasions and traces of use in this place.
- Take the halter in your left hand and throw your right hand over your head. Place it over the animal's face, pulling the head strap into place behind the ears with your right hand. Fasten the buckle or carabiner.