The desire to fence off your territory in order to hide from indiscreet glances, uninvited guests, stray animals or to block the wind is inherent in most land owners. One of the most successful options is a hedge of green spaces. It not only protects from unwanted guests, extraneous noise and road dust, but also decorates the area. Due to its properties, cotoneaster is used as a hedge and has been used for a long time. This shrub forms a dense and beautiful screen of medium height, providing good protection and not requiring much care.
Description of cotoneaster
Wild cotoneaster brilliant grows in the northern provinces of China and southern Siberia. It loves rocky slopes and pebble deposits along river banks. The plant is very unpretentious, so dogwood bushes are convenient to use for hedges.
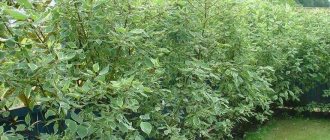
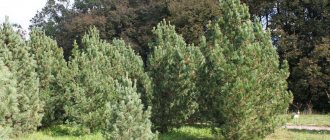
Cotoneaster bushes can create a hedge three meters high. The crown of a free-standing bush can exceed its height by one and a half times, so the hedge will have to be trimmed regularly.
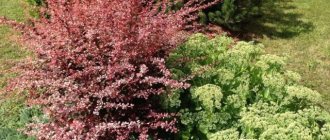
The shiny, dark green has a yellowish underside and changes color to reddish brown in the fall. In late spring or early summer, the brilliant cotoneaster is covered with pink inflorescences. They envelop the shoots so thickly that the foliage is almost invisible because of them. In mid-autumn, shiny fruits with a diameter of 7-9 cm ripen.
Varieties of brilliant cotoneaster suitable for hedges:
Common cotoneaster. The most frost-resistant and undemanding variety. Suitable for central Russia.
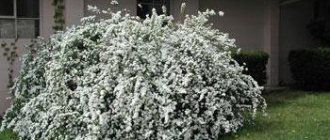
Hybrid Coral handsome. A low-growing shrub up to half a meter in height and two to three times as wide. It is distinguished by white inflorescences and coral-colored berries.
Black cotoneaster. Grows up to 2.5 m, has matte foliage. Withstands low temperatures well.
Evergreen cotoneaster. Grows up to 2 m in height. The foliage is silver-green, the berries are orange, with crimson tints.
There are several low-growing varieties that should not be used to create a hedge: creeping cotoneaster, horizontal, creeping, appressed, dwarf. These types are more suitable for decorative borders or lawn design.
Important! Dogwood differs from brilliant cotoneaster. The berries of the first type are used for food, while the second type is inedible.
Pros and cons of cotoneaster hedges
A green fence made from brilliant cotoneaster can withstand any conditions: lack of sun and moisture, poor soil, severe air pollution near the road. Even unsuccessful pruning will only spoil the decorative effect and the nerves of the owners, but will not cause significant harm to the plant.
The brilliant cotoneaster remains decorative even in autumn. Its foliage is painted in amazingly beautiful shades of yellow, crimson, and red. And black fruits are stored until frost.
The brilliant cotoneaster blooms for a whole month. And all this time the hedge will fill the area with a pleasant aroma. True, not only people like this smell. Bees sense it from a great distance and visit the blooming cotoneaster in large numbers.
A hedge of brilliant cotoneaster has strong immunity. But still, sometimes it is attacked by pests. The brilliant cotoneaster is afraid:
- apple aphid;
- scale insect;
- cotoneaster mite;
- plum sawfly.
Insects are eliminated using herbal remedies or insecticides. The brilliant cotoneaster is susceptible to diseases of powdery mildew and fusarium. It will be necessary to disinfect the soil, completely pruning diseased shoots and burning them. After cutting off diseased areas, they are treated with a fungicide.
Fence location options
The brilliant cotoneaster loves the sun, but will grow well in a shaded place. If rapid growth of the shrub is required, you should choose places well lit by the sun. There the plant will quickly reach good shape.
A hedge of brilliant cotoneaster can be located:
- along the external boundaries of the site;
- along the paths;
- cover outbuildings from view;
- fence off a place to rest;
- complement a multi-tiered composition of flowers and creeping plants;
- serve as a shiny green border for flower beds
There are no thorns on the branches of the brilliant cotoneaster. This slightly worsens its protective functions, but reduces the risk of injury while caring for the bush. Danger can only arise during the flowering season, when the hedge will be visited en masse by bees flocking from all over the area.
How to plant brilliant cotoneaster for a hedge
You can create a hedge from brilliant cotoneaster bushes using:
- seeds;
- cuttings;
- divisions;
- layerings.
All these methods will require time, skill and hassle. Cotoneaster seeds do not germinate well. They are prepared from ripened berries. The fruits are dried in the open air, the seeds are removed and washed with water. Those seeds that float to the surface must be thrown away - these are “dummy”. Good seeds are left in water. Then they are dried, covered with a peat-sand mixture and put in the refrigerator.
It is much easier to create a green hedge using 10-15 cm cuttings. At the beginning of summer, when pruning cotoneaster, strong young branches with two “knots” are cut. If cuttings are prepared in the autumn, you can use old, already woody branches, but then the number of “nodules” is increased to three. In the spring, the cuttings are treated with a special solution to stimulate growth and planted in sandy-peaty soil to a depth of five centimeters in a greenhouse.
Layers are formed from young shoots of brilliant cotoneaster. Most often, this method is used for low-growing or creeping shrubs. You need to choose a healthy shoot, lay it on the ground and carefully secure it with a staple, hook, or wooden slingshot. The next season, carefully cut off a branch near the very base of the mother plant and replant the cuttings.
To plant brilliant cotoneaster by division, you will have to carefully dig up the bush and divide it with a knife into several separate parts. Then the resulting new plants are immediately planted in the place of the future hedge.
Calculation of the number of seedlings
The recommended gap between cotoneaster seedlings is approximately 50 cm. This is the required minimum. The maximum gap is 2 m. You can plant bushes even less frequently, but the result will bear little resemblance to a hedge. What you will get, rather, is a row of free-standing bushes.
Before determining the required number of cotoneaster seedlings, choose a place for planting and measure the length of the future hedge. Divide the result by 0.5 m. This will be the maximum number of seedlings. If the place is well lit all day, the brilliant cotoneaster will grow well. Therefore, the gap between the bushes can be safely increased, i.e., fewer seedlings will be needed.
Site and soil preparation
Before planting a hedge of brilliant cotoneaster, you need to choose the right place for it and prepare the soil. The plant loves bright sun or slightly shaded areas. There is no need to prepare the soil over the entire area of the future fence. The main soil can be anything, since the nutrient mixture is placed directly into the holes prepared for planting seedlings.
Rules for planting cotoneaster to create a hedge:
- dig a hole about half a meter deep and the same diameter;
- lay gravel or brick chips in it in a layer of about 20 cm;
- add soil from turf soil, peat, humus and sand in a ratio of 2:1:1:1;
- lower the plant into the hole;
- make sure that the root collar is level with the ground;
- dig in, compact the soil, water.
You can (but not necessarily) add more lime to the planting mixture. You will need approximately 200-300 g of lime per 1 square meter. m. of soil. After planting, a small area around the roots is sprinkled with peat to protect and enrich it with microelements.
Important! For ease of planting, the brilliant cotoneaster is planted not in separate holes, but in a trench dug at the site of the future fence of the required depth.
Disembarkation dates
With the onset of warmth, when the ground has already thawed, but buds have not yet appeared on the trees, you can begin planting seedlings. Most varieties are planted during this period, however, brilliant cotoneaster and chokeberry take root well even when planted in autumn. The period between the fall of leaves and the appearance of the first frost is considered suitable for planting in autumn.
As a rule, at the beginning of the season, ready-made, purchased seedlings grown in pots are planted. They can be planted even in summer, since the root system is already well formed and the plant can easily tolerate transplantation.
Important! When planting in late autumn, you need to complete the work as early as possible so that the brilliant cotoneaster has time to take root well before the onset of frost.
Planting scheme
If a tall and thin hedge is planned, the brilliant cotoneaster is planted in one row. To create a dense, wide border, seedlings are placed in two rows in a checkerboard pattern. In this case, there are approximately 4 seedlings per linear meter.
It is not recommended to plant a triple row of cotoneaster bushes. The middle part will be inaccessible for inspection and treatment, which can lead to damage by pests and diseases. In addition, plants in the middle of the row receive less sun (the sides are covered by nearby bushes), which can slow down the growth of the hedge.
Important! When forming a future hedge, the growth of the crown should be taken into account. The distance between cotoneaster bushes in a hedge should be from 0.5 to 2 m.
How to plant
To plant, the foundation must first be prepared, namely, digging up the ground and removing the root system of weeds. Despite the fact that cotoneaster is undemanding in care, the seedlings will multiply in development, growing abundantly when the soil is most fertile. Add fertilizer, leaf humus, and sand to the soil. Reclamation of acidic soils by adding fertilizers. Approximately 300 g of lime fertilizer is recommended per 1 m².
To plant one bush, dig a hole approximately 70 by 70 cm in size. Place a drainage system on the bottom, which is made from crushed stone, remnants of bricks, and stones. Apply a layer of approximately 20 cm. Drainage will protect the roots of the plant from decomposition.
Then pour the prepared nutrient mixture into one third. Place the seedling here and cover it with soil up to the root collar.
When organizing a living garden with cotoneaster, when digging a hole, a distance of approximately 60 cm should be maintained. When you want to plant large bushes, you need to increase the gap to one and a half meters. To make the fence more beautiful, place young plants in 2 rows.
After planting, immediately moisten the soil and mulch. Caring for bushes does not require exhausting work. In the first year after planting, it is necessary to do weeding and rare watering during drought (a bucket of liquid per bush). For those who want to learn more about how hedges are planted, you should follow the link.
The video shows the landing procedure:
Cotoneaster can be planted in autumn and spring. In autumn, plant from mid-August to mid-September. There is no need to delay planting, since young plants must strengthen before the onset of the first cold weather. Starting in spring, it is possible to plant the plant from the end of April.
Today, garden centers sell more planting bases with covered roots. Such seedlings can be planted throughout the whole year, but in the warm season the plantings must be darkened. But what a wicker fence looks like and how it can be made can be seen here.
Caring for a cotoneaster hedge
The plant will not require much care. The bushes will have to be trimmed to remove old and diseased branches, as well as to maintain the width of the cotoneaster hedge. You also need to loosen the root soil and water it from time to time during drought. In winter, as a rule, no care is required. You can cover the plantings with spruce branches or branches from severe frosts, but this is true for low-growing and creeping varieties.
Young cotoneaster bushes will require regular weeding and weed removal. Over time, the overgrown crowns will shade the root soil, completely blocking the sun for the weeds.
When to trim cotoneaster for hedges
A hedge of brilliant cotoneaster is pruned in the spring, before buds appear. This will not harm the plant, will rejuvenate it and allow it to form a crown of the desired configuration. The brilliant cotoneaster is not afraid of too much pruning. It can easily withstand pruning last year's shoots by a third of their growth. Pruning tools should be very sharp to do as little damage to the plant as possible.
Pruning for sanitary purposes can be done at any time. It is needed to remove dried, old or diseased branches. If young growth thickens the hedge too much, it can also be cut out with sanitary pruning.
Important! After pruning diseased branches, tools should be washed well or wiped with alcohol to prevent the transfer of infection during subsequent use.
Watering
The natural growing conditions of the brilliant cotoneaster are quite harsh. It does not require abundant watering. If the summer is quite humid, then the hedge may not need to be watered at all. If during the entire warm period not a single rain fell, then you will have to water the bush at intervals of about two weeks. Each adult bush will require 7-8 buckets of water. After rain or watering, it is necessary to check the condition of the soil around the bushes, remove all weeds and loosen it slightly to a depth of 15 cm.
As a rule, the main purpose of watering a hedge is not to moisten the soil, but to wash the foliage so that it becomes bright and shiny again. This is especially true for bushes that fence off an area from a roadway with heavy traffic. Washing your fence with a hose fitted with a shower attachment washes away dust, dirt, and grime and improves the appearance of your fence.
Important! The brilliant cotoneaster does not like too moist soil around the roots.
Top dressing
It is recommended to fertilize at the beginning of the spring season. You will need urea or any other mineral fertilizers at the rate of a tablespoon per 10 liters of water. It is optimal to feed each bush separately, watering the soil around the roots. If the planting is too dense, then you can simply apply fertilizer along the hedge, as close to the roots of the bushes as possible.
You can repeat feeding around the second decade of May, before flowering begins. You can add superphosphate (60 g per sq. m) and potassium sulfate (10 g per sq. m) to the mixture.
Planting, propagation, care
Planting: timing and technology
Like any deciduous shrub, it is preferable to plant cotoneaster in the spring, when the buds swell, but before the leaves bloom. This happens at different times in each region. If you live in a warm region, you can safely plant cotoneaster in the fall, during the beginning of massive leaf fall of trees.
Such strict planting dates are necessary for the normal survival of seedlings with an open root system or seedlings dug up with a clod of earth. If you purchased a seedling with a closed root system (in a pot), plant it even in the summer, but planting will need to be done on a cool, cloudy day. The optimal age of seedlings is from 2 to 4 years.
The planting location can be any, because cotoneaster tolerates shading. Although its decorative qualities will best manifest themselves in a sunny area.
The hole for planting should be larger than the size of the earthen ball or root system; on heavy soils, it is advisable to provide drainage to avoid stagnation of water in the soil and rotting of the roots. As mentioned above, cotoneaster is not picky about the composition of the soil, but adding fresh fertile soil with 200 grams of lime into the hole during planting will significantly improve the life of the bush. During planting, it is important to ensure that the root collar is not above or below the soil level, otherwise the plant will die. The rest of the procedures are standard: light compaction of the soil after planting, abundant watering, mulching with peat chips, spraying with Zircon to reduce stress...
How to care for cotoneaster
Caring for cotoneaster is extremely simple. Usually they do not care for it at all after the seedling has finally taken root. You can limit yourself to watering the bush during drought and pruning dried branches. But if you want to see the cotoneaster in all its splendor, you can add to these activities periodic loosening of the soil under the bush after watering, weeding, fertilizing, molding pruning and cleaning the crown of evergreen and semi-evergreen species. Cleaning is carried out with a stream of water from a hose to remove dust and small debris. Formative pruning of cotoneaster is carried out in the spring before the leaves bloom and no more than a third of the length of the shoots.
Cotoneaster is fed according to the usual scheme: in the spring - with any nitrogen fertilizer (urea, ammonium nitrate, etc.), and before flowering - with potassium-phosphorus (potassium sulfate, superphosphate). The consumption of the fertilizer you choose will be indicated on the packaging. Instead of potassium-phosphorus fertilizer, you can use wood ash. Its application rate is 3 cups per 1 m2 of soil.
Diseases and pests of cotoneaster
Cotoneaster rarely gets sick, because it is resistant to viral and bacterial infections. Sometimes it can be affected by fusarium - a fungal infection that is activated by high soil moisture and affects the roots and lower part of the stem. Fusarium on cotoneaster can be dealt with by removing damaged tissue and treating the plant with fungicides. To avoid this infection, it is advisable not to forget about drainage when planting and periodically loosen the soil.
But dealing with parasitic animals is more difficult. Cotoneaster can be affected by apple aphids, mites and scale insects. If you notice the enemy in time, you can limit yourself to treating the bush with a decoction of yarrow, tobacco, marigolds or a soap-ash solution. And you will have to repeat the treatment 3-4 times with an interval of 5-6 days. If you see that the entire bush is covered from top to bottom with pests, it is better to use powerful insecticides without delay (Aktellik, Aktara, etc.).
How to easily propagate cotoneaster
Cotoneaster can be propagated in the following ways:
- seeds;
- cuttings;
- layering;
- dividing the bush.
The first method is the longest, most tedious and unreliable. The germination rate of cotoneaster seeds, even after special treatment, is very low. Seeds extracted from cotoneaster fruits are checked for quality in a vat of water (empty seeds should float), and then sent for stratification (keeping in a humid environment at a low temperature) to improve germination. In the spring, after stratification is completed, they can be treated with fungicides and treated with Zircon, but still there will be few shoots - a maximum of 60%.
The second method is the most popular and practical. Cuttings will take root best in July. Before planting the cuttings in a nutrient mixture of peat and sand, it is recommended to place them in water with any root formation stimulator (for example, “Kornevin”). It has been noted that rooting occurs better in high humidity, so many gardeners build shelters made of polyethylene or plastic bottles for cotoneaster cuttings.
The simplest and most reliable method is propagation by layering. However, it is more suitable for creeping, ground-covering cotoneaster species, since it is their natural method of vegetative propagation.
The fourth method - dividing the bush - is effective for propagating old bushes. This is the fastest way. Propagation by dividing the bush is not possible throughout the season, but only at a time suitable for planting plants with an open root system (see above).
How quickly does a cotoneaster hedge grow?
Building a regular fence is much faster than building a hedge. This process can be slightly accelerated by planting young, but already well-formed bushes. But they will cost much more than seedlings.
After planting, the cotoneaster bushes are left untouched for two years. Only after they have grown a little do they begin to form a hedge. The first stage is trimming to height. This will provoke rapid growth of side shoots.
Once the width of the hedge is sufficient, the growth of the sides is limited. To begin with, the shoots should be pinched to increase tillering. However, shoots that extend beyond the intended contour are cut off.
Important! Cotoneaster will give the brightest shade of autumn foliage on sandy soil. Clay soil does not contain the elements necessary for this.
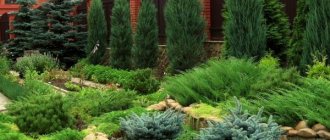
Use in landscape design
The combination of lawns, woody and deciduous plants create a certain style and form harmony with the surrounding landscape. Evergreen trees and shrubs play an important role in this. Their use allows you to create compositions with great artistic expressiveness.
Since cotoneaster is an ornamental plant species, its use in the landscape is an integral part of the design work. At the same time, it is very easy to process. The important thing here is to decide on the shape you want to give and maintain it throughout the year. A good option is to use cotoneaster bushes as a hedge.