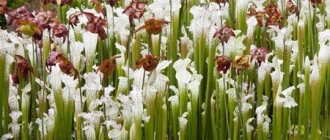
Diseases
A plant is a living organism, so it can get sick. What dangers threaten your pet? First of all, let's look at diseases associated with improper care:
- Leaves that are yellow and slightly wilted indicate burns from direct sunlight;
- Withered leaves indicate insufficient watering;
- A slowdown in the growth of the bush indicates that the pot is too large;
- No young shoots? This means that the earth is depleted, or the plant feels a lack of light...
- Eliminate the shortcomings in caring for streptocarpus, and everything will quickly improve.
And if the measures taken do not help, you need to look for a more serious source of the flower’s disease!
Take a closer look at the leaves of the flower, are there any silver streaks on them? If found, these are traces of the vital activity of pests - thrips, which are especially dangerous for plant inflorescences.
If suddenly the foliage first became covered with yellow-rusty spots, and then began to fall off, then it is likely to be infected with spider mites (in this case, a cobweb will definitely be found between the stem and leaves).
The mealybug, a harmful insect, spoils young shoots, inflorescences and buds;
Small brown warts on the back of the growth indicate infestation by scale insects.
Treatment
Treatment for thrips and spider mites is almost the same. Isolate the diseased plant from your neighbors. Then remove his flowers. Every 7-10 days, treat streptocarpus with insecticides. This needs to be done three to four times.
The drug “Topaz” (a targeted fungicide) will get rid of powdery mildew. Also isolate the plant so that the infection does not spread to its neighbors.
But “chemistry” has no effect on scale insects. The insect hides under a wax cap. So you will have to assemble it manually. The affected areas must be treated first with a soap solution and then with clean, warm water.
https://youtube.com/watch?v=NeYuFg42za4
It’s impossible not to fall in love with this amazing plant! And it will reciprocate your feelings, each time delighting you with an amazing bouquet of inflorescences against the backdrop of the ornate greenery of its leaves!
The easiest way to propagate is by dividing the bush.
Weigela planting and care.
Methods of propagation and features of pruning weigela. The most suitable propagation for streptocarpus at home is carried out by dividing the bush. As the name implies, division is not full propagation, but rather the planting of one large bush in several flowerpots.
This method is applicable mainly to large, overgrown plants. Division itself is an integral part of streptocarpus care and is carried out at least once every 2-3 years. Neglecting this rule most often leads to two types of consequences:
- Streptocarpus grows excessively and begins to wither in a small flowerpot due to lack of nutrients;
- the growing streptocarpus is repeatedly transplanted into a larger flowerpot. This soon leads to the fact that the plant stops blooming, since the flower stalks can no longer break through the curtains of leaves.
Timing for breeding
For the streptocarpus flower, reproduction is preferable in the spring and summer.
This is a time of high activity of metabolic processes, which is very important for rooting and regeneration of root segments damaged during transplantation
This rule is not so strict for indoor streptocarpus, whose biorhythms are often not tied to the changing seasons. In this case, division can be done at any convenient time.
A state of dormancy occurs in plants with a decrease in daylight hours in the autumn-winter period. During this period, any manipulations related to planting, dividing or fertilizing are contraindicated. All that a flower needs at such a time is infrequent watering. The fact that a state of dormancy has set in can be understood by the long absence of flowering.
Division technology
Dividing a bush is a process that will take some time, so it is better to immediately stock up on a couple of hours, especially if you are doing it for the first time. The division technology includes three stages:
- Identification of strong growth points. The growth point can be determined by the combination of several closely spaced leaf stems that emerge from one bush head. The leaves should be strong, looking outward from the center - our bush will be divided into such segments.
- Actually division. Before dividing, the bush must be removed from the pot and the roots must be freed as much as possible from adhering soil, being careful not to damage them. The photograph clearly shows two strong growth points, and it is along these points that the plant needs to be divided. To do this, you need to carefully cut the head of the bush between the right and left parts and separate the parts from each other.
- Lightening the bush. At this stage, you need to get rid of old leaves and thickening weak points of growth. Old yellowed leaves that appear after flowering are usually not a problem. They are easily separated from the plant, but the main thing is that the need to remove them is not in doubt for the gardener.
But it turns out that young leaves can also harm the bush as a whole. Weak growth points refer to smaller leaves that appear randomly, sometimes from where the flower stalk should be.Such leaves seem to grow inside the bush and towards each other, compacting it and making it more vulnerable to fungal infection, for example. They also prevent flower stalks from breaking through.
Important! Weak or old leaves with remnants of peduncles should be removed along with the neck and its roots.
How to choose a container and plant cuttings
It all depends on the size of the plant: the larger it is, the more space it will need. The plant should have enough soil, and the root system should be freely located in the container. Basically, disposable containers with a volume of 0.25–0.35 liters are used for planting divisions.
First, the container is filled with the substrate to about half, after which the root of the plant is lowered into it and evenly dug in on all sides. Finally, the soil is lightly compacted, but not too much - just to fix the above-ground part of the flower.
Temperature and humidity
Pyracantha planting and care, reproduction features
Another important aspect for streptocarpus to feel good at home is care and cultivation at the required temperature and humidity.
These heat-loving plants do not tolerate heat well, so the maximum temperature in summer should be +26, and in winter +15...+17 degrees. The first sign of uncomfortable temperature appears on the leaves. Their edges dry out and lose their elasticity. By changing the temperature conditions, you can return the plant to its previous appearance. It is advisable to remove completely damaged leaves, and for those that are partially dry, carefully cut off the dried edges with sharp scissors.
Another requirement that streptocarpus makes is care and cultivation in sufficiently humid air. To create the necessary conditions, it is enough to spray the air around it, avoiding contact with the leaves.
During winter, most plants are dormant. Streptocarpus also remain in this state. Caring for them in winter involves less watering and fertilizing and lowering the room temperature to +16...+18 degrees.
If you do not reduce the temperature and frequency of watering, then with proper lighting this plant can bloom almost all year round. The main thing is that the soil is fertilized and there is enough feeding to form new buds, of which there can be up to 50 in one rosette.
How do streptocarpus reproduce?
How can you propagate streptocarpus at home? There are several options. Young seedlings can be grown from any part of the mother plant, just root it.
Germination of seeds
Indoor petunia - care and cultivation at home
Streptocarpus can be propagated from seeds at home without much effort. A short time after planting, they germinate and take root well. The only peculiarity is the lack of transfer of hybrid properties to young plants. Therefore, planting material must be purchased from trusted places.
Reproduction proceeds according to the following scheme:
- the pre-prepared soil is generously moistened with a spray bottle and sent to the greenhouse;
- the seed material is not buried, but scattered over the surface;
- containers are placed closer to the sun;
- the greenhouse is covered with a lid;
- ventilate daily for 15 minutes.
Important! With proper care, the first shoots should be expected within 2 weeks
Rooting cuttings, leaves, leaf fragments
Streptocarpus can be propagated by dividing an adult bush with several rosettes. Each of them must have a growing point and a root system. After watering, the bush is removed from the container and divided into several parts. The sections are sprinkled with charcoal powder, and the resulting seedlings are planted in different containers. They are cared for according to the standard scheme.
When propagating streptocarpus from leaf fragments, you should take a middle-aged plate and cut it according to the scheme:
- across - into 2 parts;
- along - into 2 parts;
- the central vein is cut out.
The shares should be planted cut side down in mini-greenhouses. The first shoots will appear in 2 months, then they can be fed.
Leaf propagation
Royal streptocarpus - the progenitor of modern hybrids
Features of care and propagation of the Pike tail flower at home
STREPTOCARPUS (Streptocarpus) is a genus of herbaceous, profusely flowering indoor plants of the Gesneriaceae family. Includes about 130 natural species of annual and perennial plants growing in the tropical rainforests of South Africa and Madagascar. Representatives of hybrid forms obtained from Streptocarpus Rex (S. rexii Lindl.) are almost always grown in indoor culture.
These excellent plants are very similar to gloxinia, but, unlike them, streptocarpus do not have tubers and bloom much longer. The flowers are solitary, of various colors, located on long peduncles. The leaves are elongated-lanceolate, soft, wrinkled, collected in a rosette. There are species, in particular Vendland streptocarpus, that have only one single leaf of very large size, but after flowering the plant dies.
The genus name Streptocarpus comes from the Greek “streptos” meaning “twisted” and “karpos” meaning “fruit”. When ripe, the fruits begin to twist in a helical shape, which was the reason for giving this plant its name.
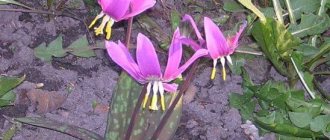
Streptocarpus Rex (S. rexii Lindl.). A perennial herbaceous plant with oval green leaves, up to 25 cm long, 5-7 cm wide. Single, less often paired, medium-sized (about 2.5 cm in diameter) flowers are located on long pedicels (up to 15 cm). They are colored lilac-blue with brown-red streaks in the throat. One of the most resistant species grown indoors. In some sources this species is sometimes called "Streptocarpus hybridus"
Almost all hybrid forms and varieties of streptocarpus originated from the parent Madagascar species Streptocarpus rex (S. rexii Lindl.), which at one time was exported to Europe, where it became widespread. Catchy long leaves and bright flowers create an elegant color palette that delights us for several months. The flowers are much larger (up to 8 cm in diameter). At the same time, hybrids can bloom from 10 to 15 gramophone-shaped velvety flowers.
Streptocarpus Wendland (S. wendlandii Sprenger). Very original and beautiful. A plant of this species grows one single very large leaf (up to 60-70 cm long, in some cases - 90 cm), green, with light veins, broadly oval, softly pubescent, wrinkled, colored red-purple below. Bluish-violet flowers up to 5 cm in diameter are collected in loose clusters on a high peduncle of 15-20 pieces. After flowering the plant dies. This species reproduces only by seeds.
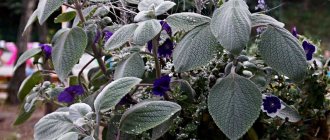
Streptocarpus rocky (S. saxorum). A perennial with a woody base, clustered shoots at the ends, small oval light green, pubescent leaves. The purple bell flowers are smaller than those of the hybrids and are produced in summer and autumn. Due to the external resemblance of this plant and its flowers to violets, Streptocarpus rockis is sometimes called the “false African violet.” This species is more demanding of temperature and humidity than other species.
Planting and caring for streptocarpus
- Flowering: from spring to autumn.
- Lighting: bright diffused light.
- Temperature: 20-25 ˚C in summer and 15-18 ˚C in winter.
- Watering: regular, moderate, after the top layer of soil has dried.
- Humidity: high. It is recommended to keep the flower on a tray with wet pebbles. The plant cannot be sprayed.
- Feeding: liquid complex fertilizers for flowering plants from spring to autumn once every 2 weeks, during the flowering period - every week.
- Rest period : not clearly expressed, occurs with a reduction in daylight hours
- Transplantation: annually in February, before the start of active growing season.
- Reproduction: seeds and cuttings.
- Pests: thrips, scale insects, aphids.
- Diseases: powdery mildew, gray rot, late blight, rot of stems and petioles, root rot.
Read more about growing streptocarpus below.
The plant streptocarpus (lat. Streptocarpus) belongs to the genus of flowering herbaceous lithophytes and epiphytes of the Gesneriaceae family, which has about one hundred and thirty species. The Streptocarpus flower comes from the subtropical and tropical forests of the island of Madagascar, South Africa, Asia and Thailand, located on the slopes of mountains above sea level. Some streptocarpus are xerophytes, that is, inhabitants of arid places, patiently enduring lack of water, other species are forest species, they hide in the shade near bodies of water. Streptocarpus flowers can be either annual or perennial, herbaceous or shrubby.
Nowadays, streptocarpus is becoming increasingly popular in home culture because of its beautiful leaves and flowers, and no one will be surprised if it soon becomes more popular than its relatives - Saintpaulia or Gloxinia.
- Homemade hyacinth: planting, forcing, growing
Dividing a bush into parts when transplanting an adult plant
When the mother streptocarpus bush has grown too much and is already cramped in the pot, and thickened leaf rosettes cause a reduction in flowering, it is best to make several copies of new plants from your pet
To do this, remove the bush from the pot, carefully free its roots from the soil and cut the plant bush along with the root system of the flower into two or three parts with a sharp, clean tool (knife, blade). Make sure that each part has not only roots, but also leaves with a growing point
Sometimes five new young flowers are obtained from one overgrown bush at once. Treat each cut part with crushed charcoal or activated carbon. Prepare pots that are not deep, but spacious. Place 1 cm of expanded clay on the bottom. There is the same amount of land on it. Use the soil for decorative flowering indoor plants. Plant new bushes in pots up to the root collar, try to ensure that the soil fills all the voids in the pot and covers all the roots. Water the seedlings carefully along the walls of the pot with settled warm water. Place them in a bright place prepared for them (but not in the sun) under a film. The bushes quickly take root and soon begin to bloom.
Types and varieties
In indoor floriculture, wild species of streptocarpus are rare; gardeners prefer modern hybrids, of which there are more and more of them. But to give you an idea of what streptocarpus are like in the wild, we will introduce you to some of their species. So:
Streptocarpus saxorum,
much more demanding of temperature and humidity than other species, it is known as a perennial plant with a woody base, shoots twisted at the ends and light green oval pubescent leaves of small size. Purple flowers, also small, bloom in summer and autumn.
Streptocarpus wendlandii
- both beautiful and original compared to other species: it grows one very large leaf, sometimes reaching 90 cm in length.
- The top is green with light veins, and the underside of the leaf blade is red-purple. The leaf is broadly oval in shape, pubescent and wrinkled, like most streptocarpus.
- Purple-blue flowers up to 5 cm in diameter in an amount of 15-20 pieces form a loose cluster on a long peduncle. Another peculiarity of the species is that after flowering the plant dies and reproduces exclusively by seed. Some of the natural species of streptocarpus, those with lodging stems, are grown by amateurs in home culture as ampelous plants. For example:
Streptocarpus rexii
The ancestor of indoor streptocarpus is a species brought to Europe at the beginning of the 19th century. It is called, or streptocarpus rex. It has long, up to 25 cm, pubescent leaves and bright purple flowers with purple stripes and streaks inside the throat. Breeders did not miss the opportunity to work with such amazing natural material and created a whole complex of forms under the general name streptocarpus hybrid. The first recognized cultivar “Constant Nymphs” was distinguished by its bright blue flowers with a purple tint, very large in size - about 7 cm in diameter at the bend of the petals.
And finally, we will present to you several spectacular hybrid varieties of streptocarpus, the cultivation of which, as you already understand, will not be difficult for you:
- – Fashion Statement – simple large flowers, the upper two petals are white, the lower three are white with an ink-colored mesh, condensing into an even violet tone in the throat area;
- – Salmon Sunset – simple medium-sized flowers of a pale salmon color, the lower part of the throat is yellow with a burgundy pattern in the shape of a maple leaf;
- – Blueberry Butterfly – medium-sized blue flowers with purple rays on the three lower leaves;
- – Texas Hot Chili is a compact, slow-growing variety with very bright red flowers and a yellow eye.
floristics.info
Streptocarpus - description, belonging to the family
The Streptocarpus flower was first discovered in 1818 in the mountains of South Africa. Its name is a combination of two Greek words: streptos - curled and karpos - fruit. The bush was named so for a reason. The fact is that its seeds during the ripening period have the shape of a box. It is characterized by large leaf blades and long peduncles on which buds of a blue or purple hue are located.
Streptocarpus (appearance)
Additional Information! Streptocarpus is native to the Cape Province of South Africa. Therefore, it is often called Cape primrose.
Currently, almost 150 species of wild Cape primrose are known. Some of them grow on rocky surfaces, others on trees. Depending on the variety, flowers can grow in the shade or in sunny meadows. They can be either annuals or perennials. But they all have one thing in common - they belong to the Gesneriev family.
Domestic varieties are usually not large in size - they rarely reach a height of more than 40 cm, and peduncles grow no more than 25 cm. The leaves of the flower are quite large - 30 cm in length and up to 7 cm in width.
Blooming buds, in addition to the standard colors, can have different shades:
- red,
- purple,
- pink,
- yellow,
- black,
- with stripes,
- speckled,
- with patterns.
This is interesting! Another distinctive feature of Streptocarpus is the fruit, which has a spiral shape.
Reproduction
At home, there are three main ways to propagate a plant. It occurs by dividing the bush, seeds and leaves. Let's look at each of them.
Dividing the bush during transplantation
During its development, streptocarpus expands due to the growth of lateral bushes from the main flower. They are easily separated from each other, and replanting them is simple. A very useful manipulation that rejuvenates the main plant.
Propagation by seeds
Streptocarpus seeds are sold in specialized stores, usually encapsulated with a special composition. It nourishes the seeds and protects them from diseases and pests.
Therefore, when planting, the first thing you need to do is soak them in the moist top layer of soil.
Reproduction of streptocarpus by leaf
This is perhaps the most common and popular method. We will dwell on this in more detail.
It is based on the plant’s ability to regenerate, that is, restore tissue in case of damage.
An adult, ripe leaf is cut into fragments with a sharp razor or blade (they must contain “arteries” - a central or lateral vein). Moreover, its upper part is cut off, and the cutting is placed in a peat tablet soaked in advance.
You can improve the nutrient medium for the shoot by mixing peat with moss - sphagnum and perlite.
Also, the leaf is immediately placed in a moistened substrate and covered with a plastic cup, creating a greenhouse effect.
Reproduction of streptocarpus by leaf
Flower propagation is carried out in several ways. Rooting methods may seem complicated at first glance. In fact, they are light and almost identical.
Read more Streptocarpus: care and cultivation from seeds, propagation rules
How to root a streptocarpus leaf in the ground
Rooting occurs after 14 days. Babies begin to appear after 1.5-2 months.
Rooting streptocarpus with a leaf is chosen by gardeners more often than other methods. If you carry out the process competently, the plant will certainly delight you with healthy offspring.
How to plant streptocarpus in the ground:
- Take a pot no larger than 100 ml in volume. A plastic cup with holes will do. It's better to use a glass. This will allow you to easily monitor the development of the root system.
- Fill ⅓ of the part with soil and make a hole.
- Disinfect the cut leaf with a solution to protect the plant from infections and fungal diseases.
- Deepen it 1.5-2 cm into the soil. Do not compact.
When the babies appear and grow up to 2 cm, you can transplant them into a separate container.
It is recommended to keep them in a greenhouse, sometimes ventilating them. This way the children will gradually get used to the room conditions.
How to propagate streptocarpus from a leaf can be seen in the video:
How to root a streptocarpus leaf in water
The chances of propagating the plant in water are very low. It is more effective to use a fragment of a leaf with a central and lateral veins.
Reproduction in water is a long and painstaking procedure. If it is enough to cut off a small shoot of Saintpaulia, then with streptocarpus everything is more complicated.
Reproduction of streptocarpus in water:
- Cut a leaf 5 cm long or take a small cutting. Dust the cut with charcoal.
- Fill the glass halfway with water and place the streptocarpus in the water. Use the liquid boiled and cooled to room temperature. You can take rainwater.
- Periodically it is necessary to add water. Sometimes even children are formed.
When a good root system is formed, the plant should be transplanted into the ground.
A greenhouse is not needed for propagation in water.
Reproduction of streptocarpus with a leaf fragment
Propagation of Streptocarpus from leaves is very easy, in many ways easier than African violets and many other indoor plants. It happens quite quickly and abundantly.
If you follow these simple, step-by-step instructions, you'll have no problem getting more of your favorite varieties:
- Cut off the healthy part with scissors. It is better to use a species that is mature but not too old. Those plants that have many veins are the best for propagation. To root streptocarpus with a leaf fragment, a portion of 1.5-3 cm is sufficient.
- Remove the middle part - the large vein. If the leaf is large, trim some of the outer edges.
- Create a gap or furrow in the root medium into which the leaf area can be placed. Make sure the soil is very light and porous. It should be moist, but not soggy.
- Place the resulting fragment in a glass with soil to a depth of 6-10 mm. It is advisable to place it vertically, then the likelihood of rotting is small.
Read more Why streptocarpus leaves dry (wither): photos, reasons and what to do
Be sure to label the pot with the name of the variety that will be propagated.
If streptocarpus is propagated from a leaf fragment, it may lose turgor immediately after transplantation. To do this, the pot must be placed in a greenhouse, and after 14 days the turgor will be restored.
Attention! In hot weather, you can’t make a greenhouse for a plant. Due to the confined space and high humidity, there is a high risk of putrefactive infections.
How to root a fragment of a streptocarpus leaf
Reproduction is also carried out from fragments. To do this, you should choose a large sheet with a noticeable number of veins. The more there are, the more children there will be.
Rooting streptocarpus with a leaf fragment - step-by-step instructions:
- Disinfect the knife or blade. Cut the leaf, cut crosswise, removing the central vein. You will get 2 parts.
- Pour up to 2 cm of soil into a low bowl up to 30 mm high or a square pot.
- Make shallow grooves in the soil, place fragments in them and lightly sprinkle.
After 2 months, small babies will appear near the lateral veins. After another 60 days they will reach a length of 3-4 cm. Now they can be transplanted from the mother leaf.
The video will tell you about the propagation of streptocarpus with a fragment of a leaf:
Reproduction using the toaster method
Sometimes, to propagate streptocarpus from a leaf, the so-called “toaster” method is used. It consists in removing the central vein from a healthy leaf 4–5 cm long. Both halves of the leaf are dried a little, then the cuts are treated with root formation stimulants and placed in a pot with a light earthen mixture, not deep, about half a cm. This is very similar to two pieces of bread in a toaster. Cover the planting with film. In the greenhouse, soon nodules with leaves will begin to appear along the cuts - the so-called babies, which you will plant from the mother leaf into separate pots as soon as they grow a little. This will happen in three to four months. Soon such bushes may bloom.
Description of the plant
The literal translation of the plant’s name is “twisted box.” It fully matches the appearance of the flower.
- flowers having one leafy stem;
- plants that do not have a stem (there is a rosette of leaves);
- flowers that have a leaf covered with hairs, the length of which is approximately 80 cm. Such bushes have well-developed peduncles.
- creation of two-color streptocarpus;
- creating fantasy, very unusual textural colors of petals forming a mesh;
- breeding double and semi-double streptocarpus;
- breeding miniature and variegated plants.
Lighting
The second important condition is good lighting. Flowering requires 12-14 hours of daylight, but the light should be diffused
In summer, western and eastern windows work well.
Streptocarpus cannot be flooded. This may lead to the death of the plant
A special feature of streptocarpus is proper soil moisture. If you forget to water the plant, it will quickly recover when it receives moisture. But if you flood Streptocarpus, it will become seriously ill and may die.
To maintain optimal hydration levels, you need
- choose not a high pot, but a fairly wide shallow bowl. The root system of streps is more developed in width, but shallow;
- choose the right soil mixture, achieving a sufficiently loose substrate. To do this, you can add 1 part of coarse-fiber peat, perlite or sphagnum moss to ordinary soil;
- provide moderate watering. Most likely, once every 2 days will be enough, but it is better to water in a tray or along the edge of the pot so that water does not get into the leaves. The water must be settled and soft enough; lime is harmful to streptocarpus.
An appropriate addition to watering would be to increase the air humidity near the flower, but not by spraying the leaves. It’s good to place a container of water next to it or put wet expanded clay.cveti-rasteniya.ru
Temperature
In winter, the plant rests, and it is advisable to provide it with cool conditions, but it should not be too cold; the normal temperature during the dormant period is considered to be 15-18C for regular varieties and 18-20C for hybrid varieties.
- Watering streptocarpus and air humidity in care
- Watering is the most difficult thing in caring for streptocarpus, and for beginners, the plant can die from improper watering, so be very careful in this regard.
- It is better to water streptocarpus in a tray; you can also water it in the ground, but only along the edge of the pot. When watering, try not to get moisture on the leaves, especially in the center of the rosette; in this case, the plant may die.
- Water for irrigation is settled in advance; it is desirable that it be a little warmer than room temperature.
- Always monitor the soil moisture, try not to overwater the plant. Streptocarpus is afraid of excessive waterlogging and stagnation of water, which can cause rotting of the root system. So, watering should be moderate, and you should water only after the middle layer of soil begins to dry out, but you should not wait until the soil is completely dry.
You should not allow even the slightest stagnation of water, therefore, immediately drain the water from the pan.
Top dressing
You also need to be careful with feeding, as with watering, despite the fact that streptocarpus love to eat. To avoid overfeeding the plant, dilute the fertilizer not as in the instructions, but half as much. For feeding, use fertilizers for flowering plants.
You can feed the plant every week, as a result it will produce more leaves, which has a beneficial effect on lush flowering.
Soil for streptocarpus
The soil should be light and porous so that air can penetrate freely and moisture can be retained. Beginners in this regard may make mistakes by replanting the plant in too dense soil, as a result of which the plant dies.
Caring for streptocarpus at home
Rules of care
Caring for streptocarpus is approximately the same as caring for Saintpaulia. Place it in a bright place away from direct sunlight and drafts. The plant needs good lighting to grow leaves, because it is from their axils that peduncles with flowers appear. The optimal temperature in summer will be 20-25 ºC, in winter - 15-18 ºC - this is exactly what the temperature in our homes usually is.
Watering streptocarpus after the top layer of soil has dried is carried out with soft, settled water at room temperature. Overmoistening of the soil leads to rotting of the roots and death of the flower, and water getting into the leaf rosette causes it to rot, so you need to pour water under the leaves, or, even better, into a pan. From time to time, you can bottom-water the plant by immersing the pot with streptocarpus in a container of water until the soil is completely saturated with moisture.
As for air humidity, the difficulty is that it should be high, but you cannot spray the leaves or wash them with a sponge. You will have to spray the air around the flower or keep the plant next to wet moss or pebbles.
- Caring for Mentas at home
Fertilizer
The plant needs fertilizers during the period of active growth, that is, from spring to autumn. During the flowering period, the need for fertilizing occurs every week. Streptocarpus stops feeding only in winter, during the dormant period. Preference is given to liquid complex fertilizers for flowering plants such as Kemira-Lux, Master or Etisso, but it should be remembered that the concentration of the solution should be 20% weaker than that specified by the manufacturer. Promptly remove old lower leaves that no longer produce flower stalks, since they only waste the strength and nutrients of the plant.
Transfer
This procedure is carried out annually closer to spring, preferably in February, before the start of active growth. The root system of streptocarpus, although more powerful than that of the violet, is also superficial, so dishes that are wide rather than deep will suit it. Each subsequent pot should be 2-3 cm larger in diameter than the previous one. The soil needs to be nutritious, but loose and light, like a store-bought mixture for violets, to which it’s a good idea to add perlite or vermiculite.
Place a drainage layer about 2 cm thick made of expanded clay or pieces of foam into the pot so that excess moisture flows freely without stagnating in the roots of the plant. Then a layer of substrate is placed in the pot, onto which the streptocarpus is transferred along with a lump of earth, and then you need to add the substrate and tamp it lightly until there are no voids left in the pot.
Growing from seeds
If you are interested in the path of a breeder, you can try growing streptocarpus from seeds. This type of plant propagation is called generative. Streptocarpus seeds are sown on top of a moist earthen substrate consisting of equal parts of perlite, crushed peat and vermiculite. To make the process easier, first mix the seeds with fine dry sand. After sowing, the seeds are carefully sprinkled with water from a spray bottle and, covering the container with the seeds with glass or polyethylene to create a greenhouse effect, place it in a warm (21-25 ºC) bright place.
Shoots will appear within two weeks. When condensation appears, ventilate the greenhouse, and when the seedlings grow a second true leaf, dive them into a nutrient substrate - three parts peat, two parts each of crushed moss and leaf soil, and one part each of vermiculite and perlite. You can use earthen mixture for Saintpaulia, sold in stores.
Pests and diseases
Pests will only annoy your flower if you violate the rules of streptocarpus agricultural technology. For example, if the room is too hot and dry, thrips may show interest in your plant, and, starting their occupation from the lower part of the plant, they gradually master the entire streptocarpus, which will dry out before our eyes. You will have to resort to insecticides, but first of all you need to establish the correct microclimate so that history does not repeat itself in a month or two.
With the same violations of care conditions, streptocarpus and scale insects are affected, leaving brown plaques on both sides of the leaves. They are destroyed by actellicom. If there is excessive soil moisture, streptocarpus is attacked by aphids, and insecticide treatment will not be enough; you will also have to change the soil.
- Plectranthus at home, care and reproduction
Of the diseases for streptocarpus, the most terrible are fungal infections, from which there is usually no escape. But if you meet the conditions for growing a plant, then it is not afraid of either pests or diseases.
Propagation by leaf cuttings
In addition to dividing the streptocarpus bush, it can be propagated by leaves. Leaf cuttings are a difficult and painstaking method that requires patience and a little special skills from those who decide to use it. The process has several stages:
- Selecting a suitable sheet.
- Leaf cuttings.
- Rooting.
Reproduction using leaf cuttings, although longer and more laborious, allows you to get a larger number of plants of zamioculcas, schefflera, domestic begonia, sundew
How and when are cuttings harvested?
Selecting a sheet.
Cuttings.
Streptocarpus is very sensitive to humidity levels and is susceptible to fungal diseases if not properly cared for - powdery mildew, gray rot, root and stem rot.
Did you know? The ability of cuttings to root depends on the soil in which the mother plant grows. If it received too much nitrogen, then the roots on the cuttings form very poorly. Excess copper in the soil has a similar effect.
Treatment.
"Kornerost" "Kornevin"
Soil selection.
peat
Rooting process
The rooting process is very lengthy and can last up to two months. For comparison, episcia belonging to the same family take leaf roots within a week. In addition, rooting should not be left to chance, and the container with cuttings requires careful care.
For streptocarpus diseases, flower growers use Fitosporin, Fundazol, Trichodermin, Skor
It will be most convenient to build a small greenhouse consisting of a container with cuttings and polyethylene - this will make caring for the plants easier.
Rules for caring for cuttings:
- Humidity. Before roots appear, cuttings do not have specialized organs through which they can absorb water. The process of moisture absorption is carried out by the entire body of the leaf, so you need to make sure that there is enough moisture.
- Light. The greenhouse with cuttings should be placed in a well-lit place, but not in direct sunlight, otherwise the plant will wither.
- Watering. You need to water the cuttings about once a week in a special way - along the edges of the container. This is done for optimal distribution of moisture in the pot.
- Diseases. Greenhouse conditions are good for germination, but they are also ideal for the proliferation of harmful bacteria, which can destroy the flower at the cutting stage. To prevent the development of pathogenic microorganisms, the substrate is boiled for 3-5 minutes before planting; another method of prevention is weekly spraying of cuttings with bactericides.
Streptocarpus should be protected from mealybugs, spider mites, scale insects, whiteflies and thrips.
Planting rooted seedlings
A streptocarpus seedling has two leaves of unequal sizes. It needs to be replanted when the largest of the leaves reaches a length of at least 3 cm. There are no special requirements for planting. A seedling 2-3 cm long is planted in a container with a volume of 150-200 ml. The next transplant is done after the first flowering.
Important! After rooting, streptocarpus grows quickly, but planting a plant with a small root in a large pot can lead to acidification of the soil and death of the flower.
When to plant and what conditions are needed for this?
Before planting, it is worth considering some conditions:
The room for the flower is chosen to be cool
The temperature should be about +12..+14 degrees. The air should have high humidity. Lighting is required diffused. An important factor is the correct selection of container for the flower. It is also important to know what soil mixture is needed.. When should you plant? Planting is done in summer
It is best to do this in June, then you can be sure that the cyclamen will bloom in the fall. If planted in August, flowers will appear in late autumn or winter.
When should you plant? The plant is planted in the summer. It is best to do this in June, then you can be sure that the cyclamen will bloom in the fall. If planted in August, flowers will appear in late autumn or winter.
Preparation: soil and pot
Priming. For planting, you will need a nutritious and light substrate that will allow air and moisture to pass through well. The mixture is prepared from equal portions of leaf soil, sand, humus and peat
You can also buy ready-made soil for cyclamens. Important! The acidity level should not exceed 5.5-6.5 pH.
Pot. The plant does not feel comfortable in large containers
A suitable size would be a pot of 10-14 centimeters. If you take less container, the cyclamen will bloom weakly and ahead of time. A large pot will lead to rotting of the roots. There must be a hole of about 1-2 centimeters at the base of the container. It is necessary for the smooth passage of water.
Seeds
- Before planting seeds, they must be kept in a weak solution of potassium permanganate for 12 hours.
- In the previously prepared soil you need to make a 10 mm groove, which is then watered generously.
- The distance at which the seeds are placed should be 2-3 centimeters. Next they are covered with earth.
- After the seeds have been planted, they are covered with polyethylene or glass.
- When the first shoots appear, you need to remove the film or glass.
- Now the sprouts are moved to a well-lit place and positioned so that direct sunlight does not fall on the flower.
- When several leaves form on the seedlings, they are planted in pots of 2-3 pieces.
- During transplantation, the tubers must be completely covered with soil.
- After 5-6 months, the cyclamen is planted in a larger pot.
From the video you will learn how to sow Cyclamen seeds:
Tubers
- First, the bulb is removed from the soil and dried.
- Then it is cut with a knife, and at least one bud and a couple of roots must be left for each part.
- Next, leave it in a dark place so that the cut can dry.
- The cut must be sprinkled with wood or crushed activated carbon. This will help cope with diseases and germs.
- The pot definitely needs drainage; expanded clay is suitable as drainage.
- After planting the tuber, the pot should be removed from direct rays.
Propagation by leaf cuttings
This process is quite painstaking. Simply rooting a cutting in water usually does not work; it rots. It is necessary to cut off a young healthy streptocarpus leaf and immediately prepare it for planting. You can plant it in a substrate consisting of a mixture of 3 parts peat and 1 part each perlite and sphagnum. You can use a peat tablet by first soaking it to swell in warm, settled water. Cut off the top part of the leaf blade and insert the cutting into a glass with a peat tablet or prepared substrate. To better guarantee its rooting, treat the cut with a root formation stimulator. Pour potassium permanganate and place in a container with a lid or another greenhouse. Rooting will proceed normally if you regularly ventilate the greenhouse, remove condensation from the lid, and the greenhouse itself will be in a bright, warm place. In a month or a month and a half, a baby will appear on the stalk of streptocarpus - such a tiny nodule with leaves. This is a future independent plant. After some time, when the baby’s leaves grow to two cm, the bush can be transplanted into its own pot. Usually this happens after four months.