There are more than 300 varieties of aloe in nature. But only a few of them are grown at home. To plant such a useful crop at home, you need to know how to care for aloe at home.
Some varieties have an unusual decorative appearance, and this indoor plant is also used as a source of air phytoncides. Aloe juice is especially valued as a remedy for colds. Let's look at how to grow aloe, as well as how to properly care for the flower.
Varieties of aloe for home cultivation
Before you find out what the growing conditions are for different types of aloe, you need to understand the homemade varieties. The most commonly grown plants at home are agave, variegated aloe, and aloe vera.
So, let's find out more about those varieties that feel good in nature and are also used as an indoor option:
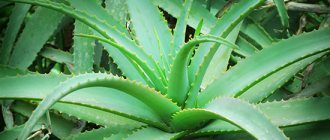
Agave has velvety and green spiky leaves. With proper care, such a tree-like plant can live for about 20 years. Cultivation of the aloe vera variety is popular. This plant has a shortened stem, and the leaves have a gray-greenish color and a grooved structure. This species has several varieties: yellow, Barbados and medicinal. Flower growers often grow aloe spinosa. It requires special care at home. The plant is distinguished by wide leaves with a white border, which form a large rosette.
Aloe spinosa
Aloe variegated is characterized by short growth and a shortened stem. It has triangular and wide leaves. Moreover, each sheet is decorated with white stripes.
Aloe variegated
Most often, aloe vera and agave are grown for medicinal purposes. Both crops are unpretentious varieties.
Agave
They tolerate both heat and cold well. To grow agave and aloe vera at home, you need to know how to care for the plant. In addition, you need to have an idea of how to plant such a crop and how it reproduces.
Aloe vera
How to cut a leaf correctly?
Cut a leaf from an adult plant at a short distance from the stem . Make the cut with a clean, sharp tool at a slight angle. The cut area must be treated with activated carbon powder and dried. The leaf is stored in a dark, dry place for several days.
It is imperative to wait for the film to form; it serves:
- A protective barrier against the entry of pathogens and infections from soil and water.
- An accumulator of nutrients from the leaf, which it will need for further growth and development.
After the film has formed, the plant can be prepared for planting for further cultivation as a separate flower.
Features of care
Growing aloe at home requires following these recommendations:
- Infrequent watering is required to prevent the roots from rotting.
- Watering is carried out only with warm water.
- To wet the roots, water can be poured into the pan.
- For irrigation, use only warm water.
- In winter, watering should be done as little as possible.
- It is better to keep the plant in a lighted place.
Fertilizing is also required. It should be carried out from spring to autumn, no more than once a month. In summer, the temperature can be normal room temperature. If possible, the flower can be taken out onto the terrace or balcony.
Caring for any aloe at home requires fresh air. Therefore, it is recommended to ventilate the room periodically. It matters where aloe grows in winter. The flower can also be placed in a cool place with a temperature of about 14 degrees.
How to grow at home?
Now we’ll tell you step by step how to plant aloe without roots. The main methods here are as follows.
Place the leaf in water, then in soil
This method of growing aloe without roots is the most common. Let's look at how to grow a shoot from a leaf for subsequent planting. The following steps must be observed:
- Prepare a glass container for the leaf, pour settled water at room temperature into it and install the planting material.
- As soon as the roots appear, remove the leaf from the water and place it on a clean cloth.
- Leave the planting material in a warm place so that the film has time to form. This may take 2-3 days. The resulting film will protect the plant from soil infection.
- After this, you can transplant the plant into a prepared container with a drainage hole and 2/3 filled with substrate.
What to do if a flower does not produce roots in water?
On the question of how to dissolve the roots of the agave in this case, the opinions of flower growers differ. Some say that cut leaves, if planted in water before planting in the ground, will certainly produce roots. Other flower growers are convinced that leaves rot when left in water for a long time, so it is better to plant them in the ground immediately. So the choice remains with the florist. In any case, if the method turns out to be ineffective, then the rapid reproduction of aloe will allow this procedure to be repeated without damage to the population.
Straight into the ground
This method is standard, and to implement it you must adhere to the following recommendations on how to grow roots:
- Cover the surface of the soil for planting with sand. It is better to use coarse grain, and its thickness should be approximately 2 cm.
- The fleshy leaf, dried for 2-3 days, is immersed in the ground with its lower part. The immersion height will be 2-3 cm.
- Using small leaves, cover the surface of the earth, pressing slightly.
- At first, watering should be replaced with banal spraying.
- After 8 weeks, when the first roots form, irrigation should be eliminated.
- As soon as the root system is developed, transplant the plant into soil intended for succulents.
- The surface of the ground can be sprinkled with a mixture of sand and expanded clay chips.
Proper watering
If you don’t know how to grow aloe, then, first of all, you need to provide high-quality moisture. Watering aloe depends on the season. Summer care at home involves plenty of hydration. In winter, it is enough to only moisten the soil a little, and you can water it again only when the soil dries out.
During cold periods, the interval between watering procedures can be about 3-4 weeks.
The plant should not stand in water. Do not allow liquid to stagnate in the pan. Do not water the plant from above. In the summer, you can perform the procedure once a week. Since the leaves of this plant are fleshy and juicy and retain moisture remarkably well. In this case, the temperature of the liquid may be slightly warmer than room temperature.
To grow aloe vera, you must not forget about additional air humidification. In this case, spraying can be done using a spray bottle.
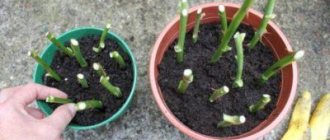
Cuttings
Now let's figure out how to plant an aloe shoot without a root. For this, shoots are used that are located on the side of the mother plant. Using a sharp, pre-disinfected knife, they are cut off at the very base. In this case, the shoot must have at least three pairs of leaves. The cuts must be immediately treated with crushed charcoal. After this, the shoot is placed in a dark place for five days to dry.
This can be done outdoors or in the refrigerator, wrapped in paper. Once a crust appears on the cut, you can begin planting. But how to plant an aloe shoot without a root? Since aloe is a succulent, you should not root the cuttings in water - the shoot may simply rot. It is more expedient to do this in the soil.
To avoid excessive soil moisture, good drainage is necessary to prevent moisture from accumulating in the soil. The cuttings must be placed in the ground so that the lower leaves barely touch the surface. Fine gravel can be sprinkled on top of the soil to increase the stability of the flower. Then the plant is watered moderately and placed in a warm, bright place: aloe does not need high humidity, but it needs sunlight for better development.
The roots will appear within 2-4 weeks. During this period, proper watering of the plant is important. In this case, it is advisable to adhere to the basic rule of gardeners - it is better to underfill than to overfill. After all, as we have already found out, this crop can withstand long droughts and does not tolerate waterlogging. If you poured gravel on top of the soil to stabilize the cutting, then watering is carried out even less frequently, since in this case it acts as mulch, which reduces the volume of evaporated liquid.
The first leaves emerging from the rosette indicate that the rooting of the cutting was successful. After this, the plant needs a transplant.
Plant nutrition
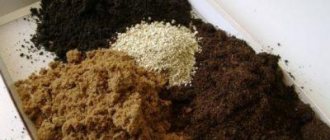
To ensure aloe is properly grown and cared for, it is necessary to provide timely feeding. The plant absorbs not only water, but also magnesium, nitrogen, potassium, iron, calcium and phosphorus. The soil in the container should be fertile and loose. You can prepare the substrate yourself. To do this, you need to take two parts of sod-clay soil, as well as one part of sand. A little peat and coal are added to the mixture. You can fertilize from April to September. Mineral mixtures are used as fertilizer.
Caring for an aloe flower involves proper fertilization after planting. Aloe is fed with liquid complex fertilizers.
Fertilizer for aloe
In this case, the first feeding can be done only after six months. The fertilizer must be diluted in water and then poured into a tray. You can also water the soil from above. Do not let liquid get on the leaves.
To properly grow aloe at home, you should not use peat as a top dressing. Nitrogen-containing and mineral compositions are more suitable for growth. They help improve metabolic processes in plant cells.
Excess vitamins and minerals are also harmful to plants.
Proper care also involves the use of fertilizers from improvised means. For example, you can use sugar, eggshells, or even water after washing buckwheat and rice.
Can it be placed in open ground?
You can transplant an aloe leaf into open ground, but only for the summer. If the spring in the region is warm and there are no frosts, then planting work should be carried out at the end of May.
It is important that the daytime temperature is 25-30 degrees, and the night temperature does not fall below 12 degrees.
Transplanting aloe into open ground is carried out as follows:
The first step is to choose a landing site. It should be carefully lit, but only direct sunlight is unacceptable.
- You also need to make sure that the aloe does not get wet during rain, otherwise it will rot.
- Once the location has been selected, you can dig a hole, the size of which will be slightly larger than the size and depth of the pot where the plant is located.
- Send sawdust or coal to the bottom, and sprinkle a layer of expanded clay on top. This layered “pie” is completed by a ready-made earthen mixture.
- Place the plant in the prepared hole and sprinkle with nutritious soil mixture.
Possible problems with aloe
Aloe variegated or other varieties of it can be affected by diseases as a result of improper care. It is worth highlighting the following main problems:
- Overwatering can cause leaves to become limp and pale.
- Lack of lighting can provoke intensive plant growth.
- Due to excess moisture, the root system may rot.
- If the leaves turn brown at the tips, this indicates a lack of humidity in the air.
- During ventilation, the plant should not be exposed to a draft.
- When spider mites appear, aloe variegated, mix or another version of the variety must be exposed to fresh air. It is recommended to ventilate the room more often.
- If the leaves turn yellow around the edges, this may occur due to the use of chlorinated water, a lack of potassium, or the presence of tobacco smoke in the air.
The most common disease of this plant is root rot. In this case, the plant stops growing and the stem dries out. In this case, the plant is dug up and the roots are carefully sorted. All rotten sprouts are removed, and the remaining parts are sprinkled with ash, coal powder and sulfur. Transplantation is done in soil mixed with sand.
How to plant aloe correctly at home
This plant belongs to the category of succulents. Therefore, aloe prefers well-lit window sills and easily tolerates a lack of moisture, as it accumulates it in its leaves with rare watering. If the basic requirements of the culture are met, this plant will not cause any trouble.
Aloe is rightfully considered a home healer.
Note! For its full development, it is important to plant correctly. This procedure includes several main steps. Therefore, it is worth familiarizing yourself with them in advance.
What time of year is it better to plant and is it possible in winter?
It is best to plant aloe, like other indoor plants, in late February - early March. It is during this period that the plant emerges from the state of winter dormancy and biological processes intensify.
If it was not possible to plant during this period, then you can postpone the procedure until the end of summer, namely until July-August. At this time, sap flow in the tissues of the plant increases, so it easily tolerates planting and quickly recovers
Important! Planting aloe in late autumn, as well as at the beginning and middle of winter, is not recommended, since at this time the plant is in the dormant stage and will not be able to fully take root, which means it will die.
What kind of soil is needed for aloe
In nature, this plant can be found in countries with arid climates and soil poor in nutrients. At the same time, aloe feels great in such conditions and grows well. Therefore, it is necessary to prepare soil for it, the composition of which will be as close as possible to its natural habitat.
You can purchase a ready-made substrate at a flower shop, choosing a soil mixture for cacti and succulents. But you can also prepare suitable soil for aloe yourself. The main thing is that the substrate is loose, light and well-drained.
To plant aloe you will need to mix the following components:
- turf - 40%;
- leaf soil - 20%;
- coarse sand – 20%;
- small pebbles - 10%;
- charcoal - 10%.
Important! Peat should not be added to the soil, as it increases acidity, and this has a depressing effect on the roots of the plant.
The soil for aloe should not be nutritious, the main thing is that moisture does not stagnate in it.
In what container is aloe grown: pot sizes
The root system of aloe, like all succulents, is small, but the leaves are fleshy and large, since they contain a supply of moisture and nutrients. Therefore, it is necessary to select not too deep, but wide pots for the plant. When planted in high containers, the plant will constantly turn over.
The diameter of the pot should be selected depending on the age of the seedling
At the initial stage of growth, the width of the planting container should be within 8-9 cm. With subsequent transplants, it can be increased by 2-3 cm.
For your information! You cannot immediately plant aloe in a container that is too large, as the excess soil in the pot will begin to turn sour and cause root rot.
Nuances of culture propagation
Aloe can be grown and propagated in different ways. Many new gardeners are interested in how to grow aloe from leaves.
There are also other methods of reproduction:
- You can germinate an aloe shoot.
- There is a method of propagation by cuttings.
- Propagation by upper shoots.
- Sometimes the option with seeds is used.
When propagated by seeds, they should be planted in March or April. In this case, small containers are used. First you need to prepare the soil from garden soil, turf and sand. In order for the seeds to germinate, you need to water after the soil dries out.
Then the seedlings are transplanted into separate containers. Caring for seedlings consists of moistening and airing. In this case, the air temperature should be within 20 degrees. The sprouts can be transplanted as soon as they become stronger.
It is worth considering that the plant produces flowers very rarely. To do this, it is important to comply with special conditions.
You can grow aloe from a cutting without roots. To do this, the leaf or sprout must be cut off. After this, the sections should dry in the fresh air for a week. The soil for planting must be moist. This propagation option is relevant for spring or summer.
Soil selection and preparation
When transplanting a succulent, you need to choose and prepare the soil correctly. To do this, it is advisable to purchase a balanced flower soil for cacti, rich in micronutrients with a high iron content, necessary for the full growth and development of the flower:
- the soil should easily allow air to pass through and not retain water;
- the earth should be neutral and slightly acidic;
- Peat cannot be added, this leads to an increase in acidity;
- You can add a little leaf humus, charcoal and sand to the soil.
It is advisable to treat the soil with high temperature before filling the pots . This is necessary for disinfection from pathogenic bacteria and pests.
Attention! Before filling the pots with soil, it is necessary to make drainage from small pebbles or coarse sand at the bottom of the container, and prepare a pot with a hole in the bottom. This is done so that water does not linger and there is good air ventilation.
Care after transplant
It is better to replant in the spring. This procedure is recommended to be done every 2-3 years. The pot must be chosen 20% larger than the previous one, since the root system is constantly developing.
Transplantation is carried out by transshipment along with a lump of earth. You need to add drainage to the bottom of the new container, and then move the seedling with soil. All free space is covered with soil.
If there are two trunks, the roots are separated and transplanted into different pots. If root shoots appear, they can be planted.
Even beginners can grow and care for useful crops. If you follow all the recommendations, the plant will become large and beautiful. Four years after planting, the leaves can be used to treat various diseases.
How to grow: ways
Agave is grown in one of 5 ways:
- Using a sheet. The method is suitable for rejuvenating an old aloe or growing a new plant. The main advantage of the method is its simplicity. However, you need to be prepared for the fact that in half the cases, growing from a leaf is unsuccessful.
- Dormant buds (“babies”). This method is the most reliable, because... propagation is carried out naturally - the grower only facilitates the separation of the seedling from the parent root system. The main disadvantage is that the plant must be removed from the pot.
- Cuttings. It is carried out by analogy with growing from a leaf, only instead of leaves, the lateral shoots of aloe are used. After cutting, they are placed in a dark place with little humidity for a week, then transplanted into the ground.
- Tops. The most reliable of the “clean” methods. The top of the plant, containing 5-7 healthy leaves, is cut off and soaked in a growth stimulator. After processing, it is placed in warm water, and after roots appear, it is transplanted into a flowerpot.
- Seeds. The method is suitable for growing rare varieties ordered from the store. The seeds are disinfected and buried 2-3 cm in the pot. Until the sprouts hatch, the seedlings are kept in greenhouse conditions under glass, then the cover is removed. Picking into a large pot is carried out after the formation of 2-3 leaves.