Description and characteristics of the variety
The Tsitsak pepper variety appeared thanks to folk selection. Most often it is used in Georgia and Armenia: in these countries it is fermented and salted. This is a heat-loving plant - in northern regions with low temperatures it requires cultivation in greenhouses. The tsitsak should be placed on the sunny side of the site so that other plants do not create shadows for it.
The main characteristics of this variety are:
- keeping quality 95%;
- high productivity;
- resistance to fungal diseases;
- withstands frost down to –20°C;
- The fruits contain many useful substances.
The pepper in question superficially resembles another popular type of this crop - chili.
How Tsitsak pepper differs from chili pepper, we will consider further. Tsitsak, like chili, is a type of hot pepper, however it has a reduced level of heat compared to chili. In addition, it tastes moderately sweet, so it is suitable for preparing salads and pickling. Did you know? “Tsitsak” translated from Georgian means “pepper”.
Description of the bushes
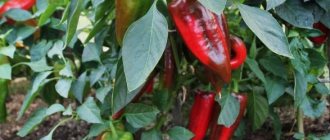
The bushes of the variety in question are of medium foliage, with a strong stem 60–70 cm high. The leaves are green, oblong, elongated, pointed at the edges. The height of the bush is up to 80 cm.
Description of the fruit
In appearance, Tsitsak fruits resemble chili peppers. The described variety is characterized by a cone-shaped shape, the fruit has fleshy walls and pulp. The weight of the fruit ranges from 30 to 50 g. The length of the pepper reaches 15–20 cm.
Reviews from gardeners about the variety
Zoya Pavlovna, Taganrog: “Excellent semi-hot pepper. I got the seeds by chance and planted them a little late - almost at the end of March. Out of 5 seeds, 4 sprouted. Since I immediately planted them in separate cups, there was no need to dive. At the beginning of June I transplanted them into the beds, and at the end of July I harvested them. From 4 bushes we got 63 light green peppers. I left a few pieces for seeds and salted the rest - it turned out very tasty.”
Sergey Borisovich, Moscow: “I tried tsitsak pickles in Tbilisi, I liked them so much that I was inspired to grow this pepper in my dacha. I bought seeds online and first planted them as seedlings, and then transplanted the seedlings into beds under film. The variety proved to be productive, despite the cool summer and lack of sun. The pepper has an amazing taste, not just spicy, but with some sweetness. They ate it fresh, added it to meat, and even fermented it a little.”
Pepper "Tsitsak" ripens on average in 100-110 days
As reviews from gardeners growing this variety show, the agricultural technology for cultivating Tsitsak pepper is no more complicated than other varieties of hot pepper. Its cultivation in greenhouses and on personal plots allows you to get a good harvest of gourmet peppers, and use it for preparing vegetable and meat dishes.
Rules for growing peppers
To get a rich harvest of Tsitsak, you must follow the basic rules of cultivation. First of all, you need to familiarize yourself with the recommendations for selecting seeds and processing them, the timing of their sowing, as well as prepare the soil for seedlings, and learn how to care for the bush after sowing. You will learn about these details below.
Did you know? Pepper appeared in Europe more than 600 years ago.
Seed selection and treatment
Before sowing seeds for seedlings, they must be properly selected and processed. To identify suitable specimens, you can carry out the following procedure: lower them into water, after which the empty seeds will float up. To treat the seeds you will need wood ash, water and gauze. From the first two components you need to make a solution - leave 2 grams of wood ash in a liter of water for 24 hours, stirring occasionally.
Then you should place the seeds in cheesecloth and leave them in the solution for 3 hours. When the specified time has passed, they need to be removed, washed and dried. You can also place the seeds in a 2% solution of potassium permanganate. To do this, you need to dilute 10 g of potassium permanganate in 1.5 liters of water. Next, the material is dipped in gauze in a solution for 20 minutes, then the seeds should be removed, washed and dried.
Preparing the land for seedlings
Soil for growing Tsitsak pepper can be purchased in specialized stores or prepared independently.
There are several ways to make soil for seedlings:
- Sand, peat, humus, and soil are taken in a ratio of 1:1:1:1.
- Sand, humus, turf and earth are combined in one part of each component. For 10 kg of this mixture, 500 g of ash is required. After which the nutrient soil is mixed with drainage in a ratio of 1:2. Fresh turf and rotted compost are then added to the mixture.
- Peat and humus are mixed in equal quantities with the addition of potassium sulfuric acid and superphosphate.
Important! After fertilizing, you need to water the bush to wash away the remaining fertilizer. This is necessary because substances in fertilizers can cause chemical burns to young shoots.
Timing and features of sowing seeds
Sowing of seeds is carried out in February - March. The box is filled with pre-prepared soil, then depressions 0.5 cm in size are made - seeds are placed in them, which are then sprinkled with soil on top. In order to speed up seed germination, you need to cover the container with agro-fabric or film, and also provide a suitable temperature regime. During the day the temperature should be +23...+25°C, and at night - +13...+15°C.
Seedling care
The procedure for caring for seedlings includes several important points, which we will consider in detail. When the first shoots appear, the diving process takes place. You need to pick the peppers very carefully so as not to affect the fragile, unformed root system. Then the specimens are placed in cups mixed with peat and soil.
The soil in which the seedlings are located must be moist. Watering should be done once every 2-3 days. When the seedlings sprout, the procedure is carried out daily. The water temperature for irrigation should be +20…+25°C. After watering, the soil must be mulched with dry sand. To avoid the appearance of fungal diseases, you need to water the plants at the roots with biofungicides once every 14 days.
You will be interested to know how to speed up the ripening process of peppers.
Feeding seedlings takes place in two stages. The first stage occurs when the plant already has two or three leaves. For this, mineral fertilizers are used, which should consist of the following components: granulated superphosphate (50 g), ammonia (30 g) and chlorine-free potassium (20 g). The indicated amount is calculated per 1 m² in dry or dissolved form (10 liters of water).
Planting seedlings in the soil
The area where you will grow seedlings must be prepared. It is best to prepare the beds in the fall, after harvesting. To do this, you need to sprinkle rotted humus on it and dig up the soil.
Pepper in marinade
The pickled vegetable will please everyone at home if it is prepared correctly. The vegetable is saturated with the characteristic taste of the marinade, becomes moderately spicy, but does not burn. There are several recipes for pickled hot peppers:
Pepper in a special marinade
You will need:
- 1 kg hot pepper;
- 0.5 l of wine vinegar;
- 0.5 l sunflower oil;
- 250 g garlic;
- 1 bunch of celery leaves;
- 2 bunches of cilantro;
- salt.
The pepper must be green in color, but has reached its maturity. Wine vinegar gives the appetizer a special piquant note, so it should be included in the marinade. Culinary experts do not recommend replacing wine vinegar with table vinegar. Required ingredients are cilantro and celery. Greens give the preparation a special aroma and characteristic taste, enhance the nutritional value and supplement the dish with useful substances.
To prepare, take 7 liters of cold water, add wine vinegar, salt and vegetable oil to the liquid. Place the marinade on the stove over low heat and wait until it boils. During this time, the vegetable is peeled and washed, the greens and garlic cloves are finely chopped.
Pepper is placed in a boiling marinade. It takes no more than 5 minutes to cook the pepper.
Stand away from the pan so as not to inhale the spicy smell when preparing pickled peppers.
Cook the vegetable until it acquires a yellowish tint. The vegetable is carefully transferred from the pan to a colander, and at this time the greens are added to the marinade. It is recommended to add some red bell pepper. Boil the liquid for another 5 minutes.
Place the vegetable in sterilized jars, pour in the marinade with pieces of garlic and bell pepper. All ingredients should be laid in layers - hot peppers, herbs, garlic, bell peppers. We alternate layers.
Next, the filled jars are sterilized in boiling water under the lid for 20 minutes, after which they are sealed with lids using a seaming machine.
Classical
The second classic recipe for pickled peppers is more familiar to housewives. In it, wine vinegar is replaced with a 9% table product.
For the marinade take:
- 8 spoons of sugar;
- 200 ml. 9% vinegar;
- 1 kg. hot pepper;
- 1 l. water;
- any spices;
- 3 tablespoons salt.
Prepared peppers and spices are placed in sterilized jars. Pour boiling water over the products and leave for 15 minutes. Next, the water is poured into a saucepan and the marinade is prepared over the fire - sugar, vinegar and salt are added to the liquid.
The contents of the container are poured with hot marinade; it can be rolled up without sterilization. The jars are turned over and wrapped in a warm blanket. After complete cooling, the workpiece is transferred to the pantry.
Pickled peppers with honey
The beekeeping product gives the spicy vegetable a special piquant taste. The dish turns out rich, sweet-spicy and aromatic.
For preparation take:
- 2 tablespoons honey;
- 1 tablespoon apple cider vinegar 6%;
- 1 tablespoon salt;
- hot peppers.
Before adding food, the jar is sterilized and the lid is boiled. The tails of the pods are cut off and the peppers are placed vertically in a jar. Honey should be thoroughly mixed with vinegar and added to hot water to prepare the marinade. Pour it over the peppers in the jar and cover with a nylon lid. After a week, the pepper is ready to eat.
Rules of care after planting in the soil
Planting of seedlings in a permanent place is carried out 2–2.5 months after sowing the seeds. 14 days before planting, seedlings need to be hardened off. To do this, watering is reduced and the soil is allowed to dry out until a crust appears. Then the temperature of the seedlings is reduced to the level of outside air - first they are placed in such an environment for 4–6 hours, then the time gradually increases until they are constantly in the natural environment. Holes are dug in the garden bed with a depth and width of 5 cm. Young plants are transplanted into the hole using the transshipment method, together with a lump of earth, then sprinkled with soil and watered.
Tsitsak pepper can be planted using two methods:
- square-cluster, planting pattern - 50×50 cm;
- private, planting pattern - 25x50 cm.
To make it easier to care for peppers, they can be mulched with grass, straw or sawdust. Such a layer will retain moisture, and there will be no need to loosen the soil.
Video: planting hot pepper seedlings
Watering and fertilizing
Watering must be done regularly, taking into account weather conditions. The soil should not be too wet or dry. You should water the pepper 2-3 times a week: 0.7 liters of water per 1 m². The procedure is best performed in the morning or evening. In this case, you need to feed the plant with nitrogen fertilizers.
Care
Growing seedlings
Proper care will ensure you a good harvest
To obtain high-quality and healthy seedlings, it is necessary to allow the seeds to germinate before planting. To do this, you will need gauze moistened with water. It must be folded several times. Place the seeds inside and put them in a warm place for 5-6 days.
Seeds should be sown in March in pre-prepared soil. It is necessary to mix drainage and nutrient soil in a ratio of 2:1. To this mixture add fresh sod and well-rotted compost. The prepared soil must be poured into a box. After which the future seedlings are covered with film or glass to create a greenhouse effect.
During the daytime, the box with sprouts must be left in a warm room with a temperature of 24-26°C. At night, move the seedlings to a cooler place with an average temperature of 13-16° C.
Picking seedlings
The sprouts need to be picked after the first leaves appear. This must be done very carefully so as not to damage the roots of the plant.
The seedlings are moved into prepared cups with peat and soil. After germination, it is transplanted into open ground.
Top dressing
Sprouts need to be fed with a small amount of nitrogen fertilizer. When each stem of the seedlings is covered with 3 leaves, you need to add phosphorus and potassium fertilizers.
In order for the bushes to grow actively, they need to be fed with organic fertilizers. The best solution would be wood ash. Feeding is carried out 1-2 times a week.
Watering
The plant must be watered regularly, taking into account weather conditions. The soil should not be excessively wet or dry.
The average number of waterings per week is 2-3. For 1 sq.m. 0.7 liters of water is enough. The best time to water is early in the morning or late evening.
Trimming
It is necessary to promptly remove dry or diseased leaves. It is also important to cut the fruits on time. This will prevent them from spoiling.
Diseases and pests
Tsitsak is resistant to some diseases, but if you do not care for the plant correctly, problems such as fusarium and stolbur .
It can also be affected by the following pests:
- An aphid is an insect that feeds on the sap of a plant, causing the leaves to lose color, dry out, and then turn yellow. Most often, in the presence of aphids, Tsitsak dies. To get rid of this parasite, you need to make a solution of 30 g of wood ash and 15 liters of water, then add 100 g of liquid soap to this mixture. The leaves and stem of the pepper are treated with this solution.
- Spider mite - it develops on the underside of the leaf. White cobwebs appear on the leaves. You can get rid of the pest using insecticides.
- Slugs are the most common pests that affect not only peppers, but also other crops. They feed on the leaves, after which holes form on them. These pests also attack fruits. To get rid of them, drugs such as Keltan and Karbofos are used.
Tsitsak recipe in Armenian
You can ferment peppers in three-liter jars, enamel dishes, plastic buckets and wooden barrels. The choice of suitable utensils depends on the quantity of raw materials prepared for processing and the intended storage location. Peppers collected from the beds should be left for several days in a warm room until the fruits acquire a yellowish tint.
The recipe for preparing peppers for the winter itself is very simple and does not require any special culinary skills from the housewife. You can ferment tsitsak with or without brine. To prepare the product without brine you will need:
- salt – 450 grams;
- greens – 1 bunch;
- hot pepper – 5.5 kg;
- garlic - 4 large heads.
Having prepared the ingredients, you can proceed directly to preparing the recipe:
- The greens are chopped with a knife on a cutting board and mixed with chopped garlic cloves.
- The pepper is pierced with a fork in several places, and then placed interspersed with herbs and garlic in a deep container.
- The container is covered with clean gauze, and then heavy oppression is placed on top of the workpiece.
In this form, the pickling is left in a warm place for several days.After this, the product can be moved to the basement or any other cool room.
We invite you to familiarize yourself with the harm insects cause.
To pickle 6 kilograms of peppers with brine you will need:
- garlic – 5 heads;
- fresh dill – 1 bunch;
- water – 10 liters;
- coarse salt - 2 heaped glasses.
After all the ingredients are prepared, you can begin the pickling process:
- Half the garlic is crushed using a garlic press, the greens are coarsely chopped, then the presented ingredients are mixed together in an enamel bowl. Whole garlic cloves are also added here.
- The washed pepper is pierced with a fork in several places. This is best done on a cutting board. After this, the fruits are placed interspersed with garlic and dill.
- To make a brine, you just need to mix cold water and salt. The brine is poured into a container with the workpiece. The peppers are covered with clean gauze and pressure is placed on top. The pickling is left in a warm room for several days, exactly until the fruits turn yellow. The fermentation process takes from 3 to 10 days in different cases.
- After the pepper changes color, the pickling can be left in the brine and taken to the basement. This completes the process of cooking pickled peppers in brine.
If the housewife decides to store the workpiece without brine, then she needs, immediately after the fruits have acquired a characteristic yellow color, to discard the pickling in a colander and completely drain all the brine. After this, the peppers are placed tightly in jars, pressing lightly with your hand. It is not necessary to sterilize the jars for this; just wash them thoroughly with soda.
Recipe for making tsitsak in Armenian.
Harvesting and application
Harvesting occurs as soon as the fruits ripen. You can collect green, yellow and red peppers. Then they can be salted, fermented, dried, then ground into spices, and also canned. Tsitsak is also used for cooking meat, since it is moderately spicy, which goes well with the taste of hearty meat dishes.
We recommend that you learn about the benefits and harms of green hot peppers.
Knowing how to grow Tsitsak pepper and care for it, you can get a rich harvest, and by becoming familiar with possible diseases and methods of combating them, you will prevent fruit loss.
Benefits and harms
Pickled vegetables are useful because they contain the same composition of vitamins and minerals as fresh ones. During the cooking and fermentation process, the substances contained in pepper do not decompose. The main benefit of pickled hot pepper is that it contains a large amount of fatty oils, carotene, as well as vitamins A, B and C.
Hot pepper can only be harmful to people who have been prescribed a diet by their doctor. These may be people suffering from various diseases of the gastrointestinal tract, liver and kidneys. This product is also not suitable for feeding small children, nursing mothers, and pregnant women.
Tsitsak: description, propagation of Armenian pepper and care for it
The hot pepper tsitsak got its name in honor of the famous Armenian dish. Even experts note that this variety is perfect for making pickles. Therefore, the description and properties of the plant will be very interesting to everyone who decides to grow it on their own plot.
Description and characteristics
Tsitsak is a heat-loving crop. In regions with cold climates, it is grown exclusively under polyethylene covers. The shrub must be placed in a well-lit place. Tsitsak has the following features:
- long-term preservation of fruits;
- high yield rates;
- low calorie content;
- resistance to fungi;
- frost resistance up to 20 degrees;
- presence of a large number of useful substances.
The fruits of this crop ripen 110-130 days after planting. Peppers can be planted near parsley, garlic and dill.
The shrub reaches a height of 100 cm. The leaves are elongated and oblong, have a pronounced green color and pointed edges. When planting this vegetable crop, it should be taken into account that no more than 6-8 bushes should grow per 1 square meter of area. If this rule is neglected, the root system of the plant will deteriorate.
Pepper fruits have fleshy pulp and a cone-shaped shape. Average weight - 30-60 g. Hot seasonings are made from them. In addition, the vegetable is used for preservation purposes.
Growing rules
To get healthy and high-quality seedlings, the seeds must germinate before planting . This is done using moistened gauze. The seed is placed in it, after which it is put away in a warm room for several days.
Tomato Rio Grand Original: description of the variety, its characteristics
Armenian tsitsak seeds are planted in March. It is necessary to mix the fertile soil and drainage. Compost and sod should be added to these ingredients. The prepared soil mixture must be poured into a container. After planting, the seedlings need to be covered with a glass sheet or plastic film to create a greenhouse effect.
During the day, it is advisable to keep the tank with seedlings indoors at a temperature of 24 to 27 degrees. At night, they need to be placed in cooler conditions. This is due to periods of plant activity.
Young sprouts are picked into separate cups with soil and peat mixture. After the roots appear, they can be immediately transplanted to an open place in the garden.


