In what cases and why do you need to thin carrots?
Thinning carrots helps solve a number of problems:
- increasing the free space in the beds has a beneficial effect on the size of root crops;
- thinned bushes receive more light and nutrition;
- by thinning carrots, it is possible to identify the most powerful sprouts, which will then bring the maximum yield;
- planted bushes will stop stretching upward, which will accelerate the development of roots;
- When growing thinned carrots, yield parameters increase by 50%.
This is interesting! Carrots are a champion in carotene content. According to scientific research, consuming 2.8 ml of beta-carotene per day is associated with a 40% reduction in the risk of developing cancer.
Is it possible to plant carrots after thinning?
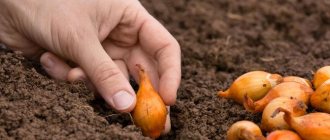
In most cases, transplanting thinned carrots does not give positive results. As a rule, as a result of such actions, branched and hairy carrots of very small sizes grow in the garden bed. It is for this reason that carrots and other root vegetables are not planted using seedlings, since they do not take root well. However, some gardeners still resort to such actions and get a carrot harvest.
To plant a thinned one, it is necessary to use the removed sprouts after the first stage of thinning, while they are very small in size. Replanting root crops at the second stage is completely pointless - the plant will constantly get sick and the harvest will be poor. In the chosen place, you should mark the holes with a pencil and plant the removed sprouts along them. Next, the soil around the plantings needs to be compacted and watered abundantly. With careful care, thinned carrots can provide a good increase in the vegetable harvest.
See also How to properly deal with carrot flies
Is it possible to grow carrots without thinning?
Not all gardeners want to thin out carrots. Therefore, they prefer to initially use proven methods for planting that avoid this procedure. These include the following:
- Planting granulated seeds. They are large in size. This helps to plant the seeds at the right distance and not worry about germination parameters. Such seeds are also processed by manufacturers.
- Planting using paste. To do this, the cooled substance must be mixed with grains and poured into the grooves.
- Mixing planting material with sand. You can also use peat chips or coffee grounds.
- Planting using tape. To carry out the procedure, you can use ready-made or homemade. In the second case, it is enough to glue the seeds to toilet paper.
- Planting in egg trays.
- Joint planting with radishes. Early ripening radish varieties will ripen before carrots appear. This helps to collect 2 crops from one bed.
Important! For any planting method, you should use only high-quality seeds. They must be fresh.
Thinning carrots is the key to a tasty harvest
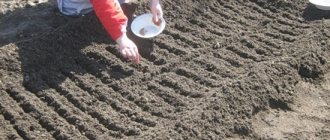
If the seeds were sown at a distance of 1-2 cm from each other, thinning the carrots will most likely not be necessary. If the seeds were poured thickly, with a reserve, then the moment will come when it will be necessary to start thinning the bed. The thing is that vegetables planted too closely will interfere with each other’s growth and development. It is not recommended to delay this process, because during growth the root part of the carrots can become intertwined and significantly complicate the removal of some sprouts, and the vegetables themselves will develop much weaker.
Thinning carrots is usually done twice. To simplify this process, you should use tweezers, which make it much easier to grab the thin stem at the very base. Watch a video at the end of the article on how to properly thin carrots.
The first thinning is carried out immediately after the first shoots appear. To facilitate this process, it is better to water the seedlings abundantly beforehand. The carrots must be pulled straight up, without tilting or loosening. If this condition is not met, neighboring sprouts can be torn off or damaged. This will contribute to the formation of branches in the root crop and it will be horned. After the first thinning of carrots, shoots should remain approximately every 3-4 cm. The remaining plants should be watered with warm water, approximately two to three liters per square meter. The earth around them needs to be compacted, and between the rows needs to be loosened. Unlike beets, pulled out carrot shoots cannot be transplanted to another place. A root system that is too weak does not take root.
The carrots are thinned out a second time after 21 days, when the stems have grown to ten centimeters. After this, the distance between the sprouts should remain within 6-7 centimeters. It will also not be possible to replant the pulled out seedlings, because they will not be able to take root. The process may create an odor that attracts carrot flies. To avoid this problem, thinning carrots should be done late in the evening or early in the morning.
The torn plants should be thrown into compost and covered with soil. It is also a good idea to sprinkle the carrot bed with tobacco.
How to thin carrots: thinning methods
Many gardeners are interested in how to thin out carrots. There are several methods for carrying out this procedure when growing crops in open ground.
Classic method
In this case, the roots must be thinned out manually. This method is considered not the most convenient. In addition, it can damage neighboring crops. This method does not always allow you to pull out the entire bush. In this case, the lower part will remain in the ground.
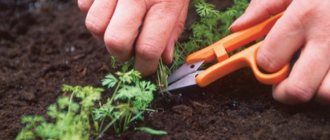
Using scissors
This method involves the use of ordinary scissors. In this case, you need to leave a distance of 4 cm between the seedlings. To carry out the procedure, you need to trim the greens at the root with scissors. At the same time, the roots themselves should remain in the ground.
However, experts do not recommend using this thinning method. Roots that remain in the soil often rot and decompose. As a result, they become sources of fungal spread throughout the entire area of the garden bed. This can lead to complete loss of the crop.
You can thin out bushes with scissors
Garden tweezers
Using garden tweezers helps to grab thinner shoots. This method is considered quite labor-intensive, since when using such a tool, extreme care must be taken so as not to damage nearby plants.
Thinning technology
Carrots are pulled in different ways: with hands, tweezers or scissors.
Manually
Excess sprouts are removed manually by carefully grasping them with two fingers. If the soil has been well moistened beforehand, the plant can be easily pulled out along with the root.
Important! When pulling, pull the sprout straight up, trying not to tilt it to the side. Otherwise, there is a high risk of damage to the roots of neighboring plants. Damaged sprouts form additional lateral roots, and the vegetable grows horned or twisted.
The procedure is carried out in clear weather so that all plants are clearly visible.
Tweezers
Ordinary tweezers are a reliable assistant in this procedure. It is especially convenient to use it at the first stage, when the sprouts are still very small and it is not easy to grasp them with your fingers.
First, the soil is thoroughly moistened, and after a while the procedure begins. Using a tool, grab the plant stem as close to the soil surface as possible and with a sharp movement pull the stem up.
Scissors
This is a quick way to remove small and weakly developed plants. The essence of the method is as follows: using sharply sharpened scissors, cut off the above-ground parts of excess sprouts. Do not touch the roots: after a while they will dry out on their own.
Is it possible to plant thinned sprouts in open ground and do they need to be replanted?
The removed sprouts can indeed be used as seedlings and transplanted to those places where seedlings rarely sprout. In this case, you should use the following recommendations:
- After thinning, the bushes should be placed in a container of water. In this case, you need to use plants that are not damaged and have strong roots.
- The tops need to be partially trimmed. As a result, its length should be 7-10 cm. This will improve the survival rate of the plant.
- When planting, the root should sink vertically into the soil. The distance between bushes should be 10 cm.
- When replanting after thinning, there is a risk that not all bushes will be accepted.
- Established carrots may produce deformed or small fruits.
Reviews
Each summer resident has his own way of thinning carrot beds and his own observations regarding this procedure.
Natalya, Nizhny Novgorod: “ Every year I sow carrots in the traditional way and then thin them out in 2-3 stages. I think that pulling gives excellent results. The result is larger carrots that are about the same size.”
Valentina, s. Lugovoe: “I had the experience of sticking seeds on toilet paper. Unfortunately, unsuccessful. Nothing came up at all. Now I mix the seeds with dried coffee and plant them. The result is excellent, there is almost no need to pull.”
Alina, s. Red: “I usually thin out carrots in 3 stages, since it’s difficult to determine which carrots to keep the first time. The first thinning, of course, is the main one in terms of the number of plants removed. In June I finish sowing in those places where the carrots have not sprouted.”
Advice from experienced summer residents
For the crop thinning procedure to be successful, it is important to follow some recommendations:
- It is best to remove excess plants early in the morning. This is done before the carrot flies fly to the garden bed. When the integrity of the bushes is damaged, many pests flock to the sap, which is very dangerous for the plantings.
- After removing excess plants, the soil in the growth area must be compacted tightly. This will help prevent pests from getting inside and drying out the soil near the roots of the remaining bushes.
- Carrot roots can be given to livestock. In this case, it is recommended to place the tops in a compost heap and sprinkle them with soil or sawdust. They will help to overcome the pronounced carrot aroma.
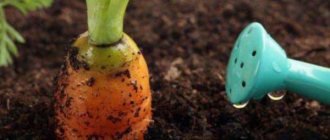
Important! When watering the beds, it is important to put a sprayer on the watering can. This helps to evenly distribute water over the planting area and avoid washing out seeds from the soil.
For watering you need to use a watering can with a sprayer.
Thinning carrots is considered an important procedure that helps increase yield parameters and make the fruits more even and beautiful. It is important to strictly follow agrotechnical recommendations.
Timing of the procedure
The traditional growing method involves removing excess plants in 2 stages.
First stage
For the first time, carrots are thinned after the first 2 leaves have grown.
Advice! On the eve of the procedure, water the beds well. This will make it easier to remove excess plants without damaging neighboring ones.
At the first stage, a distance of 2-3 cm is left between the plants. After the procedure, the beds are loosened, slightly compacting the soil next to the sprouts.
It is convenient to combine the first pulling with weeding. Removing weeds and loosening the soil will provide the tender shoots with optimal conditions for further development.
Second phase
The second time, the crops are thinned out after 2-3 weeks, when the tops have grown to 10 cm. In this case, the distance between the root crops is increased to 5–7 cm. When determining the exact interval, they are guided by the recommendations of the manufacturer of the variety or hybrid.
Attention! After thinning, a characteristic odor spreads from the removed plants, attracting a dangerous pest - the carrot fly. Therefore, the sprouts are removed from the beds into a compost heap and covered with earth and sawdust.
Thinning should be moderate, otherwise it will negatively affect the quality of root crops and yield indicators.
How to plant carrots without thinning
This method has been known for a long time, but few dare to use it.
In winter or autumn, take a narrow paper strip, maybe toilet paper, stick seeds on it, dry it, roll it up and leave it until spring. When the carrot bed is ready, the tape is laid in the ground and sprinkled with damp soil. No more sprouts will sprout than there were seeds. But will they come up?
When deciding how to sow carrots so as not to thin out, you need to carefully weigh the pros and cons so as not to be left without a harvest.
We suggest you read: If the carrots are frozen: in a bag, in a garden bed or on a windowsill, what can you do?
An interesting method is to pour seeds into a salt shaker and “salt” the soil in the furrows with the seeds. But the holes in the salt shaker must be wide enough for them to fall out.
How to plant carrots so as not to thin them, but so that they are guaranteed to sprout? In order for the glued seeds to germinate, you can use the Moscow method of growing seedlings. To do this, in the spring the roll is placed in a bowl of water so that it does not cover the seeds. The hygroscopicity of paper should be high. Moisture will flow to the seeds, and they will germinate faster. But before planting the tape, it needs to be dried so as not to tear.
If you mix carrot seeds with sand in a ratio of 1:5, germinate them, dry them a little before planting and sow, then the crops will not be thickened. It may be necessary to break through, but not much.
Sowing granular seeds also increases the distance between plants. Plants grown this way require less thinning.
Some gardeners sow carrots with a special planter. Now she is very popular. To sow each seed, press the handle once.
Treatment and prevention of carrot pests
Like other cultivated plants, carrots are susceptible to diseases. Let's look at the main diseases and pests for carrots:
- Dry rot. Brown-spotted lesions on the tops of roots and leaves. Infestation is avoided by autumn plowing and the use of potash fertilizers.
- White rot. White “cotton” coating with compactions in some places and visible mucus. The disease is provoked by waterlogging. For prevention, correct crop rotation, potash fertilizers, loosening, and destruction of plant residues are used.
- Black rot . Brown spots affecting leaves. Treatment involves autumn plowing of the site and the use of fertilizers containing potassium.
- Carrot fly , an insect with a yellow head, is one of the main enemies of carrots. Emerges from the pupa and lays several eggs. The larvae penetrate the carrots and reach the core. Preventive measures include early sowing, thinning, weed removal, and timely loosening. Planting carrots together with onions or treating the rows with wood ash can help prevent the appearance of carrot flies.
The carrot fly lays larvae that attack the carrots from the inside.
The photo on the right is a root crop affected by white rot. Despite the unpretentiousness of growing conditions, the necessary preventive measures are carried out on the site regularly and protect the crop from destruction.
Harvesting and processing carrots
It is important to dig up carrots in time so that they do not lose their juiciness and bright taste. The right time to harvest carrots depends on the varieties planted and the time when the seeds were sown in the ground.
Bunch carrots can be harvested as early as July, but for winter storage, it is better to dig up root vegetables at the end of September, when the tops begin to turn yellow.
Take a garden fork and carefully pry up the layer of soil with the carrots, being careful not to damage the roots. A dug carrot can be pulled out of the soil with your hands by the tops. Since root crops are sent for storage without tops, novice gardeners may have a logical question: how to properly trim carrots?
Video about growing and planting carrots
As you can see, growing carrots is much easier than growing other vegetable crops. The whole secret is to ensure proper watering, regular loosening and weeding of the carrots, then the harvest will please you.
Second thinning
If the first thinning is done after two leaves appear on the shoot, then the second thinning is done after the plant becomes an adult. You need to carefully pull the shoots up after they emerge, at a right angle. If a gardener loosens a root crop and pulls it in different directions, he damages the rhizomes of neighboring carrots.
Proven folk fertilizer for carrots
Fertilizers for carrots prepared according to folk recipes have proven themselves well. To prepare it, the container is filled with chopped nettles and filled with water. To enhance fermentation, add yeast or starter and stove ash. Cover with film and place in a sunny place. Stir occasionally until fermentation is complete. The finished fertilizer acquires a specific smell of manure. Dilute with water in a ratio of 1:10. For more information about bait and fertilizers for carrots, read the article: → “The best fertilizers for carrots: in spring, autumn, before winter and before planting.”