Bean sprouting experience
Elena Aleksandrovna suggested that we conduct an experiment on germinating beans at home, record the results of the experiment and prepare a report based on them. We decided to go further and prepare an online report from the scene of the events. Meet us! “Fa-fa-sol” or “Where life begins”!
Beans (lat. Phaséolus) are a type genus of plants of the Legume family, uniting about 87 species growing in the warmer regions of both hemispheres. They are bred for their fruits and seeds – and some species also for their flowers. Of the cultivated species, the first place is occupied by the common bean with many varieties and varieties, some of which are climbing, others are bush. The homeland of this species is Latin America.
The benefits of sprouted beans and their harm
Many people know that legumes have a positive effect on health, but not everyone knows how to make bean seed germination easy and fast. Bean sprouts contain many useful substances that improve the functioning of the gastrointestinal tract and strengthen the immune system.
Attention! Eating raw red beans is not recommended because they contain toxic proteins that lead to poisoning. If you carry out heat treatment, all toxins will disappear, making the beans absolutely safe.
Bean sprouts contain many beneficial substances:
- fiber, carbohydrates and fats;
- calcium, zinc, iron;
- vitamins A, C and group B.
Because they are rich in plant protein, beans can be a meat substitute.
To protect yourself from colds and lose weight, you should take legume sprouts. They will normalize metabolism and improve the functioning of internal organs. They have a positive effect on hematopoietic processes, remove toxins and improve external condition.
However, it is recommended to be aware that not all types of beans are equally suitable for consumption as food. To do this, it is best to germinate Mung and Mung beans, which are valued by raw foodists. Sprouts are not harmful if you do not eat too much of them. Abuse can lead to flatulence and diarrhea.
Sprouted sprouts can be used in the creation of medicines, as well as in folk medicine, as it contains many positive substances. It is advisable to use it as a therapeutic drug for diabetes and high blood pressure.
Many summer residents prefer to sprout beans at home before planting in open ground in order to harvest the crop faster, but more often bean sprouts are used as food, from which you can prepare many different dishes and even sweet baked goods.
Part I: Preparation
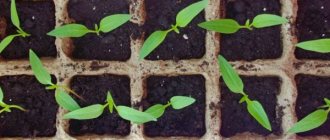
For the experiment, we chose red bean seeds to see how the color of the seeds would change during the germination process. We measured the beans and looked inside
- Check out the most popular care products
- Preserve the beauty and natural health of your skin
- Create a new look with the brand's collection of the season
- Create a special mood for any holiday or event
More details
The beans bought at the nearest store turned out to be approximately the same size, about one and a half centimeters. Each of them can be split into two halves - cotyledons - these are nutrients for the future sprout until it gets stronger. The photo shows a plant embryo with a pair of leaves. The cotyledons and embryo are covered with a dense membrane. The inside of the cotyledon is the same color in both white and colored beans. The only difference is the color of the shell and the size of the beans.
We will have three samples participating in the experiment: Sample 1 - will simply lie in the light and heat. Sample 2 – will lie in a glass of water. Sample 3 – will lie on a piece of cotton wool moistened with water. Thus, we will find out which conditions are best for bean germination.
Why are beans sprouted?
Adherents of proper nutrition recommend eating sprouted sprouts of various crops, including beans. They contain a large amount of vitamins and microelements necessary for the body. The food used is small green mung beans called peas. Salads, stews, and cutlets are prepared from it. The procedure for sprouting beans is carried out for several reasons:
- When sprouting, sugars that contribute to bloating are decomposed.
- The amount of healthy protein in grains increases by 30%, the amount of carbohydrates decreases by 15%.
- The carcinogen aflatoxin is deactivated.
- The number of enzymes increases 100 times.
- Eating bean sprouts helps eliminate toxins.
If the legume crop is not used for eating raw, but as planting material, germination will help the seeds germinate quickly. The gardener will be able to harvest the harvest earlier than when planting beans without sprouts.
The first day
The first day has passed. There are no visible changes in sample No. 1. The beans in sample No. 2 increased in size to two centimeters, and the color became paler. In sample No. 3, the beans also increased in size. On the side in contact with the wet cotton wool, the beans swelled more and the color became pale, as in the 2nd sample.
We cut the bean from the 3rd sample and immediately noticed that the root of the embryo became thicker and the leaves increased in size. The bean skin has become softer.
How to quickly germinate beans: seed preparation and germination methods
- View the full image
Sprouting beans
Preparing bean seeds
Basic methods of germination
How to sprout beans for eating
Rules for caring for beans
Proper germination of beans is the basis for obtaining quick, friendly shoots and a good harvest. Gardeners who plan to grow beans at their summer cottage in open ground need to know the basic rules, and those who want to use sprouted sprouts for food as a living source of vitamins. Knowing how to quickly germinate beans, you can get strong sprouts in a few days, which over time will turn into strong, hardy plants.
Second day
The second day has passed. We didn't see any big changes. The 1st sample has not changed at all. The 2nd and 3rd samples increased slightly. The water turned slightly pinkish from the bean skin dye. We cut the bean from the 3rd sample. The root of the embryo became a little larger and, after cutting the peel, began to stick out a little to the side.
First harvest and storage
Harvesting depends on the variety of bean. For example, asparagus should be collected once every 2-3 days throughout the flowering period. If you harvest the beans less often, the old pods will not allow new ones to grow. Ripe beans can be distinguished by their appearance - if they are full, then it’s time to pick them. Cut the pods themselves from the stem so as not to damage the plant. A ripe pod can be identified by its smooth, broken edges.
After harvesting, the crop cannot be stored unpeeled for a long time, since moisture accumulates in the pods, and this is an excellent breeding ground for various bacteria. Before storing the crop, the pods must be cleaned and the beans should be well dried in the sun. After this, store in small bags in a dry place.
Beans are a crop that is a beneficial product for the body due to its nutritional composition. You can prepare a variety of delicious dishes from beans, and sprouted beans can be used for medicinal purposes. Germination of bean seeds is considered easy, as long as it is carefully cared for. Then you can proudly show your harvest to gardeners and share impressive photos and videos.
Day three
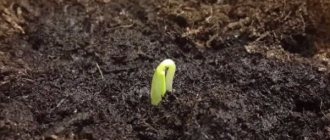
The third day has passed. And in our third sample, two beans hatched! The first and second samples are still without visible changes.
Day four
In the third sample, two more beans hatched! Yesterday's roots had greatly increased in size, and the skin around them began to tear. The first and second samples are still without visible changes.
Day seven
The first part of our experiment has come to an end. The first sample, which was kept warm but without water, did not germinate. The second sample, which was completely immersed in water, increased in size, but did not produce a single shoot and the water deteriorated. And only in the third sample, which was lying on a damp cotton wool, beans sprouted, and one grew especially strongly and even sent out lateral roots.
conclusions
As a result of our experiment, we saw that some of the seeds that were simply lying in the light remained unchanged. Those that lay in the water did not sprouted, but died. Those seeds that were on cotton wool moistened with water gave early and friendly shoots. Thus, we concluded that water, air, and heat are necessary for the development of the seed. While working on the project, we learned how a seed works. It consists of a seed coat, cotyledons and an embryo. The seed coat protects the seed from damage and drying out. The cotyledons contain nutrients for the embryo. And the embryo gives life to a new plant.
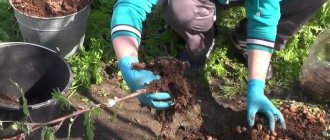
Bean care
As soon as the beans sprout, the bed is watered with water, then the soil is loosened. The procedure is carried out carefully so as not to damage the fragile seedlings. Subsequently, loosening is combined with weeding. Water the beans so that the soil is moist but not wet. Moisture is especially needed during the formation of pods. 25-30 days after seed germination, young plants are fed with complex mineral fertilizer. The next feeding is after 20 days.
To prevent plantings from being affected by fungal diseases, it is necessary to observe crop rotation, disinfect seeds, and burn infected bushes.
Pests in the form of snails and slugs are collected by hand. Climbing varieties of beans need to be tied to supports so that they do not break from the wind.
See also
Description and properties of the 50 best varieties of green beans, benefits and harms
Read
Note! Before fertilizing the planting, it is spilled with plain water, otherwise the delicate roots may be burned by the salts.
Part II: Germination
Our experiment does not end here. Now we have to find out what conditions are necessary for a young sprout to turn into a full-fledged plant. To do this, we selected sprouted beans from the third sample. We divided them into three groups. We placed the first group, together with the largest sprout, in a glass jar so that we could observe the growth of the root through the side wall. We will place this sample in a warm and bright place. We will place the second group next to the first, but cover it with a lid, i.e. deprive access to sunlight. We will place the third group in a sunny place, but on a cold windowsill, i.e. in a place where there is less heat than the first and second samples. We will observe which group of seeds will develop better.
Care after landing
Beans do not require much attention and any type grown in beds will bear high-quality fruits, but one planting is not enough to grow them.
One of the main priorities in sprouted crops is proper watering. It should be done not too often, in moderation, and preferably in the morning. It is necessary to moisten between the rows, otherwise water will get on the leaves and fungal diseases may appear. For green beans and decorative watering, watering should be carried out throughout the whole season, since its deficiency leads to drying of the seedlings, which will not have a very beneficial effect on the quality of the crop. Stagnation of water is also harmful and risks causing the growth of leaves to become uncontrolled, which will lead to their rotting.
It would be a good idea to monitor the condition of the soil: clear it of weeds and loosen it with a hoe, since the roots need access to air. But you need to make sure that the tool does not damage them. If yellow spots appear on the leaves, then the plant does not have enough potassium. Its deficiency leads to bacterial diseases; to prevent this from happening, wood ash is sprinkled on top of the beds.
The first day
One day has passed since the sprouted beans were planted in the ground. There are no big changes yet. We planted the beans shallowly, so it is possible that the beans were slightly exposed as a result of the heavy watering.
Second day
Yesterday, when we photographed the first sample, a tiny edge of a bean could be seen between the lumps of earth. And this evening a sprout 8 cm high grew in this place! It's amazing! Such progress in just one day of light! The first pair of leaves are well formed and ready to open. The cotyledons began to shrink. In the second and third samples, the beans barely emerged from the ground. The development of sprouts occurs with a noticeable lag.
How to choose the right bean variety for your home?
Not all varieties of beans can be chosen for home growing. In a small balcony space that is in use, you cannot place many containers. If you decide to create a shaded decorative corner on the balcony and collect edible beans, bush varieties of green beans of early ripeness are most suitable. It is harvested green, which reduces the growing time. Among the best varieties are “Shakhinya”, “Caramel”, “Priusadnaya”. Not very tall climbing plants up to 1.5 meters will not shade the balcony too much. (varieties “Violetta”, “Krapinka”, “Rumba”) It is impossible to place tall varieties on the balcony, where there is not much space. If long vines are still planted, they are pinched at the required height.
Ornamental plants, for example, red-flowering climbing beans, are in demand to decorate balconies. In addition, it does not require special care or large volumes of land. Popular varieties of Indian small beans are mung beans and mung beans, which are ideal for eating. Experts recommend trying to grow several varieties and determine which one is suitable for your conditions.
Day three
The first sample exceeded all our expectations. During the night it rose another 5 centimeters, and during the day the first pair of leaves unfurled, the leaves became larger and the color darker. Between the first pair of leaves there was a sprout for further growth. Through the glass of the jar, the elongated roots of the white plant are visible. In the second sample, the bean barely rose in the ground. Compared to the first sample, the lag is two days. The third sample never changed.
Is it possible to create conditions suitable for beans at home?
I lived my entire childhood in the Krasnoyarsk Territory (Eastern Siberia), in an apartment on the 5th floor. The most favorite plant for decorating the balcony was the climbing bean, blooming with fiery red flowers. It was sown in standard balcony boxes with a depth and width of about 20 cm and a length of up to 50 cm. 10 beans were placed in two such boxes. This was back in Soviet times, so they didn’t know about any ready-made soils from the store. They collected soil in the yard from a pile brought for flower beds. They didn’t change it in the boxes for years, didn’t feed or fertilize it with anything.
Red flowering beans grow well on the balcony; they do not need a large amount of soil or special care.
The beans grew very actively every year, the vines climbed along the stretched ropes all the way to the canopy of the balcony. All the stems were covered with flowers, and then with pods. Back then it was normal for me. But today I wonder how this heat-loving culture could grow in such Spartan conditions. Maybe it’s true that all its species are so unpretentious that they can grow not only in the garden, but also on the balcony, and even on the windowsill.
Video: experience of growing beans on the balcony
Optimal conditions for bean development:
- The soil is sandy loam or loamy, heated to +12... +15 ⁰C.
- Air temperature: +20… +25 ⁰C.
- Lighting: intense sunlight.
- The length of the day before fruiting begins is 10–12 hours.
The last point needs some explanation; by understanding and applying it, you can get maximum bean yields anywhere. The culture refers to plants with short daylight hours. For the establishment of generative organs, that is, flower buds, 10–12 hours of illumination is required. If you provide your plants with exactly this length of day from the moment of germination to the beginning of flowering, you will receive earlier and more abundant fruiting. During the period when the beans are already making you happy with the harvest, this parameter is not particularly important.
From germination to flowering, it is advisable to keep beans with 10–12 hours of daylight, the lighting should be intense
Day four
In the first sample, the first pair of leaves increased. The cotyledons gradually dry out and are about to fall off. The root system has grown and filled the free space in the jar. The sprout in the second sample was never able to rise above the ground. In the third sample, growth stopped completely.
conclusions
For plant growth, it is very important that there is plenty of sunlight, warmth and moisture. When all three conditions are met, the sprout very quickly strengthens in the soil and opens its leaves in a matter of hours. From this moment on, the plant can independently obtain nutrients and water through the root system and obtain energy through photosynthesis in the leaves.
Look in fast motion at how our sprout grew. First, it grew roots, absorbed moisture and nutrients from the soil, and then quickly developed a strong stem with the first pair of leaves.
Care after landing
Beans do not require much attention and any type grown in beds will bear high-quality fruits, but one planting is not enough to grow them. One of the main priorities in sprouted crops is proper watering. It should be done not too often, in moderation, and preferably in the morning. It is necessary to moisten between the rows, otherwise water will get on the leaves and fungal diseases may appear.
For green beans and decorative watering, watering should be carried out throughout the whole season, since its deficiency leads to drying of the seedlings, which will not have a very beneficial effect on the quality of the crop. Stagnation of water is also harmful and risks causing the growth of leaves to become uncontrolled, which will lead to their rotting.
It would be a good idea to monitor the condition of the soil: clear it of weeds and loosen it with a hoe, since the roots need access to air. But you need to make sure that the tool does not damage them. If yellow spots appear on the leaves, then the plant does not have enough potassium. Its deficiency leads to bacterial diseases; to prevent this from happening, wood ash is sprinkled on top of the beds.
Part III: Life after the experience
The germination experiment has been completed, the results have been received, and conclusions have been drawn. But we were curious whether it would be possible to grow an adult plant at home. To do this, we purchased a couple of flower pots and transplanted all the sprouts from the previous part into them. Exactly a month has passed since the start of the experiment. Our sprouts have not only grown large, the first flowers have already appeared on them!
Another week passed and we noticed that tiny bean pods appeared in place of several flowers. This means that our beans have self-pollinated! We will continue to water and monitor growth.
And now, 3 months after the start of the experiment, the decisive moment came. One of the pods grew and dried up. We decided to open it up and see if we were able to grow new beans at home. When we carefully separated the slices of the pod, we found only one bean inside, about the same size as the original ones, but brighter in color. We assumed that there were so few beans in the pod due to insufficiently favorable conditions for growth: most of the time during the experiment the weather was cloudy, the flower pots have a small volume and the soil in them dries out very quickly. But we got the most important result - with proper care of the plant, it is possible to grow beans at home ! This concludes our experiment. Thanks to everyone who followed our online reporting for three months.
Did you like the project?
Then you can
thank
the author for his work and download the presentation! Give thanks
Bean seed germination
The development of beans from seed to adult plant has a number of features. The optimal temperature for seed germination is +15…+26 degrees. In more severe conditions, seed germination deteriorates and pod development is disrupted.
It is important to choose the right timing for planting this crop. It is best to do this a week after the threat of frost has passed. It is recommended to plant beans at intervals of 5-7 cm. This helps provide them with optimal nutrition and sufficient space.
Important! It takes an average of 2-3 months for beans to reach full maturity. In this case, the specific period is determined by the variety, climatic conditions, and soil conditions.
Beans need moist soil that has good drainage. In this case, the pH parameters should be 6-7.2. Untreated soil or high humidity can cause beans to rot.
It is important to ensure that the soil does not have a high ability to retain moisture. Excess water can cause the grains or sprouts to rot. Don't use too much fertilizer. This plant does not need a lot of feeding. It grows well in normal soil. However, to improve its quality characteristics, organic matter is suitable.
For high-quality seed germination, nutritious soil is required.