Bean seed germination
The development of beans from seed to adult plant has a number of features. The optimal temperature for seed germination is +15…+26 degrees. In more severe conditions, seed germination deteriorates and pod development is disrupted.
It is important to choose the right timing for planting this crop. It is best to do this a week after the threat of frost has passed. It is recommended to plant beans at intervals of 5-7 cm. This helps provide them with optimal nutrition and sufficient space.
Important! It takes an average of 2-3 months for beans to reach full maturity. In this case, the specific period is determined by the variety, climatic conditions, and soil conditions.
Beans need moist soil that has good drainage. In this case, the pH parameters should be 6-7.2. Untreated soil or high humidity can cause beans to rot.
It is important to ensure that the soil does not have a high ability to retain moisture. Excess water can cause the grains or sprouts to rot. Don't use too much fertilizer. This plant does not need a lot of feeding. It grows well in normal soil. However, to improve its quality characteristics, organic matter is suitable.
For high-quality seed germination, nutritious soil is required.
The best varieties and types of beans for growing
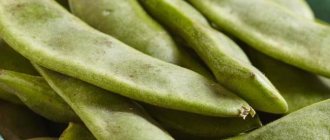
There are a huge number of plant varieties; common beans are more popular in Russia. It can also be climbing, semi-climbing or bushy. Types of bush beans are in demand in the Russian Federation; they quickly bear fruit and do not require special care.
The color of beans can also be different, the most common being white, red, purple and black. The plant is divided depending on the valves into:
- Sugar. The popular name is asparagus. It appeared because its unripe pods are tender, like asparagus shoots. Suitable for food are blades - pods with undeveloped beans. It is impossible to open the doors of this type of bean to get the fruits.
- Semi-sugar. They get rude for a very long time. At first, you can use it as sugar, and then collect the finished beans.
- Peeling. Planted to collect beans.
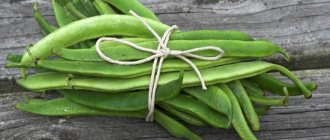
If you plan to grow beans on the balcony, then excellent varieties would be:
- Caramel. In 60 days it bears pods of sweet taste. The variety has strong immunity to many diseases.
- Butter king. 40-50 days after planting, the beans can be harvested. The pods are tubes, 0.25 m long. Tender and tasty, suitable for harvesting and fresh consumption.
- Saxa 615. Length is about 0.4 m. The pods are tubes, 0.12 m long. They contain useful elements that benefit the human body.
beans variety "Caramel"
beans variety "Oil King"
beans variety "Saksa 615"
Bean seed germination stage
Favorable conditions are required for beans to begin to develop. The germination phase of beans begins at a temperature of +15...+26 degrees. In this case, they begin to sprout after 2-3 days.
Observation of the germination of bean seeds shows that the beans include 2 cotyledons and a root, which is subsequently transformed into a full-fledged root system. Also at this stage of germination, a plume appears, which forms the shoot, and a hypocotyl, which subsequently develops as a stem. All these fragments are located in the seed coat.
The germination process begins at the stage of swelling of the beans. This occurs under the influence of moisture. As a result, the seed coat ruptures and a root appears.
Important! This stage of bean growth is of great importance. Sprouting grains helps produce strong sprouts that help withstand cold temperatures and develop into a powerful plant.
Before starting the process, you need to select the highest quality seeds. In this case, damaged, moldy or wrinkled grains must be removed. There are several germination methods. However, they all boil down to providing the bushes with sufficient moisture and light. This helps soften the hard skin and speed up the swelling of the seeds.
Project “Is it possible to grow beans on a window?”
Serbina Anna
Project “Is it possible to grow beans on a window?”
We knew that plants needed heat and light, moisture, air to grow.
To find out how to germinate a bean , my parents and I searched for information using the Internet, a story from an experienced person (a grandmother gardener, an encyclopedia.
Before the experiment, we measured the bean and examined it in cross-section.
With the help of the encyclopedia, we learned how the seed works. It consists of a seed coat, cotyledons and an embryo. The seed coat protects the seed from damage and drying out. The cotyledons contain nutrients for the embryo
How we sprouted beans .
We took two containers (iron plates)
.
In one, the bean were completely filled with water, and in the other, the bean were placed on damp cotton pads. Both containers (plates)
were placed in the light - the windowsill.
After 2 days in a plate with water, the beans swelled and the water turned red.
In a plate with cotton pads, the beans have increased significantly and the cotton pads have become colored.
After 4 days, the beans with water remained unchanged, but the bean with wet disks sprouted.
On day 5, some beans began to have roots :
The beans , in a bowl completely filled with water, swelled, but did not germinate because there was no air. Beans on moist disks sprouted because they were in favorable conditions for growth - moisture, air, heat.
Conclusion: water, air and heat are vital for seed germination.
Next - on Friday we planted the sprouted beans in fertilized loose soil
and already on Monday we saw sprouts:
On the third day a green leaf appeared. The green leaf grew very quickly. He reached for the light and we continued to water him. Other beans . Leaves appeared. The leaves were green and tender. Every day there were more and more leaves.
We observed the growth of beans and recorded all changes in an observation diary.
one seed of sprouted beans in a transparent box and observed what happened to the seed underground. We saw the following:
First, the seed had a root, it was directed downwards, as it needed soil and water.
“Climbed out” at the top
sprout and headed up towards the light.
Beans shed their shell - the peel.
The first leaves appear on the new plant. Bottommost (first)
The leaves are different from others: they are semicircular. We learned from the encyclopedia that they are called cotyledons.
At of the beans were tender and weak.
Every day they became longer. The beans grew very quickly , this was noticeable by the ruler stuck into the ground nearby.
Conclusion: seeds need water, soil, light, warmth, our care and attention to germinate and grow successfully. And in order for the pods to grow and the beans , WE THINK - they need to be planted in the garden, that is, in open ground.
We will continue to watch our beans on the window .
We also made a collection of beans
Educational and research project “Mrs. Beans” PROJECT “Mrs. Beans” Project manager Rimma Vladimirovna Rybalko. Project type: research. Project type: short-term (February.
Project “Vegetable garden on the window” Project: short-term. Type of project: educational and research Project duration: 2 months Project participants: educator, Project “Vegetable garden on the window” PROJECT “GARDEN ON THE WINDOW” “Give children the joy of work! This joy is brought to him by success, awareness of his skill and the importance of the work he does. Project “Vegetable Garden on the Window” Relevance: In the modern world, children, including preschoolers, are increasingly interested in computer games, consoles, and phones. Project “Vegetable Garden on the Window” » Kindergarten No. 56 “Sun” Secondary group No. 2 Educator: Lyashenko T. I. Belgorod 2021 Project “Vegetable Garden on the Window” Project type: creative, Project “Garden on the Window” Project “Vegetable Garden on the Window” in the preparatory group Type of project : educational – practical. Project participants: Teacher, students.
Project “Vitamins on the Window” Project passport Institution: Municipal government preschool educational institution “Mama’s Kindergarten” Project topic: “Vitamins.
Project “What kind of greenery is on the window” Project duration - 4 weeks Project type - educational Project goal: To form the foundations of environmental culture in children.
Lesson in the middle group “Peas and beans” Lesson for middle-aged children. "Introduction to the properties of peas and beans." Goals: formation of cognitive and research.
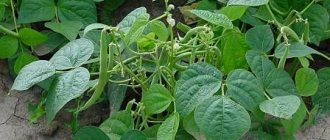
Bean growth stage
The structure of bean grains has a hypocotyl, which has a curved shape. This element connects the spine to the drain. The direction of growth of this part of the bean depends on the sunlight.
Under its influence, it begins to grow upward and straightens. This results in a change in orientation. Thus, the sprout rushes to the top and develops into leaves. The cotyledons gradually degenerate and fall off. Moreover, after 6 weeks the beans become a mature plant. This completes all stages of bean seed germination.
The growth stage of beans has a number of features
Pests and recommendations on how to get rid of them
- Powdery mildew .
A disease associated with fungal overgrowth. Most often associated with excessive humidity and high temperature. Dark spots on the leaves with distinct droplets are a sure sign of disease. The best way to combat this is to completely remove the lower leaves of diseased plants and then burn them. - Aphids and whiteflies .
These insects are very small, but due to their large numbers they cause great harm, oppressing the plant at a young age. The control method is spraying. You will need an ash and soap solution. Half a glass of ash in a bucket of water, into which a little laundry soap was previously crumbled and dissolved. - Slugs . Polyphagous pests that love moisture. You should keep your area clean, remove films and old piles of leaves under which they hide during the heat. And of course moderate watering. Slugs can damage a plant at any stage of growth.
- Sprout fly .
A small fly that lays eggs in the soil. The larvae hatch when there is sufficient moisture and warmth and are able to crawl and find beans in the ground. They settle in them, gnaw through many tunnels and, of course, such a seed will never sprout. Therefore, it is best to sow beans under the condition that they germinate quickly, cultivate the soil early, when the wintering insect is cold, and apply manure fertilizers as deeply as possible.
How to sprout beans at home
Sprouting beans at home does not take much time. The only thing worth paying attention to is the quality of the seeds. Before the procedure, they are carefully sorted, especially if they are from a store. All dried, rotten and spoiled grains should be thrown away. There are several ways to germinate seeds; let’s look at the simplest one. Algorithm of actions step by step:
- take a small plastic container and make holes in the bottom so that water can come out through them;
- place the container in a deep bowl; it is important that the bottom of the container does not touch this container, otherwise there will be no room left for water;
- Place gauze folded several times on the bottom of a plastic container;
- Sprinkle a thin layer of beans on top of it;
- pour warm water over the seeds so that it only slightly exceeds their level;
- cover the grains with a cloth and put them in a warm, dark place;
- To ensure that sprouts appear as early as possible, the beans are watered every 3 hours.
If everything is done correctly, sprouts will appear the next day. Beans for food should be sprouted for 4-5 days, when the plants reach a height of 5-6 cm. Do not forget that the accumulated water must be drained regularly.
Planting germinated material in the ground
Selection of location and soil
Beans are heat-loving plants, so if the winter is particularly harsh, first plant beans in a room, on a balcony or in a greenhouse. Sprouted grains can be planted in a permanent place when the soil and air have already warmed up well (at least to + 15-18 ° C). For most regions, May will be the best month.
The place should be as open to sunlight as possible and protected from winds.
Owners who are interested in how to properly germinate beans for planting should choose light soil for the plant with an optimal acidity level of 6-7 pH.
First, the soil must be dug up as efficiently as possible. For fertilizing, you can use a natural fertilizer such as humus (calculation: 1 part humus to 2 parts soil) or potassium chloride, superphosphate, ammonium nitrate. There should be little nitrogen in the soil, otherwise leaves will grow well, but fruits will grow slowly.
Planting germinated material in the ground
The sprouting material should be sown to a depth of 5 cm. The best distance for bush varieties will be 12-15 cm, and for others - 8-10 cm. It is better to place a small amount of compost at the bottom of the hole. Such material will provide the future plant with a sufficient amount of nutrients.
Before planting beans, you need to water the bed with warm water. Gardeners often ask which side to lay out the grains with sprouts. Since farmers do not give a clear answer to this question, most owners lay out beans in a horizontal position.
Cover the grains with loose soil. Immediately after planting, you can also water the plant a little.
Care after landing
Those who want to plant beans at home or in the garden should pay attention to caring for them after planting. So, for those varieties that climb, you definitely need to install supports - small wooden slats. Beans can grow to different levels, but as soon as their length reaches 2 meters, the plant must be tied to a support so that large fruits can ripen faster and the plant itself does not become depleted.