Description of cucumbers variety Connie F1
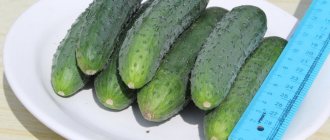
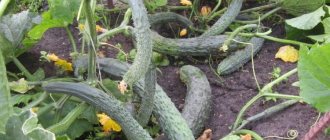
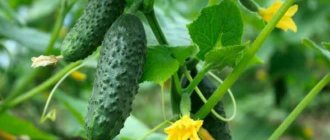
Connie F1 is one of the well-proven early and productive varieties of cucumbers, rightfully considered the best of the heterotic hybrids (all varieties marked F1). The stem of these cucumbers is capable of unlimited growth, and its medium-sized wrinkled leaves have a regular crenate edge. Cucumber Connie F1 can be grown both in greenhouses and in open ground. The fruits ripen 47–50 days after full germination. Juicy and crispy cucumbers of this variety have a cylindrical shape. Their length ranges from 7 to 9 centimeters, weight does not exceed 80 grams. Cucumbers of the Connie F1 variety do not outgrow, even if they were not picked from the garden at the right time. The fruits are covered with frequent small tubercles and have white pubescence.
Connie F1 cucumbers are good for both fresh consumption and homemade preparations
Parthenocarpy (the property of setting fruit on a female ovary without pollination) allows you to obtain a stable harvest of cucumbers regardless of weather conditions. Since cucumbers of this variety produce from 3 to 9 ovaries in each node, the early yield averages 9 kg/sq. m, and marketable - 14 kg/sq. m. The complete absence of bitterness is another quality of Connie cucumbers, thanks to which it has been popular for many years. In 1999, the cucumber hybrid Connie F1 was included in the State Register of the Russian Federation.
Advantages and disadvantages compared to other similar varieties
Among the advantages of Connie cucumbers, it is worth emphasizing the following:
- Cucumbers of the Connie F1 variety are resistant to powdery mildew and root rot, are insensitive to temperature changes and, unlike varieties with similar characteristics, are unpretentious.
- The Connie variety, unlike many varieties that produce a harvest within 3-4 weeks, is characterized by a long fruiting period.
- Cucumber lovers find greens of this variety especially tasty.
- No voids in canned cucumbers.
Certain features of cucumbers of the Connie F1 variety can be conditionally classified as disadvantages:
- Some gardeners, who have previously grown only large-tubercular cucumbers, find the small tubercles and white spines on cucumbers of the Connie F1 variety unusual and consider this their big flaw.
- Since cucumbers of this variety are small in size, there is a misconception about their low yield compared to similar varieties. In order to achieve a high yield, it is necessary to follow the correct agricultural technology, including the appropriate timing and technology of sowing and planting, timely application of fertilizing, watering, etc.
Advantages and disadvantages of the variety
- The positive aspects of the domestic hybrid are as follows:
- unlike many other varieties of cucumbers, “Connie F1” is distinguished by a long fruiting period, which exceeds the standard 3 weeks;
- canned fruits do not have voids;
- high resistance to root rot and powdery mildew;
- high yield even with improper and infrequent planting care;
- Gardeners note the extraordinary taste of the fruits, which will appeal to everyone.
- Like any other vegetable, “Connie F1” has its downsides:
- Sometimes summer residents consider small mounds and sparse cover of thorns to be a disadvantage. Rather, this drawback is caused by the fact that the familiar varieties of cucumbers have large, coarsely lumpy fruits.
- There is an opinion that due to the small average weight of the fruit, the total yield (kg/sq. m) is significantly lower compared to some other varieties. But breeders assure that if all agrotechnical standards are observed, the yield will be at the highest level.
The hybrid has no clear and obvious disadvantages, but its positive qualities attract more and more summer residents from year to year.
Sowing seeds
Sowing seeds of the Connie variety for growing seedlings is carried out in early or mid-April - depending on the region and the intended method of growing them (open or closed ground). Before planting, it is recommended to soak the seeds in warm melt or rain water (you can also use settled tap water), leaving them in a wet linen cloth until the seeds swell and hatch - this usually takes 2-3 days. A better harvest will undoubtedly be facilitated by treating the seeds with a growth stimulant.
It is recommended to soak the seeds before planting
The land for planting cucumbers should be fertilized with organic matter. If your options for using organic fertilizers are limited, consider composting and adding mineral fertilizers to poor soil - cucumbers love them just as much.
Landing
The hybrid can be planted either by seedlings or without seedlings. The first is recommended for earlier harvesting in the northern regions and the middle zone. The timing of sowing seedlings is early or mid-April for greenhouses, late April or early May for open ground. Seeds can be sown directly into greenhouse or unprotected soil when the soil warms up to +15 degrees to a depth of at least 12 cm.
Before planting, the seeds are treated by immersing them in a one percent solution of potassium permanganate for 10 minutes. Then they are washed and soaked in a growth stimulator according to the instructions.
Seedlings are grown in individual containers, preferably peat, but plastic can also be used. The seeds are immersed to a depth of 1.5-2 cm, moistened the soil and covered with film. Before germination, a temperature of +24-25 degrees is required. When sprouts appear, it is immediately reduced to +18-20 and the plants are transferred to a well-lit place.
Cedric cucumber variety: description, characteristics, cultivation and care
Seedlings with 3-4 true leaves are planted in a permanent bed when the soil warms up. Choose areas located in a sunny place, protected from the wind. It is best if tomatoes, potatoes, peppers, legumes, and cabbage were grown there before cucumbers.
To plant seeds directly into the soil, it must be prepared in the fall. The bed is dug deeply and a bucket of humus or compost is added to each square meter. After sowing the seeds, the soil is covered with film until seedlings emerge.
Growing seedlings
The hatched seeds are planted in loose, fertile soil to a depth of about one and a half centimeters. For seedlings, it is important to maintain a temperature of at least 24 degrees (at night it should not fall below 16 degrees) and protect it from drafts. Also, additional lighting will not harm cucumber seedlings. If you are growing seedlings at home, it is recommended to plant each seed in a separate pot, cup or bag - this way, when transplanting, the root system will receive a minimum amount of injury.
Some gardeners prefer to grow seedlings of Connie cucumbers not on window sills, but in a small bed directly in the greenhouse. In this case, covering material should be prepared in advance to protect the plants from nighttime drops in temperature.
At the age of 21 days, Connie F1 cucumber seedlings are moved to a permanent place of growth
Optimal planting dates
- in the middle zone: early or mid-April (followed by planting in a greenhouse in May);
- in the regions of Siberia, the Urals, and the North-West: at the end of April (with landing at the end of May or even the beginning of June).
When planning to plant on ridges, you need to prepare additional cover for the seedlings: film, covering material.
Typically, cucumber hybrid seeds do not require any additional processing. In the factory, they have been disinfected and treated with plasma, so all that remains is to sow the seeds in the ground.
Pots and cups are prepared for seedlings, since it is better to grow cucumbers in separate containers. The age of the seedlings should be about 25 days, since later the cucumbers will not take root well.
The temperature when growing seedlings is not less than 25ºC, at night - not lower than 18ºC. 10 days before transplanting, you need to accustom the cucumbers to fresh air by taking the seedlings outside, onto the balcony, or onto the veranda.
Planting is carried out when the weather outside is warm, up to 22ºC... 23ºC, and the soil warms up to 14ºC... 15ºC.
Planting scheme: two bushes per square meter; three plants can be planted in the beds for the same area. There is no need to thicken the plantings, trying to place as many plants as possible in a small area. This will not increase the yield; moreover, the indicators will be lower, since the plants will not have enough space and nutrition.
You may be interested in:
Further care is standard, and agricultural techniques in a greenhouse will not differ much from growing cucumbers in open ground.
Planting dates will depend on the region, as well as on the place of cultivation - greenhouse or open ground. On the packaging, the manufacturer indicates that the seeds can be planted in the soil in an open space as early as the beginning of May, making sure that the threat of a return of night frosts has completely passed. But it is still better to cover the bed with crops with a film to be sure; in addition, the greenhouse effect will allow you to retain the required amount of heat and allow seedlings to appear faster.
In a greenhouse, seeds can be planted earlier - in April and even in March, if you create an optimal microclimate (stable temperature of at least 20°C and air humidity of at least 90%).
Seedlings are planted at 20 days of age in late May - early June. In the northern regions of the country, where night frosts are still observed in May, seedlings are grown in a warm room, and their planting can be shifted to the end of June, but not later. In a greenhouse, seedlings are planted at any time of the year while maintaining the necessary conditions for growing.
Planting in a greenhouse and in open ground
The place for planting cucumbers should be well lit, but it is advisable that the plants be in light shade for part of the day. Under no circumstances should you grow cucumbers in the same place for several years in a row. You should also avoid planting cucumbers on soils where their close relatives - pumpkins, zucchini, watermelons and other plants of the pumpkin family - were previously grown, since all pumpkins suffer from the same diseases. It’s good if the predecessors of cucumbers are legumes, radishes, cabbage, potatoes or tomatoes.
Both when growing Connie cucumbers by seeds directly into open ground or a greenhouse, bypassing the seedling stage, and when using the seedling method, you should wait until the end of night frosts. By that time the earth warms up to 12–15 degrees. There should be no more than two plants of the Connie variety per square meter of planting. If you plant cucumbers with seeds, you can plant them a little more often, and at the stage of four true petals, discard weak plants.
Before sowing seeds or planting seedlings of Connie F1 cucumbers, you should prepare a special bed for them. To do this, 30–40 cm of the top layer of soil is removed from the bed, the exposed soil is covered with a mixture of pine sawdust, peat and straw, and humus and manure are laid on top of this layer. The final layer of the cucumber bed should be the previously removed top layer - loosened and cleared of weed roots.
Step-by-step description of planting seedlings in open ground
- Water the bed with water from a watering can. Cover the ground with plastic film.
- After 2 days, build planting holes for the seedlings. You can add a little chalk, wood ash, peat or dry manure to them.
- Fill the resulting holes with water.
- Plant the seedlings into the planting holes. Do not water the plants for several days - they need time to adapt to their new location.
How to plant cucumbers in open ground with seeds
- Pour boiling water over the garden bed, then water with added fertilizer.
- Make grooves in the garden bed and place the seeds in them.
- Sprinkle the seeds with a layer of loose soil.
- Cover the bed with film for 4–5 days.
- When the first true leaves appear, spud the stems.
Sequence of actions when planting seeds in a greenhouse
- Soak cucumber seeds in a weak solution of potassium permanganate for 2-3 hours.
- Dry the seeds by spreading them on a paper towel.
- Dust the seeds with Trichodermin.
- Create planting holes in the garden bed, arranging them in a checkerboard pattern.
- Spill the holes.
- Plant the seeds two seeds deep.
Planting cucumber seedlings in a greenhouse
- Make holes in the cucumber bed in a checkerboard pattern corresponding to the size of the pot in which the seedlings grew.
- Water the holes with a solution of organic fertilizer, spending an average of half a liter per hole.
- Place the plants in the holes and fill the pot with soil.
If the seedlings have stretched out a little, the stem should be covered with a mixture of peat and sawdust or the seedlings should be planted a little deeper.
Video: how to plant cucumbers correctly
Planting and growing varieties
It is important to follow the rules and technology of planting for good seedlings, which in the future will be the key to a large harvest. Whatever method you decide to grow a hybrid, it all starts with preparing the seeds and soil. After proper sowing, you need to carefully observe the temperature regime of the plantings, watering technology and control the sufficient supply of sunlight.
We advise you to find out whether bitter cucumbers are good for the human body.
Seedling method
Preparations for planting seeds for seedlings should begin in March. Agronomists recommend planting “Connie F1” seeds in peat cups: when transplanting seedlings to a permanent place in the root system of young plants, there will be no interference, as is usually the case when using the transshipment method. In addition, if you grow seedlings in peat cups, the risk of developing root rot in cucumbers is minimized.
The soil for seedlings should be light, with good water permeability and breathability, but at the same time have a rich mineral composition. It is best to buy ready-made earthen mixtures for seedlings of early varieties of cucumbers, which include the hybrid “Connie F1”.
If you want to prepare the substrate yourself, there is a universal formula:
- turf land (collected not from coniferous forests);
- peat;
- vermicompost or mature compost;
- river sand.
All of the above are mixed in a ratio of 1:1:2:1.
The finished mixture must be frozen or steamed with boiling water for disinfection. Before planting the seeds, the substrate must be enriched with organic and mineral fertilizers. For 10 kg of soil for planting, add 50 g of phosphorus and 30 g of potassium fertilizers, as well as 200 grams of crushed wood ash. The seeds need to be soaked before planting. To do this, they are wrapped in a wet cloth, covered with cellophane and sent to a warm place for three days, where they sprout.
Important! The temperature of the water for soaking should not be lower than +26°C, otherwise the sprouts may not appear.
The day before the seeds are planted, the prepared substrate must be poured into peat cups. Fill 2/3 of the container with it, then water the soil with warm water and leave the container warm until the next day. The seeds are planted in holes up to 1 cm deep. 2-3 seeds are placed in each hole, after 2 weeks the less developed shoots are removed and one sprout is left.
Caring for seedlings consists of the following steps:
- Maintaining a constant temperature in the room with seedlings in the range of +26...+28°C.
- Regular spraying with warm water.
- Cover with film for the whole day (however, you need to open the film for several hours for ventilation).
- 20 days after planting the seeds for seedlings, the seedlings can be transplanted into open ground.
Seeds directly into the ground
Seeds are planted in the ground at the end of May or at the beginning of June. The area for planting should be prepared in advance: remove all debris and weeds, dig it up and enrich it with organic fertilizers (bird or cow droppings, peat). The soil for planting should be light, preferably sandy loam, with an acidity in the range of 6.4–6.8 pH. You can adjust the acidity of the soil on your site using wood ash or slaked lime.
When choosing a location, you should focus on lighting and groundwater level. “Connie F1” will produce crops in a semi-shaded place, but it is still better to select the most illuminated area. The groundwater level should not be close to the surface (preferably below 1 meter), since excess moisture can cause root rot in plants.
Did you know? It has been scientifically proven that cucumbers improve the functioning of the thyroid gland, which suffers under conditions of increased background radiation. Greens also cleanse the walls of blood vessels from “bad” cholesterol.
Before planting, the seeds are soaked (the same as in the seedling method). Planting is done in soil pre-watered with warm water. The seeds are planted 2 cm deep, 2-3 seeds are placed in each hole. The distance between the holes should be 30 cm, between the rows - 50 cm. Immediately after planting, the holes are sprinkled with loose soil, and the bed is covered with film for 5-6 days. At this time, the bed should be sprayed with warm water every day for the first week. Then reduce the frequency of watering by 2–3 times. The film should be opened slightly for several hours a day for ventilation.
Caring for Connie F1 cucumbers
In the open ground
- Protection from wind and provision of branching. From the wind, it is recommended to install trellises along which the stems can curl.
- It is better to water Connie cucumbers early in the morning or at sunset, preferably daily, waiting for the soil to partially dry out. Regular watering is especially important during the fruit formation stage.
- You should also weed the cucumber beds at least once a week.
Pollination or the use of special means to attract insects is not required for cucumbers of the Connie variety.
In the greenhouse
- Temperature control and ventilation. It is important to avoid excessive temperature increases and excessive lighting. To lower the temperature, the greenhouse is regularly ventilated by opening doors and vents. If ventilation does not have the desired effect and the temperature exceeds thirty degrees, you can spray the walls of the greenhouse with a weak aqueous solution of chalk - such shading will create diffused light. If the duration of daylight hours decreases, the greenhouse can be washed of chalk, although rain can also do a good job of this task.
- The air humidity in the greenhouse when growing Connie cucumbers should be at least 90%. It can be maintained by spraying and watering.
- Water Connie's cucumbers with settled warm water 2-3 times a week on hot days, and in cloudy weather - no more than twice a week. Overmoistening the soil can lead to diseases of the root system! The rate of watering of cucumbers of the Connie variety is quite simple to determine: the number of liters required for optimal watering of plants depends on the depth of penetration of their roots. Cucumber seedlings usually penetrate no more than 3 cm deep, so they need to be watered at the rate of 3 liters per 1 m2; During the fruiting period, the roots penetrate 15–17 cm, so the cost of watering 1 m2 of soil on which cucumbers grow should be 15–17 liters.
- Loosening. In order for water to reach the roots of plants, it is necessary to loosen the soil in which they grow. The first loosening is carried out 3 weeks after planting the seedlings in the greenhouse. You need to loosen the soil very carefully so as not to damage the roots of the plants. Next, you need to loosen the cucumbers when the first signs of compacted soil appear. If the plants have grown, intertwined and loosening has become difficult, 4–6 punctures with a fork can be made per 1 m2 to the depth of the horns. This type of loosening for Connie cucumbers is extremely useful and allows you to increase their productivity.
Another advantage of growing Connie cucumbers in a greenhouse is the ability to increase the intensity of their development and increase productivity by increasing the carbon dioxide content in the air. To do this, start the fermentation process by placing a mixture of manure and water in a barrel located in the greenhouse.
Video: subtleties of caring for cucumbers in a greenhouse
Feeding and fertilizer (table)
It is difficult to obtain a good harvest without fertilizing cucumbers with organic fertilizers, so fertilization should be done frequently, but in small quantities.
| Plant development stage | Feeding frequency | Amount/concentration | Drug (components) | Effect of the drug | How to deposit |
| Before flowering | 1 time | 1 tbsp. l. for 10 liters of water | Complex fertilizer Agricola-5 | Increases the energy of plant cells, enhances the digestibility of nutrients, and the resistance of plants to adverse factors. | Copious spraying |
| Flowering period | 1 time | 1 tsp. each component per 10 liters of water | Superphosphate, urea, potassium sulfate + 1 tbsp. organic fertilizer humate Fertility | Promotes the plant's fullest use of nutrients from the soil, the accumulation of chlorophyll, vitamins, sugars, and prevents the excessive accumulation of nitrates. | Watering |
| Fruiting period | 4 times every 10 days | 1 tbsp. l. liquid fertilizer, 1 tsp. Nitrophoska per 10 liters of water | Potassium humate or Agricola-vegeta, Ideal, Nitrophoska | Enhances the absorption of nutrients by the plant, the growth of the root system and the vital activity of the entire plant. | Watering at the rate of 5 liters per 1 m² |
| 0.5 liters of manure, 1 tsp. potassium sulfate per 10 liters of water | Cow or any other dung, potassium sulfate | Increases the intensity of photosynthesis and the rate of fruit development, increases resistance to diseases. | Watering at the rate of 5.5–6 liters per 1 m² | ||
| 1 tbsp. l. Nitrophoska, 2 tbsp. l. organic fertilizer per 10 liters of water | Nitrophoska, universal organic fertilizer (for example, Barrier) | Promotes the growth of healthy vegetative mass, improves the taste of fruits. | Watering at the rate of 6–9 liters per 1 m² | ||
| 1 tbsp. l. organic and complex fertilizer per 10 liters of water | Fertility, Agricola-5 | Promotes holistic strengthening of plants, increasing the duration of fruiting. | Watering at the rate of 5 liters per 1 m² |
Any feeding of Connie cucumbers should be done in the morning or evening, preferably in cloudy weather.
Description of the variety and distinctive features
The hybrid is mid-season, so you should not count on too early harvests. But after about 45-48 days, you can start picking the first greens - smooth, small, with finely tuberous skin.
Connie F1 is a powerful long-climbing hybrid characterized by strong growth. The foliage is average, the leaf blades have a regular shape and are not very large in size. The surface of the leaves is slightly wrinkled.
Indeterminate hybrids with a long stem require mandatory formation; it is also advisable to pinch the stem to get a good harvest. Typically, such powerful cucumbers are grown using trellises.
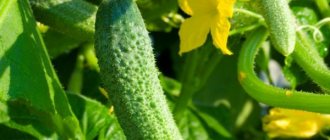
This hybrid is parthenocarpic, which makes caring for it much easier. The ovaries are formed without pollination of flowers by insects and are laid in bunches. With proper nutrition, there can be from 3 to 8-9 ovaries in the sinuses.
Zelentsy are leveled, white-thorned, dark green in color. The skin is dense, with a large number of small tubercles. The taste of Zelentsov Konni is excellent, the flesh is dense, without voids, with a small number of seeds. These cucumbers are perfect for all types of preservation, pickling, and marinades. Their length is no more than 9 cm; you can remove the fruits with pickles and gherkins. Weight – about 60-80 grams.
Signs of damage to cucumbers by pests and diseases
The main pests of cucumbers include the cucumber bug, spider mites, aphids and greenhouse whiteflies.
The cucumber bug is a black insect 2–3 mm long. It lives on the underside of cucumber leaves and prefers greenhouses to open ground. You can determine whether plants are affected by the cucumber bug by directly seeing it on the leaves or by looking at the curled leaves - the bug sucks all the juice out of them.
Spider mites indicate their presence on plants by the appearance of individual white dots on the leaves, followed by whitening of the entire leaf. In the absence of measures to combat the mite, within one to two weeks the plant is covered with a continuous web, and parasites accumulate in large numbers on its tops.
Aphids not only eat young shoots and leaves of plants, but also during their life processes secrete a sticky substance, which is a favorable environment for the proliferation of fungal infections. A sign that aphids have settled on the plant is the appearance of wrinkled and curled leaves. Aphids can only move onto cucumbers from weeds, so don’t neglect weeding!
The greenhouse whitefly also sucks the juice from cucumber leaves. During the course of the disease, caused by the proliferation of whiteflies on cucumber leaves, they become covered with a white sugar coating. Then the leaves turn black and dry out.
Anthracnose is one of the most terrible diseases of cucumbers, literally and figuratively. Symptoms of the disease are brown spots on the stems and leaves of plants, deep weeping ulcers on cucumbers. Since anthracnose is fungal in nature, it progresses significantly in high humidity, heavy dew and rainy weather.
Sclerotinia or white rot is another fungal disease of cucumbers, which is predominantly distributed in greenhouses. Sclerotinia spores live in the soil, so getting rid of it is not so easy. The root part of the stem is the first to be affected. Sclerotinia is easily identified by watery, wet spots that eventually become covered with a white, cotton-like substance. Sclerotinia causes rotting of the fruit and death of the entire plant.
Photo gallery: how to recognize pests?
Leaves of a cucumber infected with greenhouse whitefly
Aphids on cucumbers are visible to the naked eye
Whitening of a cucumber leaf is a sign of spider mite damage to the plant.
Cotton-like clumps on cucumber stems with sclerotinia
Cucumber leaves affected by anthracnose
Disadvantages and advantages of a hybrid
Among the “disadvantages” of this productive hybrid, gardeners note the rather high cost of seeds, as well as the inability to take their own seeds from the fruit. This is impossible to do with hybrid forms, since all the declared characteristics are preserved only in the culture of the first generation of hybrids - F1, and then they disappear. Initially, hybrids contain:
- resistance to adverse conditions;
- disease resistance;
- great taste.
Unfortunately, summer residents cannot obtain hybrid seeds from their harvest; this requires special conditions and, of course, parental lines of the crop.
Some gardeners are distrustful of Connie's fruits, believing that small-tubercular cucumbers are inferior in quality and taste to their counterparts with large tubercles and black thorns. But in fact this is not so, Connie F1 greens are good in all types of pickles and marinades.
Advantages:
- early fruiting periods;
- resistance to a number of diseases, including root rot, powdery mildew;
- resistance to adverse conditions;
- great taste;
- good yield, on average - about 10 kg per square meter, in a greenhouse - up to 13-14 kg;
- bunch type of fruiting;
- suitability for conservation;
- not bad keeping quality.
In order to obtain the yield declared by the manufacturer, it is necessary to take care of adequate nutrition of the hybrid, as well as follow basic agricultural practices.
Protection from diseases and pests (table)
The drugs presented in the table can be used to carry out both preventive and protective measures against the main pests and diseases of cucumbers.
| Pest/disease | A drug | Periodicity | Mode of application |
| Pests | |||
| Cucumber bug | Infusion of tobacco or chamomile | 2 times a month | Spraying |
| Spider mite | Decoction of tomato tops, Persian chamomile infusion, dandelion infusion, wormwood infusion | 2 times a month | Spraying the bottom of the leaf |
| Aphid | Red pepper infusion | If weed removal is insufficient - 1 time, repeat after a week | Spraying plants and paths in a greenhouse |
| Greenhouse whitefly | Actofit (0.2%) | 2–3 times during the growing season | Spraying |
| Diseases | |||
| Anthracnose (scarden) | 1% solution of Bordeaux mixture or 0.4% copper oxychloride, preparations Kuproxat and Oxychom | 1 time every 2 weeks | Spraying |
| Sclerotinia | Potassium permanganate | One-time when planting seedlings | Watering the holes |
| Bacteriosis of cucumbers | 0.02% solution of zinc sulfate | One time before boarding | Soaking the seeds |
Prevention of all fungal diseases in the greenhouse is its timely ventilation and compliance with the optimal humidity regime.
Growing hybrid Connie F1: recommendations
Caring for long-climbing hybrid forms of cucumber has its own characteristics. Summer residents are often unhappy that the indicators indicated in the description have not been confirmed in practice. Meanwhile, the characteristics of the hybrid always indicate that such a cucumber requires enhanced feeding.
In addition to this, you need:
- Properly form the plant.
- Prepare supports in advance for tying up long stems and shoots of cucumber. It is good if trellises are made in the greenhouse, since with this method of cultivation the yield is always higher.
- Carry out prevention against diseases and various pests of cucumbers.
- Ensure regular watering and loosening of plants.
For cucumbers, choose sunny places, but if you plan to plant the plants on ridges, it is better if there is slight partial shade in the afternoon. The thing is that on hot summer days, even such a heat-loving crop as cucumbers suffers from excess heat.
It is important to observe crop rotation, planting plants after cabbage, legumes, and root vegetables. It is not recommended to grow cucumbers in one place for a long time, as harmful pathogens accumulate in the soil and the risk of infections increases.
When can we expect the harvest?
When growing cucumbers of the Connie variety in a greenhouse, the time of harvesting the first harvest coincides with the time of planting cucumber seedlings in open ground. So, if you plant Connie F1 cucumbers on April 15, you will harvest their first harvest in early June. Most of the harvest of cucumbers of this variety is harvested early and consumed mainly fresh, although the extended fruiting period and high taste make it possible to successfully use them in making preparations for the winter. Therefore, feel free to plant Connie cucumbers if you like experiments: having received a good harvest and putting in a little effort in canning, in winter you can enjoy crispy pickled cucumbers, cucumber rolls in apple cider vinegar, pickled gherkins in cucumber sauce, and even jam made from greens.
Advantages of the variety
Cucumber Connie F1 feels equally good both in open ground and in greenhouse conditions.
Before planting, you should know about the main advantages of this crop:
- high yield, early ripening of cucumbers;
- excellent resistance to temperature changes and extremes;
- friendly fruiting;
- excellent taste characteristics, without bitterness;
- female type flowering;
- the ovaries are formed in bunches;
- there are no voids in the cucumber pulp during canning;
- no barren flowers.
Among the conditional disadvantages, it can be noted that there are small tubercles on the surface of the cucumber and the presence of a light fluff. And also the Connie variety requires mandatory support and garter, as it grows quite tall.
Storage conditions and periods
Connie F1 cucumbers can be stored fresh at room temperature or in the refrigerator in the vegetable compartment without special preparation for no more than 3–5 days. For longer storage, when harvesting cucumbers, it is important not to tear off their stalk or wash off the natural coating on them. If these conditions are met, you can dip the cucumber stems in water and, placing them together with the vessel in this form in the refrigerator, store the greens for 3-4 weeks. If you need to store Connie F1 cucumbers for 10 days, wrap each of them in a paper napkin and place them in a plastic bag . Cucumbers prepared in this way should be stored in the refrigerator.
It is important to know that cucumbers cannot be stored at low temperatures - even at a slight minus, they become covered with sticky mucus and quickly soften.
Properly frozen cucumbers of the Connie F1 variety, after defrosting, retain their excellent taste and aroma, are suitable for preparing not only okroshka, but can also be used as a side dish, decorating sandwiches and for cosmetic purposes.
Video: how to freeze cucumbers correctly
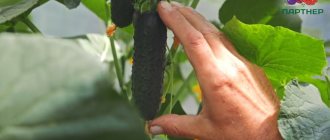
Harvesting and storage rules
Harvest should be done as soon as Connie's cucumbers reach 8-10 centimeters. This gives the bushes the strength to set and grow new greenery.
The harvest is stored in the refrigerator. To extend the shelf life, the stalks are not cut off and the greens are not touched again, protecting the plaque and tubercles. If you need to preserve it for a long time, the tails of the cucumbers are immersed in water.