Home Tips for summer residents
Potatoes grown by yourself are especially tasty. And with a competent approach to planting, a gardener harvests ten from one bucket. In order for the potatoes to be tasty, large and in large quantities, you need to follow some rules.
- 2 Treat the tubers before planting
- 3 Don't plant deep
- 4 Feed with chemical fertilizers
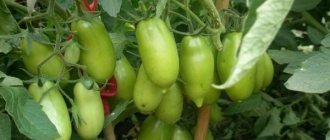
- 5 Break stems for large tubers
- 6 Plant useful plants nearby
Choose smaller tubers
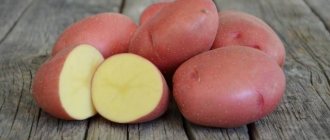
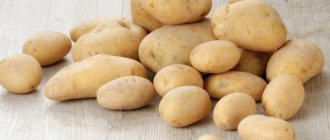
The key to a rich harvest is high-quality planting material. Choose medium-sized potatoes, weighing about 80-100 g. From very small tubers (25-30 g) the same small potatoes will grow.
Too large ones can produce a good harvest, but they will require much more to plant. However, they can be cut, but so that each part has at least three eyes. Freshly cut root vegetables should not be planted in unheated soil; the cuts may rot.
Examine each potato carefully for planting. There should be no stains, dents, scars, signs of rotting or disease. Nematodes are very dangerous. An affected root crop can infect the entire seed material.
Also pay attention to the shape. It should be round. Curvature and deformation are a sign of degeneration of the variety. Also, potatoes that are slightly rotten or damaged by frost are not suitable as planting material.
Treat tubers before planting
For a rich harvest, proper preparation of seed material is important. Potatoes just pulled out of the cellar cannot be planted. 2-3 weeks before planting, it should be placed in a warm room with good lighting.
From sprouted tubers, the harvest ripens 10-14 days earlier; with this preparation, pathogenic bacteria die. When sprouting potatoes in the light, move them every five days so that the lower eyes with sprouts are at the top.
Immediately before planting in the ground, spray the seed with a 1% solution of copper sulfate. This will protect against the most common disease of tubers - late blight (potato rot). To prevent late blight, you can also use a 1% solution of Bordeaux mixture.
Hilling
This protects the tubers from late blight. After all, its pathogens quite quickly get from the infected tops to the tuber.
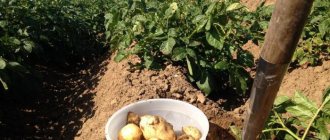
When the tops reach 13-15 cm, we begin the first hilling. We only carry out the event in moderately moist soil. Using a hoe, we carefully rake the soil in small doses so that as a result of our actions we get a mound around the bush.
After 10-12 days - the second hilling. It gives impetus to flowering and tuberization.
The comfortable temperature regime for the crop is 18-22 °C. At 25 °C, tuber growth slows down, and at 30 °C it stops altogether. But low temperatures (up to 10 °C) also have a negative effect, leading to a weakening of the formation of tubers.
Don't plant deep
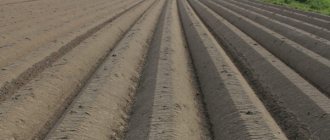
The main rule is not to plant too deep and not to cut holes. Otherwise, the bushes will interfere with each other, and instead of a bountiful harvest, you will get small potatoes and overgrown tops. The depth of the hole should be no more than 6-8 cm, the spaces between them should be 10 cm. The width of the rows for early varieties is about 70 cm, for late varieties - about 80 cm. It is advisable that the area for planting be free of potholes and holes, otherwise they will moisture will be retained and the tubers will begin to rot.
The most common mistake made by novice gardeners is planting on the same plant for more than 3 seasons in a row. The place needs to be changed. Moreover, if you plant potatoes in an area where legumes, cereals, beets, cabbage, radishes, radishes or cucumbers grew last season, you will be surprised how much the yield from one bush will increase.
If it is not possible to change the location, then immediately after harvesting, sow it with fast-growing green manure. After a month, dig up the area along with the green shoots. This will help quickly restore the fertility of the topsoil.
Methods of growing potatoes
There are many ways to grow potatoes, from traditional, in the fields, to modern cultivation in greenhouses. You need to choose a technology based on your goals. If you want to get a harvest of very early potatoes, choose greenhouses. When you don’t have the energy and time to dig up the ground, the method of growing under straw is suitable. If there is very little space on the plot, then they choose the method of growing potatoes in barrels or bags. The main thing is to familiarize yourself with all the methods and choose the most suitable option for yourself.
Traditional growing method
Potatoes have been grown this way since time immemorial; it is constantly being improved, but the essence of the method remains unchanged. The method consists of several mandatory stages, these are: planting, germination, leaf development, budding, flowering, ripening and withering of the tops. This is how potatoes grow in traditional farming .
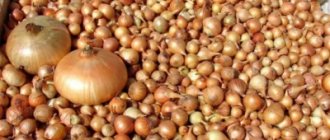
Seed material is selected during the autumn harvest. They take seed tubers only from the strongest bushes, immediately sorting them by size. Medium potatoes are ideal for planting. Seed potatoes are not removed from the field; they are left in the sun until they turn green.
In the fall, the area is prepared for future potato plantings. It must be fertilized so that by spring the fertilizer has already rotted and started working.
Before planting, the nodules are germinated in a cool, bright place. To speed up germination, peat or sawdust is used to sprinkle the tubers. When the tuber has sprouted about 1 cm, it can be planted in open ground.
Potatoes treated with a 1% boric acid solution before planting resist diseases well. Root vegetables are soaked in this solution for 20 minutes.
Potatoes are planted in soil sufficiently warmed by the sun. Usually this is the end of April - beginning of May. The distance between the rows is left taking into account the fact that you will have to hill up several times. There should be about 30 - 40 cm between the holes. Traditionally, a handful of stove ash is poured into each hole as a mineral supplement.
Lack of feeding, as well as its excess, can be detrimental to the plant.
Before the potatoes sprout, it is good to loosen the soil superficially. Usually a rake is used for this. This makes it possible to achieve earlier seedlings and destroy weeds before they come into force.
Hilling is recommended to be done twice. There is no need to be afraid to pour soil during this operation. Many even completely cover young shoots, protecting them from spring temperature changes. The first hilling is carried out when the green shoots reach 15 cm in height. This procedure is repeated a second time just before the bush blooms.
It is recommended to choose the planting method based on the composition of the soil. On heavy soils, the best results are shown by planting potatoes in ridges, and on light soils, the hole method of planting tubers gives optimal results.
Dutch way
Holland is rightfully considered a country of excellent harvests. No wonder Dutch seeds are in high demand. Recently, the Dutch technology for growing potatoes has been very popular. It is also called growing potatoes in ridges. The main feature of this growing method is soil aeration .
- To ensure that the root crop receives enough air and light, the row spacing is made wide, the soil is often loosened, and the potatoes themselves are planted in ridges.
- The Dutch growing method has strictly defined rules of action. According to which elite planting material is carefully selected and germinated. In spring, the soil is treated with urea. The ridges are located from north to south, and there should be at least 75 cm between the rows.
- Potatoes are planted according to the scheme: 30 by 6. Which means planting the tuber to a depth of 6 cm, with a distance between tubers of 30 cm; ash is added to the hole as a mineral fertilizer.
- The potatoes are placed in the hole so that the sprouted sprout faces upward. The holes are covered with earth, forming ridges about 10 cm high.
- When the sprouts appear, the first hilling is carried out. To do this, loosen the row spacing well and cover the young potato sprouts with loosened soil. The ridge is filled to a height of 20 cm.
Potatoes are required to be irrigated three times a season. The main stages for watering are the time before, during and 10 days after flowering. An increase in the amount of watering may be associated with excessive drought and abnormal heat.
Planting under straw
This method of growing potatoes cannot be called new; rather, on the contrary, it belongs to the well-forgotten old methods of growing root crops.
The method has significant advantages, but there are also many disadvantages. The main advantage of this method is that the most labor-intensive part of the process of planting potatoes is eliminated. Namely, digging up the field. Instead of digging, the field is covered with a thick layer of straw. It is enough to simply loosen the soil to a depth of about 5 cm.
Potatoes feel great under straw. It does not overheat and receives enough moisture. There are some rules for planting using this method .
- The soil must be moist and sufficiently loose.
- The layer of straw should be about 30 cm. If the layer is lower, it will not be able to sufficiently cover the potatoes and retain moisture in the ground. And if the layer is too thick, it will slow down the warming of the soil and the potatoes will not be able to sprout for a long time.
- The potatoes are laid out sprouts up, on a small layer of straw, no closer than 30 cm from each other.
You can also use a combined planting method. In this method, potatoes are planted in shallow trenches, covered with soil and covered with a layer of straw up to 15 cm high. The plant is also covered with straw. This method allows you to reduce the amount of straw and gives excellent results in growing potatoes.
The method of growing potatoes in straw involves a significant reduction in labor costs. Such potatoes do not need watering or weeding and can be harvested simply by pushing the straw apart with your hands.
But this method also has significant disadvantages. The main enemies of potatoes in straw are mice and rats, which can even destroy the entire crop. The second enemy is slugs. An excellent habitat is formed for them under the straw, and they can also greatly harm the future harvest.
Vertical techniques
Such methods allow you to get a good harvest, taking up a minimum amount of land for planting. Potatoes are grown in any strong and capacious bags or barrels of suitable volume. It is better to paint the barrel white, so it will better attract the sun's heat. The container is filled with nutrient soil mixture to a third of its volume. The germinated seed material is laid on the soil and sprinkled with dry soil on top.
If you use bags, you don't have to cut holes in them. But the barrel should be prepared. To do this, the bottom is beaten off, and small holes are made in the sides approximately every 15 cm across the entire surface of the barrel.
The containers are placed in a sunny place. When the potatoes sprout, they are covered with soil. This is done until the containers are filled with soil to 2/3 of their volume. The soil mixture is often watered, not allowing it to dry out.
There is no need to weed and loosen the potatoes completely. Hilling up is replaced by simply sprinkling with earth.
This method of growing potatoes allows you to harvest the first harvest within two months after planting. After all, in a barrel or bag the earth warms up much faster. This method has proven itself well for growing the very first potatoes, so it is better to choose early-ripening varieties of root vegetables for cultivation.
Seedlings from seeds
Growing tubers from seeds is quite difficult and time-consuming. But this way you can get excellent planting material, almost free of charge. Moreover, even the most elite varieties will envy its resistance to disease and productivity.
To plant potato seeds you will need fertile soil. A peat-earth mixture in a ratio of 1:4 is perfect. The soil mixture must be treated with antimicrobial agents, such as phytosporin. Instead of soil, you can use small sawdust.
Seeds are germinated in a humid environment, periodically ventilating them. After germination, they are transferred to moist soil and covered shallowly with soil. The seedlings are placed under the film. She needs light and warmth. The soil is well moistened, preventing it from drying out.
Be sure to illuminate the seedlings with a fluorescent lamp to prevent blackleg disease. Once the seedlings will need to be fed with complex fertilizer.
After three weeks, the seedlings are picked up and moved into larger containers, burying the first leaf into the ground. Seedlings grow better in greenhouse conditions. Considering that this is how future seed material is grown, you can sacrifice space in the greenhouse.
Transplant the seedlings into holes that have been previously fertilized with humus and ash and well-diluted with water. The seedlings are filled almost to the top, leaving only the very edges of the top leaves on the surface.
If seedlings are grown in open ground, then the film covering should not be removed until mid-June. Then the plant is cared for using traditional technology, hilled up, watered and fed on time.
Potatoes in a greenhouse
This technology makes it possible to obtain harvests of young potatoes almost all year round. Due to greenhouse conditions, the harvest is much richer and the tubers are larger compared to cultivation in open ground. Pests practically do not bother such potatoes; there is no need to use chemicals to combat them.
Root crops are planted in a greenhouse with a distance of about 30 cm between tubers, to a depth of 7 cm. In the future, caring for greenhouse potatoes is no different from caring for them under normal growing conditions. The only thing is that such potatoes require a lot more watering. The soil in the greenhouse dries out very quickly. Watering is carried out every 10 days.
It is better to dig up tubers in dry, but not very sunny weather. The harvested crop is immediately placed in a well-ventilated storage facility, where it is subsequently sorted and sorted for winter storage.
Feed with chemical fertilizers
In order for potatoes to be born healthy, large and in large quantities, they need enhanced nutrition. Traditional organic fertilizers worsen its taste, and some compounds are even harmful. For example, fresh manure causes scab infestation.
Use chemical fertilizers for fertilizing, acting strictly in accordance with the manufacturer's instructions. The second rule is to apply fertilizer when the plant is deficient in specific elements.
The first feeding occurs at the beginning of June, during the period of active growth of tops. At this time, fertilizers are used in which nitrogen predominates. When flowers form on the plant, the potatoes are fed with phosphorus fertilizers. And during flowering - with mixtures with a predominance of potassium.
Soil preparation
After the autumn digging there is no need to level the area; let it remain that way until spring. And in the spring you need to add fertilizer to it.
Organic fertilizers (per 1 m2): in heavy clay or loamy soil - 1 bucket of humus; in sandy or sandy loam - 1 bucket of humus plus 1 bucket of clay soil.
Mineral (per 1 m2): 1 tbsp. a spoonful of superphosphate (powdered), 1 teaspoon of potassium sulfate plus 1 cup of wood ash or 2 tbsp. spoons of nitrophoska plus 1 glass of wood ash.
After applying fertilizers, the soil is dug up to a depth equal to the bayonet of a shovel.
You can also add them directly into the holes. For early potatoes - 1 cup of humus, 1 tbsp. spoon of ash, 1 teaspoon of superphosphate. Fertilizers are mixed with the soil at a depth of 8-10 cm. When planting mid-season potato varieties, the dose of each fertilizer is increased by 1.5-2 times, and the depth of their placement is up to 12-15 cm. Fresh manure is often applied under the potatoes. In vain! Because of this, the potatoes grow watery and tasteless. In addition, the bushes become infected with late blight, macrosporiosis, and the tubers become infected with scab. Only rotted manure can be used.
Planting potatoes
Three golden rules for planting this crop:
1. The soil temperature at a depth of 10 cm should be +6...+7 °C.
2. Tubers need moist, loose soil.
3. Planting depth must be at least 10 cm.
First, early-ripening varieties of potatoes are planted, the tubers of which have been germinated for 60-75 days. Then - mid-season varieties, with germination for 40-45 days.
The standard potato planting scheme for areas with hot climates is as follows: - row spacing - 55-65 cm;
— the distance between tubers in a row is 18-20 cm;
— planting depth – 10-12 cm; — planting density – 500 tubers or segments per 1 sq.m.
The slices are placed in the grooves 1-3 pieces at a time - depending on the number and strength of the sprouts (be sure to have the sprouts facing up!).
There is an opinion that thickening plantings by reducing row spacing to 40-50 cm helps to increase yield. On the contrary, in this case, due to the deterioration of development conditions, it decreases by 30-40%. In addition, the tubers grow small, most of them turn green, and have an ugly shape.
After planting, you need to form a ridge, the presence of which will facilitate all subsequent processing.
If there is a threat of frost, the emerging sprouts should be spudded - they have enough strength to then quickly get to the surface.
Plant useful plants nearby
Plants that grow near the potato plot also affect the yield. The best neighbors are legumes. Plant them along the edge of the potato plantation. Bacteria living on the root system of legumes enrich the beds with nitrogen, and the smell of the roots repels Colorado potato beetles and click beetle larvae.
Coriander, nasturtium, tansy, catnip, marigolds, onions, and garlic also repel pests. But the best soil disinfectant is mustard. It can be planted both around the perimeter and between the rows. In the second case, the plant is cut off when its stems are completely level with the potato tops. The roots left in the ground decompose and further fertilize the soil.
Dangerous neighbors are root and petiole celery, parsley and strawberries. If you plant them next to potatoes, you won’t get a good harvest.
- Author: Inna Kiseleva
Rate this article:
- 5
- 4
- 3
- 2
- 1
(8 votes, average: 4.3 out of 5)
Share with your friends!
Lighting is an important factor
This is one of the main requirements of potatoes. After all, it is the full illumination of the place that can produce an excellent harvest. Growing in the shade leads to stretching of the tops and yellowing of the leaves. You are unlikely to see flowers, the tubers will be small, and therefore there will be no harvest.
The best place is a sunny area, with no shadow from the south and southwest.