Why are pears grafted?
Grafting involves the introduction of a living part of one plant into the tissue of another. A scion is a cutting (bud) that is grafted onto a selected tree. The rootstock is the tree onto which the scion is grafted.
Typically, trees are grafted to give them new varietal characteristics and qualities. Pear can be grafted for various purposes:
- increasing productivity;
- imparting the property of precociousness;
- improving quality and improving taste;
- obtaining fruits of different varieties on one tree;
- testing new varieties;
- wild game domestication;
- increasing pear resistance to adverse weather conditions and pests;
- rejuvenation of an aging pear tree;
- restoration or formation of the plant crown;
- breeding a new variety or propagating a rare variety.
Comment! As a result of grafting, you can obtain a plant with better characteristics than the original trees. You can form dwarf, decorative, standard pears.
Necessity of vaccination
Tree grafting is not a mandatory procedure. It is carried out so that the pear shows signs of other trees or in the case when:
- Pear produces a late harvest;
- The fruits are very small or not sweet enough;
- The tree is quite old, but I want to preserve it;
- A gardener wants to develop a new variety;
- There is no desire to wait several years until the seedling begins to bear fruit.
Timing of pear grafting in spring
It is effective to graft a pear in the spring, during the period of plant sap flow. Signs of a favorable time for vaccination:
- stable daytime temperature above +10 0С, night temperature - from 0 – 2 0С;
- kidney swelling;
- readiness of the cambium layer and tree bark.
Advice! The bark with the cambial layer should separate well. To check this, the tip of a sharp knife is immersed in the bark and lightly picked up. If it goes away well, then the grafting procedure can begin. The damage should be covered with garden varnish.
An important advantage of spring pear grafting is that the plant begins to grow actively, its ability to regenerate increases, and the cambial layer quickly grows together. If after 2 - 3 months it becomes clear that the result of pear grafting is negative, you can try to repeat the procedure in the summer.
The disadvantage of this season for grafting is that the weather conditions are uncomfortable for the gardener (wind, cold, slush), as well as the fact that it can be problematic to determine how the rootstock survived the winter.
When can you plant a pear in the summer?
Typically, summer vaccination is carried out in the following cases:
- if the deadline for spring vaccination is missed;
- The spring vaccination was unsuccessful.
In summer, the second period of juice movement begins, and the bark becomes elastic again. Therefore, pear grafting is possible in July–August. The most successful time can be determined by the state of the cortex using the method described above.
The advantage of summer pear grafting is that there is no need to specially prepare and store the scion, and you can also evaluate the condition of the rootstock and see the result before the end of the season. However, heat and scorching sun can harm the cuttings. During this period of the year, the procedure is carried out in the morning or evening.
When is the best time to plant a pear tree in the fall?
The variability of autumn weather, the short period during which pear grafting is possible, and the poor results of the procedure are factors that limit grafting at this time of year.
Vaccination in the fall is recommended in early to mid-September. Its advantages are that it can improve the result of a spring or summer procedure. The negative point is the fact that damage to the rootstock takes a long time to heal due to the slowdown in the rate of sap flow; in winter, the grafting area can be frostbitten. The final result of autumn grafting is low.
The recommended timing for the pear procedure for different regions, depending on the season, is given in the table:
| Region of Russia | Vaccination period | ||
| in the spring | in summer | in autumn | |
| Regions in the middle zone, including the Moscow region | mid - end of April | end of July – first ten days of August | beginning – mid-September. |
| Northwest | end of April | end of July – beginning of August | mid – end of September. |
| Siberia, Ural | end of April – mid-May | first week of August | end of September. |
| Zones with a temperate continental climate | second half of March – beginning of April | mid - end of July | end of September – beginning of October. |
| Southern regions | end of February - March | August | end of September – beginning of October. |
Winter pear grafting: myth or reality
Grafting pears in winter, according to experienced gardeners, is not a myth, but a reality. Her goal is to quickly obtain a strong varietal seedling. This procedure can be carried out from December to March.
Important! Grafting should be carried out using the improved copulation method, but it is possible to use methods other than bark grafting.
Frost-hardened pear cuttings are used as a scion; the rootstock can be annual plants dug up in the fall or wildflower roots. The grafting is performed indoors when both the scion and the rootstock are dormant.
The grafted plant is stored until spring in a cool place, for example, in a cellar. After the onset of heat, it is planted in the ground. The advantage of winter grafting is the high probability of scion survival.
Newbie mistakes
When performing the procedure, it will be useful for novice summer residents to know what to avoid:
- Stretching out the event time. If the cut is made for a long time, it may dry out and oxidize during the process.
- Using poor putty (var).
- The bandage is not applied tightly enough. Untimely weakening of the clamps during the development of the graft begins to compress the bark.
- Incorrect position of the grafted plant.
- Removing branches from the rootstock, which can become a possible cause of death of the graft.
- Poor quality, unsharpened instruments.
What tree can a pear be grafted onto?
When grafting, the rootstock performs the most important functions. Its root system provides nutrition to the scion. The general characteristics of the tree affect durability, frost and drought resistance, requirements for soil quality, adaptability to the climatic conditions of the area, compatibility and fusion with grafted varieties.
When choosing a tree onto which a pear will be grafted, it is necessary to take into account the coincidence of the vegetation cycles of the rootstock and scion, otherwise the plant may die or have low yield.
Attention! In nurseries, for pear grafting, the most resistant varieties of this plant are chosen as a rootstock.
In a private garden, pears are grafted onto common crops, the survival rate of which has already been well tested. The graft can be:
- pear of a different variety or game;
- Apple tree;
- rowan (red or chokeberry);
- hawthorn;
- quince;
- cotoneaster;
- irga;
- cherry plum and plum.
Attention! Early pear varieties grafted onto late ones, and late pears grafted onto early-ripening crops, lead to an imbalance in the tree’s biorhythms. It gets sick more often, bears fruit worse, can freeze in winter, and most of the scion will not take root.
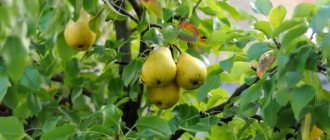
Go wild
One of the most effective ways is to graft a pear onto a wild or semi-cultivated plant. Can be used as a rootstock for varieties with high resistance to adverse environmental factors:
- Severyanka - has the property of frost resistance;
- Forest Beauty - characterized by durability and unpretentiousness;
- Bessemyanka is a late-ripening variety;
- Thin branch - frost-resistant and high-yielding;
- Ussuri is winter-hardy; almost all other pear varieties take root well with it.
This grafting is used when it is necessary to improve the quality of the crop. In this case, a plant is obtained that bears fruits of different types of pears.
Advice! In order for a wild pear to bear fruit for a long time and abundantly, it is necessary to grow the rootstock yourself from carrion seeds collected in the forest. Otherwise, the resulting hybrid will not have the desired characteristics.
You can prepare a wildflower rootstock using the following algorithm:
- Find a wild pear in the forest.
- In autumn, collect fallen fruits, choosing the largest ones.
- Let the pears sit at room temperature until soft but not rotten.
- Remove the seeds.
- Size the seeds, choosing only large, smooth, intact and fully ripened seeds.
- Wash the seeds, dry them, and put them in a paper bag.
- In October, before the onset of frost, sow the seeds in a permanent place in loose, fertile soil.
- In spring, thin out the seedlings, regularly weed, loosen and water.
- In the southern regions, wildflower seedlings will be ready for grafting in the first summer. In the northern regions - in a year.
An old pear tree can be rejuvenated by grafting a young shoot onto it.
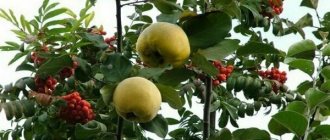
To the mountain ash
Red-fruited rowan is one of the best rootstocks for late-ripening pear varieties due to its frost resistance. Other characteristics of rowan grafting:
- a good option for growing pears on waterlogged soils that are unacceptable for it;
- the crop located on the compact crown of rowan trees is easy to harvest;
- pears grafted onto rowan acquire a tart-sour taste, which can worsen varietal characteristics.
Advice! The rowan crown is formed, leaving no more than 1/3 of the branches. This measure allows you to provide pears with adequate nutrition. Over time, it is necessary to install support under the grafted shoot.
Video on how to plant pears on rowan:
In Irgu
Irga is a small deciduous tree or shrub of the Rosaceae family. It tolerates frosts down to –50 0С, and during flowering – up to -7 0С and is undemanding to the composition and acidity of the soil.
The preferred option for pear grafting is round-leaved or spiked irga. A pear grafted onto them takes root well. But the result is a hybrid plant characterized by a short lifespan.
For cotoneaster
Cotoneaster is a small, thornless tree or shrub of the Rosaceae family. It is unpretentious in terms of soil composition and quality, frost-resistant, and takes root well. The grafted pear quickly adapts to new conditions, and the taste of its fruit takes on a tart, piquant hue.
On the hawthorn
An important property of hawthorn is drought resistance. It can be used effectively by grafting onto this plant a pear tree. The resulting hybrid will develop well even on depleted sandy soils. The disadvantage that makes it difficult to collect fruits is the presence of thorns in hawthorn.
On black rowan
You can also graft a pear onto chokeberry. When grafting, it must be taken into account that this is a dwarf tree, up to 1.5 m high. The resulting hybrid will be short-lived. The pear cutting grows quickly, and the rootstock will not be able to fully nourish the ripening fruits. They become more tart, dry and lose their sugar content.
To quince
Grafting a pear onto a quince is one of the most common options. This way you can reduce the height of the tree and, accordingly, the area of the territory it occupies in the garden if you use a dwarf or semi-dwarf quince rootstock. At the same time, the fruiting time is accelerated, the taste of the fruit is improved.
Important! Even a pear variety that is incompatible with it can be grafted onto quince.
If the pear variety chosen for grafting is not compatible with quince, proceed according to one of the following methods:
- In the first year in the spring, a variety known to be compatible with it is grafted onto the quince. In the second year, the grafted material serves as the basis for the desired variety.
- Another option for grafting a pear variety that is incompatible with quince is that when grafting using the “bark” method, a spacer is made between the plants from a small piece of wood that is compatible with the quince and pear plant.
For plum and cherry plum
Plum and cherry plum are similar crops in many ways. It is possible to get a good result from grafting a pear onto a plum if you prepare the cuttings correctly. They are harvested after the first severe frost.
A more acceptable rootstock for pears is cherry plum. The resulting plant will begin to bear fruit early, will be compact and unpretentious.
What happens if you graft a pear onto an apple tree?
The apple tree is one of the most common fruit crops. Therefore, pear trees are most often grafted onto it. On apple rootstock, pear cuttings take root easily and quickly. The disadvantage is the possible incomplete fusion of wood, which can lead to the breaking off of the grafted shoot in the future. But this situation can be avoided if the pear branch is tied or supported.
Advice! The best result is obtained if in the spring a pear is grafted onto an apple tree grown from a seed.
The result of grafting a pear onto an apple tree will be a unique hybrid containing simultaneously shoots of both crops. This vaccination is carried out in mid-to-late April using the “kidney to T-incision” or improved copulation methods.
There is an alternative opinion, according to which the pear takes root well on the apple tree, but does not develop normally, bears fruit poorly and dies off after two or three years.
What is a columnar pear grafted on?
Columnar pear is compact, dwarf (up to 2 m high) and high-yielding. A characteristic feature of such varieties is that the fruits develop along a column-like trunk, which has almost no side shoots. A common rootstock for such a crop is serviceberry or quince.
The best results are obtained when grafting a columnar pear onto a wildflower seedling. The plant develops powerful, healthy, durable and productive. But it requires regular thinning pruning, otherwise it will lose its characteristic features.
The disadvantage of wildflower, compared, for example, with quince, is that a pear grafted onto it begins to bear fruit later. If on quince fruiting of a grafted columnar pear occurs in the 2-3rd year (with a lower yield), then on wildflower - on the 5-7th year after grafting.
Is it possible to graft a dwarf pear onto a tall one?
Dwarf pears are hybrid trees specially grafted onto a “dwarf” rootstock. Thanks to this, they acquire the properties of short stature and compactness, which are combined with early fruiting and fruit quality that is not inferior to tall crops.
Grafting a dwarf pear onto a tall one is possible, but not advisable. This leads to degeneration of the properties of the hybrid.
Suitable rootstocks for pears
Propagation of pears by cuttings - at home in summer
The ideal option is to graft the pear onto other varieties of this tree - semi-wild, but also growing favorably in the present climate. The other plants listed below are possible as rootstocks, but the success rate of such grafting will be low.
For plum and cherry plum
Cherry plum is better grafted onto pear. The material is prepared after the end of frost. A small tree grows, which is in good health and quickly begins to bear fruit.
Pear can be grafted all year round, but winter is considered the most inappropriate time.
On black rowan
The rootstock is used to improve the quality of pear fruits and in the presence of a situation where the tree grows on not very suitable - wetland. The finished tree will have a comfortable, small crown. Subsequently, tying up the shoot will be required.
In Irgu
Grafting a pear with shadberry, chokeberry or quince material can only produce low-growing trees. Over time, the size of the young plant will become different from the rootstock and it will be necessary to build a frame for the plants.
To the apple tree
You will get an unusual tree if you combine a pear with an apple tree. It will be possible to observe both apples and pear fruits on it. Many gardeners succeed in such vaccination, but there is a risk of a negative result. The procedure is performed according to 2 schemes: copulation or through a T-shaped cut.
On the hawthorn
Thanks to the use of hawthorn, the pear becomes less whimsical and becomes resistant to drought. The plant begins to bear fruit early; they are large in size and rich in taste. The finished plant will have thorns.
For cotoneaster
Cotoneaster allows you to obtain a frost-resistant pear with a tart taste of fruit, capable of growing on different soils. Cotoneaster seedlings easily adapt to the climate.
Go wild
When combining wildflower and pear plants, there is a good chance of getting a frost-resistant, easy-to-care crop that also has a large and strong root. However, the pears will be small in size. A common method is grafting by cuttings.
What material should be prepared for grafting pears?
To graft a pear correctly, all the necessary material is prepared in advance.
Cuttings
You can choose a suitable scion in a specialized nursery or purchase it “from hand”. The result of the vaccination depends on its quality and correct preparation. A cutting is a one-year-old shoot separated from a tree. It is selected according to the following principle:
- this should be the top of a branch or side shoot that has grown this season;
- with bark on the cuttings of intense color, and a smooth, even, glossy surface;
- and the point on the shoot from which the growth extends, bounded by a bud ring (a scar with an influx ring).
The selected shoot is cut off under the bud ring, or you can leave a part of a young shoot with two buds on the tree.
As a rule, for spring grafting, cuttings are prepared after leaf fall in the fall, at above-zero temperatures. In the middle zone this can be done in October. It is recommended to choose shoots that grow on the periphery from the southern part of the crown. Select branches 30-40 cm long and 0.5 - 0.7 cm in diameter. Their wood should be green and moist. From such a branch for the scion, the middle section is cut out so that there are 3 - 5 clearly defined leaf buds on it. The sections are covered with garden varnish. If the harvested cuttings are of different varieties, then it is convenient to tie them into bundles and label them.
For the winter, cuttings prepared in this way are dug into a trench about 25 cm deep. They are installed vertically or horizontally, sprinkled with earth, then leaves or straw are laid on top and covered with air-permeable material (burlap). In winter, it is necessary to ensure that there is a high layer of loose snow above the trench.
If there are few cuttings, they can be stored in the refrigerator in a plastic bag, wrapped in a damp cloth. For storage, boxes with wet sawdust are also used, which are installed on a glazed balcony or in a cellar. Periodically, the cuttings are removed and examined for the presence of fungi and signs of rotting.
Important! The storage temperature for cuttings should be 0 - 4 C.
In the spring, 4-5 days before grafting, elastic, healthy branches are selected. Rotten and dried specimens are not suitable for further use. On the selected cuttings, the sections are renewed the day before the grafting procedure. Then they are immersed in a solution of a growth stimulator (Kornevin or potassium humate) for 6 hours.
In the southern regions, cuttings can be cut in the spring, before the sap begins to flow. When grafting with fresh cuttings in summer, they are cut immediately before the procedure.
Preparation of the rootstock comes down to a thorough inspection of the site of future grafting for signs of damage by diseases, pests or rodents. The bark of the plant should be even, smooth and have a uniform color. The tree on which the pear will be grafted must be strong and healthy. The optimal rootstock is considered to be seedlings aged from 1 to 3 years. A more mature plant up to 10 years old is allowed, mainly when grafting skeletal branches.
The branch on which the pear will be grafted must be skeletal and directed vertically or tend to such a position. They grow well and cuttings take root quickly.
Another important parameter is the dimensions of the rootstock. They must correspond to the scion parameters:
- for grafting into a cleft, the diameter of the rootstock trunk must be larger than the dimensions of the cutting;
- if the chosen method involves grafting shoots of equal diameter, then the appropriate rootstock is selected.
Important! Cuttings do not take root well on old bark.
Tools and materials
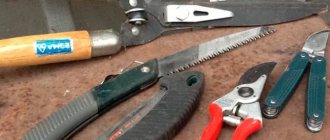
To carry out a high-quality vaccination operation, you will need the following tools:
- grafting knife - copulating or budding, depending on the chosen grafting method;
- grafting pruner for large shoots;
- hacksaw.
Important! All instruments used for the grafting procedure must be sharp and clean. It is advisable to sterilize them or disinfect them with alcohol.
Additional materials:
- garden varnish to prevent the entry of pathogenic microorganisms into the grafting zone and promote the rapid fusion of the scion and rootstock;
- foil, paper or plastic bag to wrap the scion for protection from the external environment;
- insulating tape or polyethylene divided into strips for strapping.
Advice! For tying, it is convenient to use a special film, which itself decomposes when exposed to the sun.
Procedure for preparing cuttings
The quality of the scion is the key to the success of the entire operation. Therefore, its preparation and storage must be approached with all responsibility.
The best time to prepare material is autumn. By this time, the pear should completely lose its foliage. The procedure must be carried out at positive air temperatures. In temperate climates, harvesting is most often done in the last ten days of October or early November.
If the tree has already “awakened” from hibernation and the process of active sap flow has begun, the grafted cuttings will have to provide themselves with moisture and nutrients on their own for 2-3 weeks or even more, until connective tissue is formed after grafting. In such a situation, it is the base attached to the rootstock that dries and dies first, that is, the cutting will definitely not grow back.
If the leaves on the pear are already blooming, it is too late to prepare cuttings for spring grafting
Some gardeners prepare material in early spring, before the sap begins to flow, but this is a certain risk. At the moment, it is impossible to assess from the condition of the cutting how successfully it survived the winter. The only exception is regions with a mild climate, where the temperature does not drop below -15–20°C. There you can guarantee that the pear withstood the cold well.
Pear shoots for summer grafting are cut off immediately before the procedure. Here any delay is undesirable. They are not suitable for storage in principle.
Cuttings are taken only from absolutely healthy, consistently and abundantly fruiting pears at the age of 4–10 years. It is advisable to choose those located on the periphery of the crown - they are better illuminated and warmed by the sun. The thickness of an ideal cutting is at least 5–7 mm (about the size of a pencil), length is 30–40 cm. It is necessary to have 3–5 mature leaf buds located quite close to each other and a slightly lignified base. It is better to cut them from the southern side of the crown - such cuttings have shorter internodes. The cut wood should be slightly damp and greenish-white in color. Its brownish tint means that the cuttings are frozen. It is best to take the middle part of the branch - at the top the leaf buds are underdeveloped, at the base the bark is hard, and sap flow is less intense. If the shoot is cut off entirely, it is advisable to preserve the “heel” - a little more mature wood at the base.
If a lot of pear cuttings are being prepared, it is advisable to label them so that in the spring you will be able to identify the varieties
The collected branches must be preserved until spring. To do this, on the day of cutting, they are buried in a pre-dug trench with a depth of at least 25 cm, laid out horizontally or placed vertically. They place it in a place where the snow melts most quickly in the spring and where melt water does not linger. The sections are pre-wrapped in polyethylene, covered with garden varnish, and “sealed” with wax or paraffin. The cuttings are tied in bunches. It is advisable to attach to each of them a label made of waterproof material with an indelible ink inscription, so as not to confuse the varieties in the spring.
The trench for storing pear cuttings should be deep enough
Sprinkle the top with straw, hay, fallen leaves, and pine branches. The trench is covered with several layers of air-permeable material (agryl, lutrasil, burlap). As soon as enough snow falls, it is shoveled from above, constructing a snowdrift. In winter, it gradually settles, so the structure will have to be renewed several times, while simultaneously breaking the crust of hard crust on the surface.
The material used to cover the trench with cuttings must allow air to pass through.
If there are few cuttings, you can store them at home, for example, in the refrigerator on the bottom shelf or on a glazed loggia or veranda. The base is wrapped in a damp cloth (it should not be allowed to dry out), and the cuttings are placed in a plastic bag. Another option is to “plant” the branches in boxes filled with moistened sand, peat, sawdust, finely chopped sphagnum moss or coconut fiber and put them away in the basement or cellar until spring. Particularly valuable cuttings, without covering the cut, are stuck into large potatoes. The optimal temperature for storage is 2–3°C, air humidity is 65–70%. The substrate is moistened as needed. If when you try to squeeze it in your fist it crumbles, it’s time.
Any substrate in which pear cuttings are stored in winter is constantly maintained in a moderately moist state.
Pear is a pome crop, so storage in the cellar is quite acceptable for it. But cuttings of stone fruit trees often do not survive in such conditions.
Cuttings “sealed” with wax prevent mold and rot from developing
3-4 days before the planned procedure, the cuttings are removed from storage and left indoors at room temperature. Their condition is assessed - those that are suitable for grafting have bark without wrinkles or traces of peeling, the buds fit tightly to the shoot, their scales are smooth. The branch bends easily, but does not break.
Before the grafting procedure, the cuttings must be allowed to lie at room temperature for several days.
A day before grafting, the base, having renewed the previously made cut, is immersed in a solution of any root formation stimulator for 5–6 hours. These can be either purchased drugs (Kornevin, Heteroauxin, Immunocytophyte, potassium humate) or folk remedies (potato and aloe juice, succinic acid tablets, a solution of baking soda and honey).
Both store-bought preparations and folk remedies are used with equal success as a biostimulant for soaking cuttings.
The rootstock also needs preparation. The vaccination site is carefully inspected. When choosing it, take into account that summer pear varieties take root best closer to the top of the crown, autumn ones - in its central part, winter ones - in the lower part. At the same time, it is undesirable to graft early ripening varieties onto late ones and vice versa. The resulting tree will not be able to properly prepare for winter. The bark should be healthy - smooth, elastic, uniform, without the slightest trace of damage by diseases, insects, rodents.
Video: preparing cuttings for grafting
Pear grafting methods
The choice of grafting method depends on the type of pear, the timing of the procedure, as well as the experience and skills of the gardener.
Important! Regardless of the method, the vaccination procedure must be carried out as quickly as possible. If the process lasts more than a minute, the cambium will dry out and the likelihood that the scion will take root will be significantly reduced. To avoid infecting the plant, the cuts should not be touched with your hands. The rootstock branch is wiped with a napkin before starting the procedure.
The grafting is performed on the north side of the rootstock to limit exposure to direct sunlight. To protect against drying out, the grafting area, oriented to other sides of the world, can be shaded or covered with foil or a bag.
To select a vaccination area, follow the following rules:
- An early variety of pear is grafted onto the top of the rootstock.
- Cuttings of mid-season varieties are placed in the central branches of the crown.
- Late pears are grafted into the lower part of the rootstock.
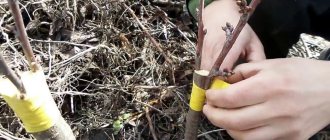
Into the cleft
In a situation where the crown of the plant has significant damage, but the roots are still strong and powerful, the method of grafting a pear into a cleft is used. In this case, the parameters of the rootstock are greater than the diameter of the cuttings. The essence of the procedure is that 2 - 4 cuttings are grafted onto a cut tree stump. It is carried out as follows:
- The rootstock is split with a horizontal cut or crosswise.
- The lower part of the cuttings is well sharpened.
- The cuttings are inserted into the split so that the cambium layers are well connected.
- The grafting area is fixed with insulating tape, and the cut is coated with garden varnish.
Kidney
The grafting method, when a bud (eye) is used as a scion, is called budding.
There are two methods of budding, depending on the time of the procedure:
- Sprouting eye. To graft pears, use a bud from a cutting harvested last fall. Such a bud germinates and sprouts within the year of grafting. This method is used in the spring.
- Sleeping eye. When grafting is carried out in the summer, the bud is separated from the fresh shoots of the current year's pear. After overwintering, it germinates in the spring of next year.
The bud for grafting is cut from the cutting, capturing a small area (1.5 cm above and below the bud) of adjacent tissues with bark and the top layer of wood. Pear grafting by budding is carried out using one of the technologies: in a T-shaped incision or in the butt.
Budding a pear into a T-shaped incision
It is optimal to carry out such vaccination in July.
The algorithm for how to step by step graft a pear in the summer by budding into a cut is as follows:
- Release the root collar of the rootstock, remove shoots from it 10 cm from the ground, and carefully wipe the trunk with a napkin.
- On the north side, the bark of the rootstock at the root collar is cut in the shape of the letter “T”, about 3 cm long.
- The side edges of the incision are bent to the sides and the prepared bud is inserted into the bark.
- The grafting area is wrapped with a plastic strip so that the bud remains open.
Butt budding
To properly graft a plant in this way, you should:
- Cut off an area on the rootstock bark corresponding to the size of the prepared bud.
- Attach the scion bud to the incision site, tightly aligning the cambium layers.
- Secure the bud to the rootstock using adhesive tape so that it remains free.
Attention! If after 13 - 15 days the bud begins to develop, then the pear grafting procedure by budding was successful. A dry and black bud is a sign of unsuccessful grafting.
For the bark
Grafting a pear by the bark is the least labor-intensive technology. It is carried out in the spring, with the beginning of the movement of juices, when the bark is well separated from the trunk, and there is no need to make a large cut to place the cutting there.
This spring pear grafting procedure is available for beginning gardeners. It is performed in the following sequence:
- The rootstock trunk is cut to a stump at knee level. The cut area is cleaned with a sharp knife.
- On one side of the rootstock, the bark is carefully cut from top to bottom by 1 - 2 cm.
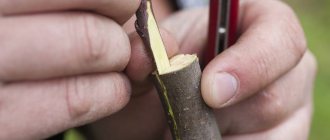
- On a cutting prepared in the fall, a cut is made at an acute angle with a sharp, precise movement.
- The cut on the cutting is shortened by 0.5 cm and placed on the cut area of the rootstock bark. It is pushed a little deeper, being careful not to break the stalk.
- Having placed the scion exactly under the bark of the rootstock, the grafting area is tightened with electrical tape.
Important! It is necessary to ensure complete contact of the cambium layers on the rootstock and scion. - On the cutting, cut off the part of the branch located above the third bud.
Copulation
A frequently used method of grafting pears in spring is copulation. For its successful implementation, it is necessary that the parameters of the scion and rootstock coincide.
Important! When copulating, it is necessary to exclude the movement of the scion and rootstock relative to each other, otherwise they will not grow together.
Conventional copulation
Conventional copulation is a simple procedure for grafting a pear. It must be performed quickly and accurately according to this scheme:
- The upper part of the trunk is cut at an acute angle for the rootstock and the lower part for the scion cutting. The length of the cuts should be three times the diameter of the shoots.
- The grafted parts are connected so that the cambium layers coincide as much as possible.
- The grafting area is tied with a fixing tape.
Improved copulation
A more unreliable fit of the pear scion to the rootstock is achieved by using improved copulation. This procedure is often used for grafting pears onto pears and is carried out no earlier than November, so that the buds do not wake up before the onset of frost and die.
Step-by-step guide on how to plant a pear in the fall:
- The scion and rootstock are trimmed as for regular copulation.
- The shape of the cuts is complicated by fixing protrusions. To do this, step back from the upper edge of the cut by approximately 1/3 of the length and make a cut deep into the shoot by 1 - 1.2 cm.
- The scion is inserted into the rootstock, placing the protrusions behind each other.
- The grafting site is reinforced with film or tape.
- The scion is cut off above the 2nd - 3rd bud, and the cut areas are covered with garden varnish.
Ablactation
Ablation grafting is a method that is rarely used for pears. It is based on the fact that two shoots growing in close contact with each other will gradually grow together into a single whole. The sequence of actions should be like this:
- Areas on the scion and rootstock that will be in contact are freed from bark.
- Using prepared places, the pear stalk and rootstock are brought together.
- Secure the grafting area with self-adhesive tape.
- 2 - 3 months after the shoots grow together, the binding is removed.
Important! This is an ineffective way to graft mature fruit trees.
Grafting methods
There are several simple step-by-step schemes by which you can graft a pear. However, each individual case has its own method. Thus, modern copulation is better suited for working with a young tree that has not yet strong branches. In the spring, gardeners graft the pear plant onto the bark. Beginners should give preference to a simple method - using a peephole.
Spring grafting of pear bark
To plant a pear whose area size does not match the size of the plant being grafted, the following method is used:
- Waiting for the weather to warm up outside. In this case, you need to be in time before the sap flows near the tree.
- Separate the bark from the pear trunk so that a small pocket of about 5 cm is obtained.
- A prepared cutting is inserted inside. The scion should have a sharp edge.
- The work is secured with tape. You can additionally wrap the top with film, which will protect against negative external influences.
The tree can be grafted into a split or side cut, bark, or through cuttings
Additionally! In the summer, grafting is carried out only after sap flow has completed, in order to cause less harm to the tree and make it easier to separate the bark.
Into the cleft
It happens like this:
- The trunk part of the pear is cut down: a stump approximately 20 cm high should remain.
- The cut is split in the center - depth 5 cm.
- For convenience, a wedge is inserted. 1-2 cuttings with oblique cuts 3-4 cm in length are placed on opposite edges.
- The wedge is immediately removed. The grafting area is lubricated with garden pitch.
- A fastening bandage is made.
Side cut
Lateral grafting consists of the following steps:
- A section of the tree at a height of 10 cm from the ground is cleared of branches and wiped with a cloth.
- Using a knife, a cut is made in the form of a “T” symbol and 3 cm long.
- The shield of the grafted plant is cut off with a special budding tool. The cut parameters must match perfectly.
- The cortex of the T-shaped incision is carefully opened and the new bud is placed into it.
- The area is pressed with your hand and tied with tape. The kidney should remain on the surface, the shield should be under the bandage.
Butt budding is similar to the described method, but instead of a T-cut in the rootstock, a shallow lateral cut is made.
Attention! Experts recommend doing budding on the northern part of the tree.
Cuttings
Another well-known, but rather rare method is ablation. It is suitable only for young plantings and includes the following steps:
- Preparing the scion and rootstock sites: cleaning their top layer.
- The cuttings are connected in the required areas.
- A tight bandage is applied to the area of their contact, which will need to be removed after several months.
How to regraft a columnar pear
Columnar pears can be seeded (grown in the usual way) and grafted (obtained by grafting onto quince, game or game). They are propagated by seeds, seedlings, and cuttings. The most effective method of propagation is regrafting.
The columnar pear is re-grafted to a new place in the spring at the end of April - beginning of May. This is done in the morning or evening, adhering to the general rules for grafting fruit trees. The procedure is as follows:
- In the fall, a scion cutting 70-80 cm long is prepared.
- On the selected rootstock, all fruiting shoots are trimmed to a length of 40 cm.
- Graft the cuttings.
Attention! Effective methods of regrafting a columnar pear: by the bark, in a split, and also in a side cut. - The grafting area is tightly tied with tape and covered with garden varnish.
If the procedure is carried out successfully, the cutting of a columnar pear on a new rootstock takes root within 3 - 4 weeks.
When to carry out this process
You can graft a pear from early spring to early autumn. If the work is carried out in the spring, then this must be done before the buds begin to bloom on the trees. This guarantees that the plant will take root, and the result will please the gardener, especially if the pear is well cared for. In the southern and central zones of Russia, including in the Moscow region, this procedure can be done in early March, and in the northern regions - no earlier than mid-April.
If the pear does not take root, you can try your luck in the summer - at the end of June. It is worth correctly calculating your strength in order to complete the process by the 10th-15th of August, when it is too cold outside for weakened plants. You need to work on grafting in the morning or evening to protect the cuttings from overheating and drying out.
The next attempt is possible in the fall - early September. This is rarely practiced; gardeners prefer to wait until spring and then try again. The reason for this is the variability of the weather and sudden changes in temperature. Cuttings grafted during this period will be hardened next year.
In winter, you can also graft a pear, but there are more complications and nuances. During the period from December to February, you can graft cuttings that have already been hardened by frost, as well as annual rootstocks. The buds on them are at rest. Therefore, there is no need to rush anywhere. Most of the plants take root and subsequently produce excellent fruits.
To determine the exact time for a safe and successful vaccination, it is important to pay attention to the air temperature at different times of the day. The daytime temperature should be at least +10 °C.
Important! The difference between day and night temperatures should be insignificant, otherwise the plant will freeze and die.
Caring for seedlings after grafting
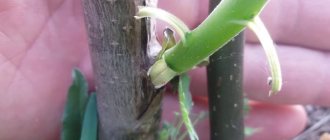
It is recommended to carefully examine the tree 20 - 25 days after pear grafting. If the procedure was successful, the buds on the scion will be green and fresh leaves will appear on it.
In the spring, after the start of sap flow, the rootstock must be cut approximately 1 cm above the grafting zone. The cut must be covered with garden varnish. Lower branches and wild growth must be removed to provide the grafted pear with sufficient nutrition. If there is insufficient rain, the tree is watered regularly. After three months, the garter is removed by cutting it. These are mandatory stages of care.
Additionally, favorable conditions for growth and development can be created for the tree:
- to stimulate crown development, the tops of fast-growing shoots are pinched;
- to protect against gusts of wind, the scion is tied to a support;
- to protect the pear shoot from damage by birds, you can make a fence around the tree and tie sticks above and below the grafted branch;
- the soil around the hybrid should be loosened, dug up, fertilized with humus, superphosphate or potassium salt.
Important! In preparation for winter, the tree trunk circle of the grafted pear is mulched. The mulch layer should be located a short distance from the tree trunk.
If the grafting was successful and the pear was properly cared for, then in 2–3 years the first fruits of the new variety will appear on the grafted tree.
When is it better to graft a pear onto an apple tree in spring or autumn? Vaccination dates
How to properly graft a pear onto an apple tree? Experienced breeders believe that grafting works best if done in early spring. It is best to prepare cuttings that will be grafted in late autumn. For example, cuttings cut in November are stored all winter at a temperature of about four degrees Celsius.
It is important to carry out all work on grafting a pear to an apple tree before the onset of heat and sap flow in the apple tree.
At this time, the apple bark moves away from the branch perfectly, which allows for successful grafting. It is important that during the period of grafting and shoot survival, the air temperature must be stable. Fluctuations and frosts negatively affect the result: the graft will not take root, and new shoots will be rejected by the mother tree.
Autumn grafting of trees - timing of the procedure
growingproduce.com
Autumn is not the most favorable time for grafting trees in the middle zone and the Moscow region. Usually, at the end of the season, summer residents prepare grafting material for the next year, and they try to do the grafting before the end of summer, so that the plants have time to grow together by winter. The fact is that the weather in autumn is unstable, it can be warm during the day, and the graft will begin to grow together, but at night the thermometer will drop closer to zero, and the chances of engraftment will sharply decrease.
But if you are not afraid of difficulties, and you are ready to try vaccination in the fall, do it strictly before the start of frost - in September or early October, depending on the weather conditions in your area. You will most likely see the results of the vaccination only in the spring, so it is important to do everything correctly.
Choose the time to graft trees and shrubs in the morning or evening. The weather is preferably warm, dry and windless.
Methods of grafting onto a tree: summer, winter and spring
In order for grafting to give the desired results and not lead to the death of the tree, the procedure should be performed according to the rules. Since the grafting process is considered unique, you need to use only high-quality rootstock - in this case, optimal results with minimal time are guaranteed.
Before getting vaccinated:
- Choose the best method and familiarize yourself with the technology.
- For grafting, take healthy and strong young cuttings.
- Choose the timing of vaccination correctly.
- Remember that summer varieties have maximum survival rate in the upper parts of the crown, autumn varieties - in the middle parts, and winter varieties - in the lower parts.
- Summer varieties are not grafted onto winter varieties and vice versa.
- Double procedures are possible - but only if necessary.
- Choose a high-quality scion that will match the rootstock in anatomical and other indicators.
- Decide in advance what kind of result you expect from the vaccination.
- Annual cuttings take root best; also take into account the degree of illumination of the plant (rooting usually occurs better on the south side).
- You can harvest cuttings at the end of autumn, the main thing is to do it before the onset of frost.
Store the scions in the basement or refrigerator, wrapped in cloth or film.
Into the cleft, onto the stump
Cleft grafting is done on identical and different rootstocks, but most often this method is used when the diameter of the rootstock is larger than the diameter of the scion.
Basic vaccination rules for cleft:
- Shorten the rootstock with a cross cut.
- Open up the cut and insert a small wedge into the middle.
- Insert a couple of strong cuttings along the edges of the rootstock; the wedge can be completely removed.
Be sure to treat the grafting site with garden varnish and cover it with cloth or film.
Also read about cleft grafting of apple trees here.
For the bark
Grafting using the bark method is used when the diameters of the scion and rootstock do not match. In this case, the bark needs to be separated from the tree bark, and a shoot should be inserted into the gap (so that it holds as tightly as possible).
The pear needs to be grafted onto the bark when active sap flow has ended - this will make it easier for the bark to move away from the tree trunk. Do not leave the diameter of the shoots more than 5 mm. In the tree, use a sharp knife to make an oblique cut approximately 25 mm in length. Remove excess bark from the end of the cut so that fusion occurs more actively. If the cuttings are thick, make an oblique cut to the required length and then insert the cutting under the bark. When you have installed all the cuttings, wrap the grafting site with tape and wrap them in film to ensure reliable fusion.
Autumn apple tree grafting
my73.ru
The best time to graft an apple tree is spring and summer. But the autumn procedure also has its advantages. Thus, scions grafted in the fall tolerate spring transplantation well and take root faster after it. In addition, you won’t have to wait until the new season if you were only able to get a rare variety now to carry out this important garden procedure, which means there will be more time for other garden work in the spring.
The grafting method is chosen depending on the age of the plants and weather conditions (it is better to complete the grafting before the thermometer shows 15°C or below). Until mid-September, budding (eye grafting) and bark grafting are usually carried out. In September and October, split grafting can be done. The procedure cannot be carried out at the end of October, because... trees begin to prepare for winter, shed their leaves, and sap flow in them slows down. But residents of the southern regions can still try to get vaccinated.
It is better to cut cuttings for grafting (semi-lignified or lignified annual shoots) immediately before the operation and, preferably, from the southern part of the crown. But if you have to postpone the vaccination for several days, store them in the refrigerator. First, wrap the cuttings in damp cloth and polyethylene, and bury the ends in damp sand. Drying out is detrimental to scions, so monitor the humidity in the container.
What can you graft an apple tree on?
moya-dachka.ru
The apple tree is one of the most popular plants for grafting. Difficulties rarely arise with it, but only if the rootstock is chosen correctly. Another varietal apple tree or a “wild” apple tree grown from seeds is best suited for this role.
In autumn, scions take root well on young rootstocks. It is not advisable to carry out the procedure on mature trees.
Also suitable as rootstocks:
- chokeberry (chokeberry);
- red rowan;
- hawthorn;
- viburnum;
- quince.
An apple tree will not take root well on a pear tree, but on a red rowan tree it may become shredded over time. Gardeners are not always successful in grafting on quince, and experiments with hawthorn still require more accurate confirmation in practice. In general, you can expand this list and try to graft the apple tree onto other pome crops.
During copulation (grafting with cuttings), make a cut on the rootstock opposite the bud, because in this place the branch’s nutrition is improved and the scion will take root faster.
For the vaccination to be successful, follow simple rules:
- use only clean and sharp tools;
- water the rootstock thoroughly before starting the procedure so that the bark becomes softer;
- do not touch the cuts with your hands to avoid infection, and cover all wounds with garden varnish;
- For the procedure, choose dry, cloudy weather;
- for the winter, after the first frost, cover the graft with cloth or film.
- How to properly plant an apple tree in the fall
Step-by-step instructions for autumn grafting of an apple tree with photographs and useful tips.